Chapter 24. Virtualization
Table of Contents
24.1. Synopsis
Virtualization software allows multiple operating systems to run simultaneously on the same computer. Such software systems for PCs often involve a host operating system which runs the virtualization software and supports any number of guest operating systems.
After reading this chapter, you will know:
The difference between a host operating system and a guest operating system.
How to install FreeBSD on the following virtualization platforms:
Parallels Desktop(Apple® macOS®)
VMware Fusion(Apple® macOS®)
VirtualBox™(Microsoft® Windows®, Intel®-based Apple® macOS®, Linux)
QEMU(FreeBSD)
bhyve(FreeBSD)
How to tune a FreeBSD system for best performance under virtualization.
Before reading this chapter, you should:
Understand the basics of UNIX® and FreeBSD.
Know how to install FreeBSD.
Know how to set up a network connection.
Know how to install additional third-party software.
24.2. FreeBSD as a Guest on Parallels Desktop for macOS®
Parallels Desktop for Mac® is a commercial software product available for Apple® Mac® computers running macOS® 10.14.6 or higher. FreeBSD is a fully supported guest operating system. Once Parallels has been installed on macOS®, the user must configure a virtual machine and then install the desired guest operating system.
24.2.1. Installing FreeBSD on Parallels Desktop on Mac®
The first step in installing FreeBSD on Parallels is to create a new virtual machine for installing FreeBSD.
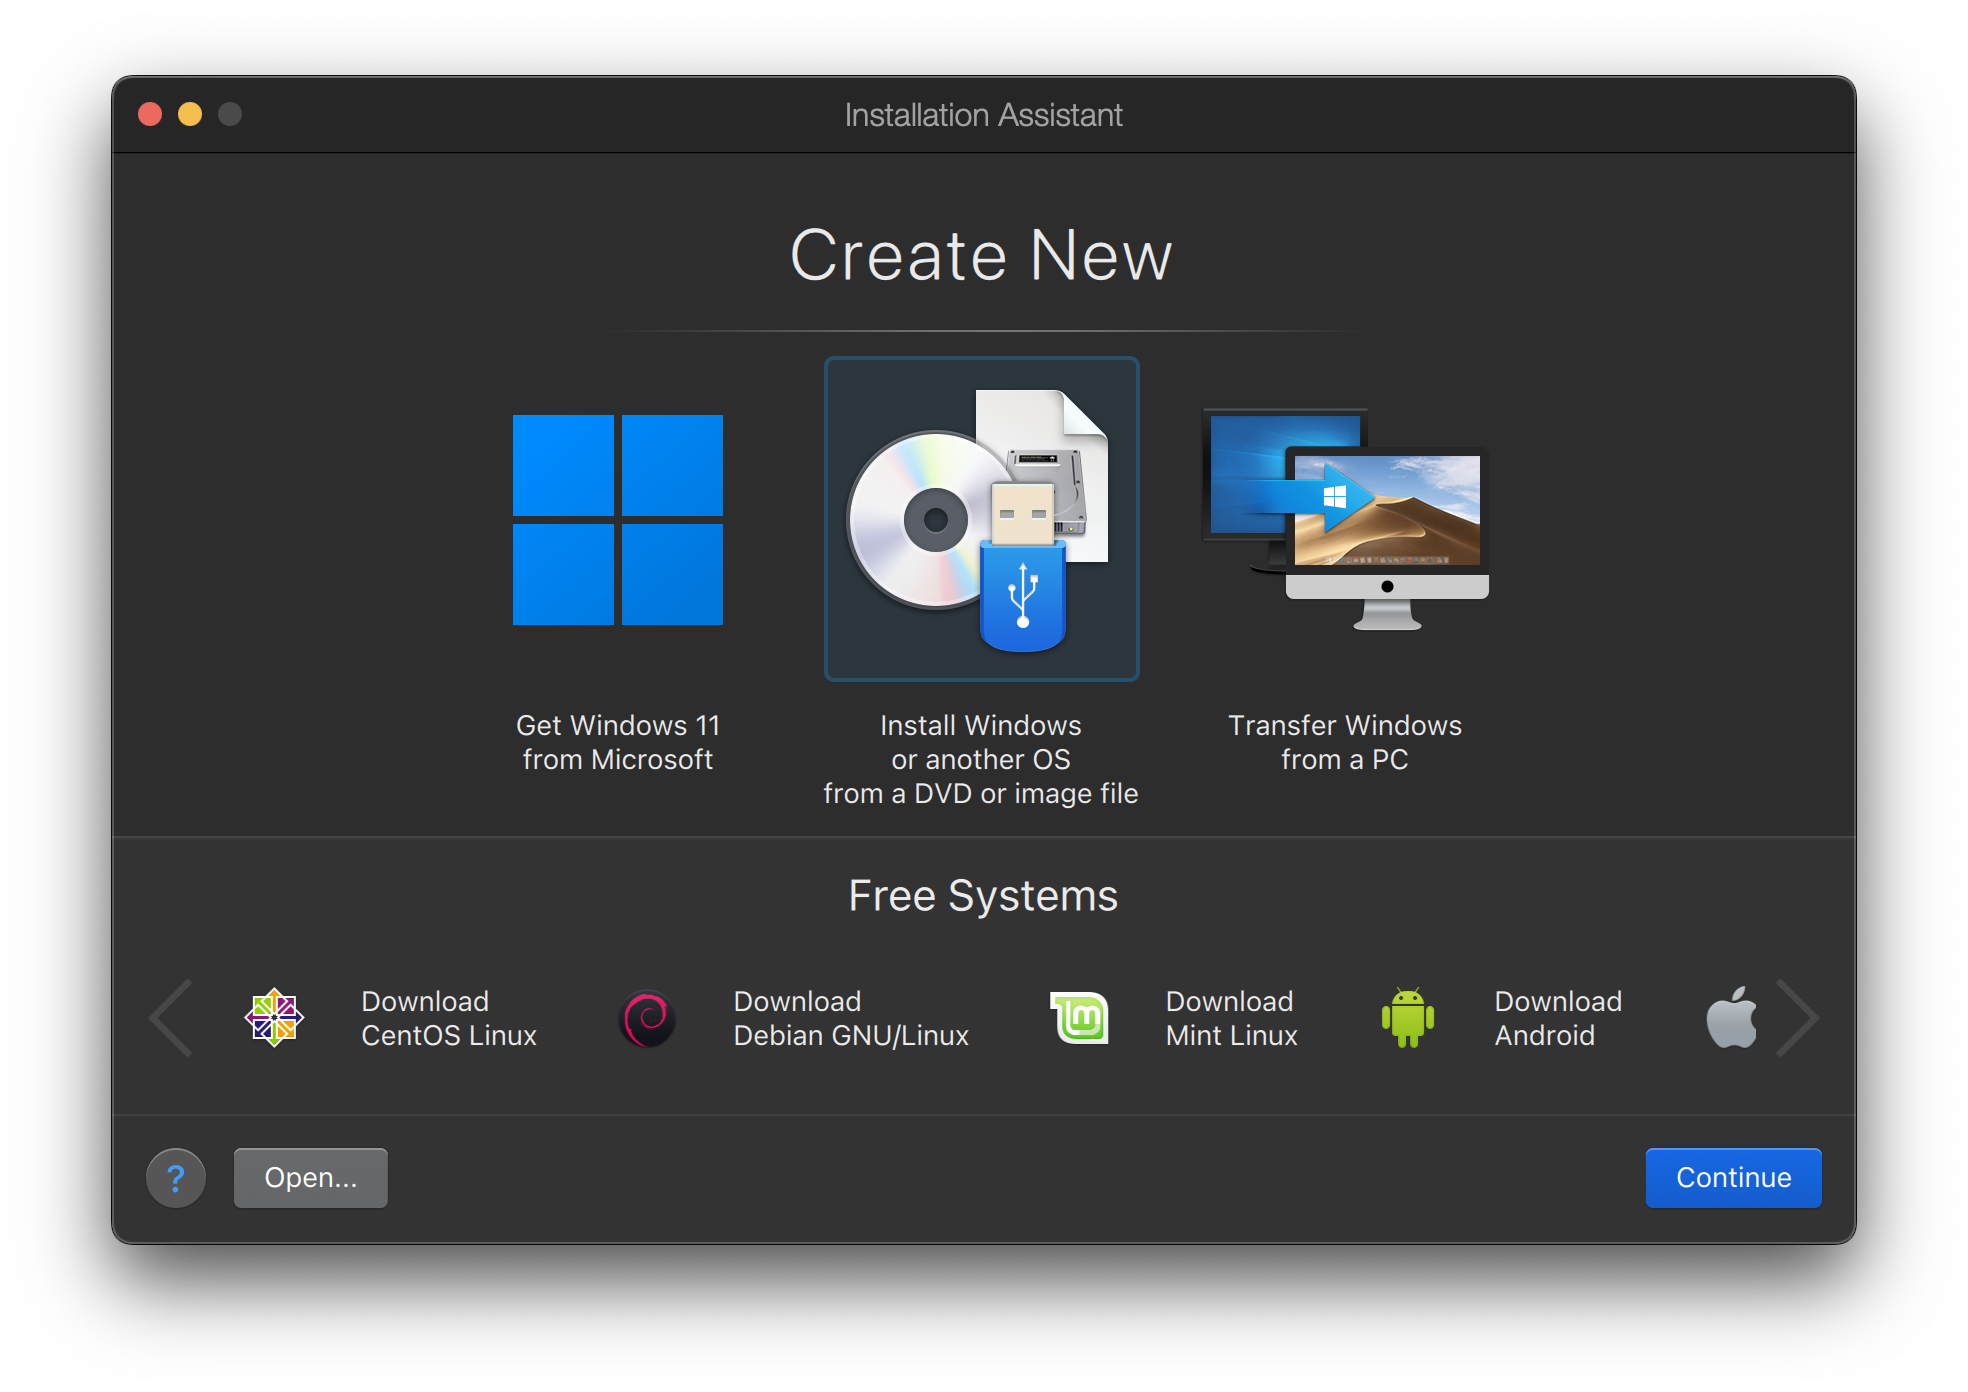
Choose Install Windows or another OS from a DVD or image file and proceed.

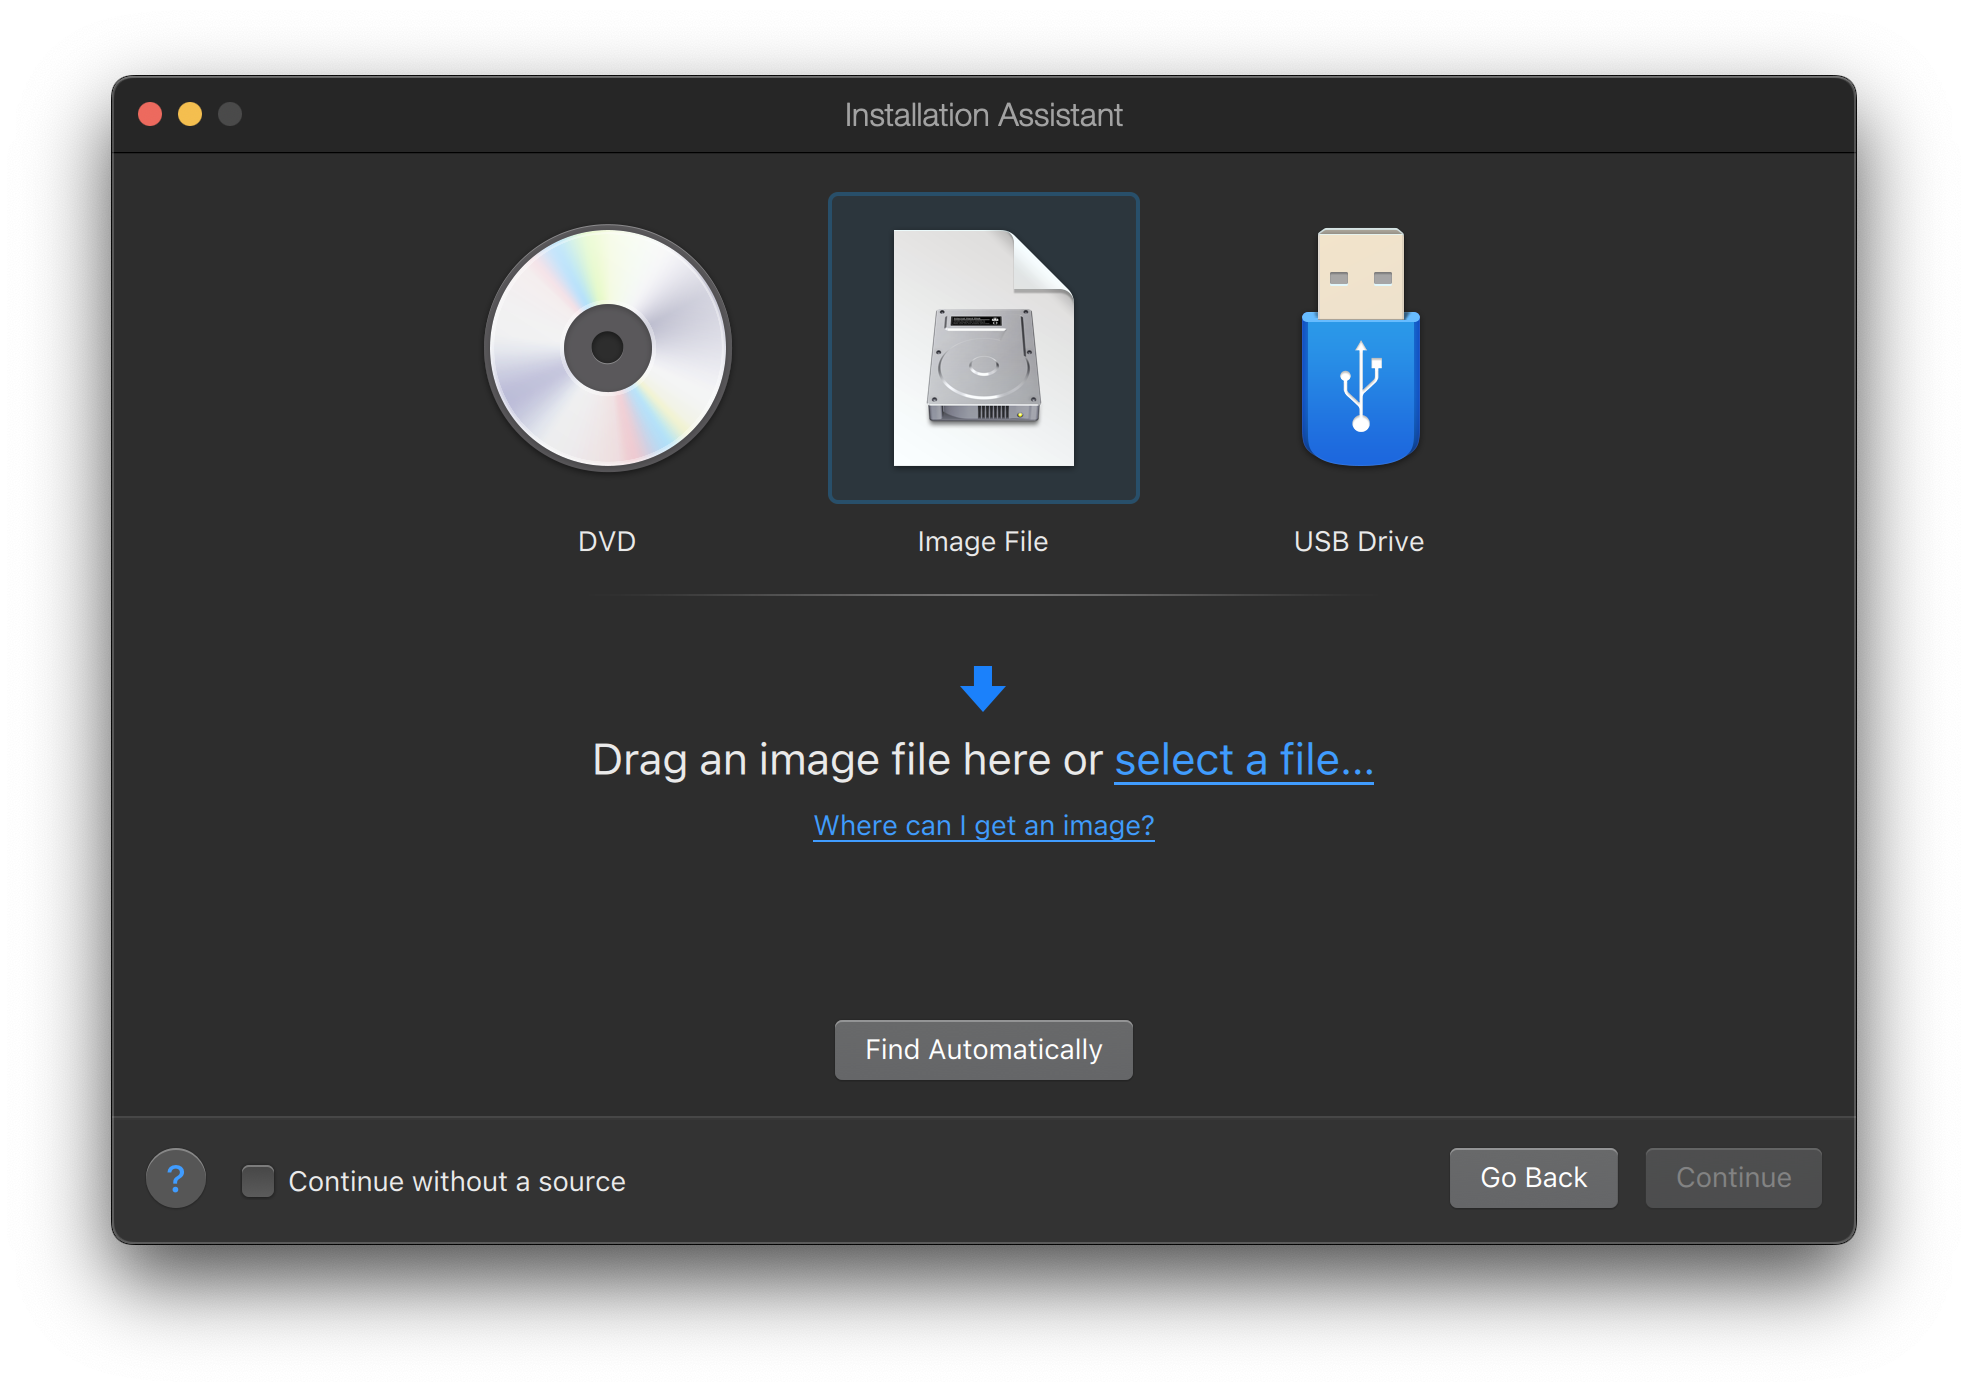
Select the FreeBSD image file.
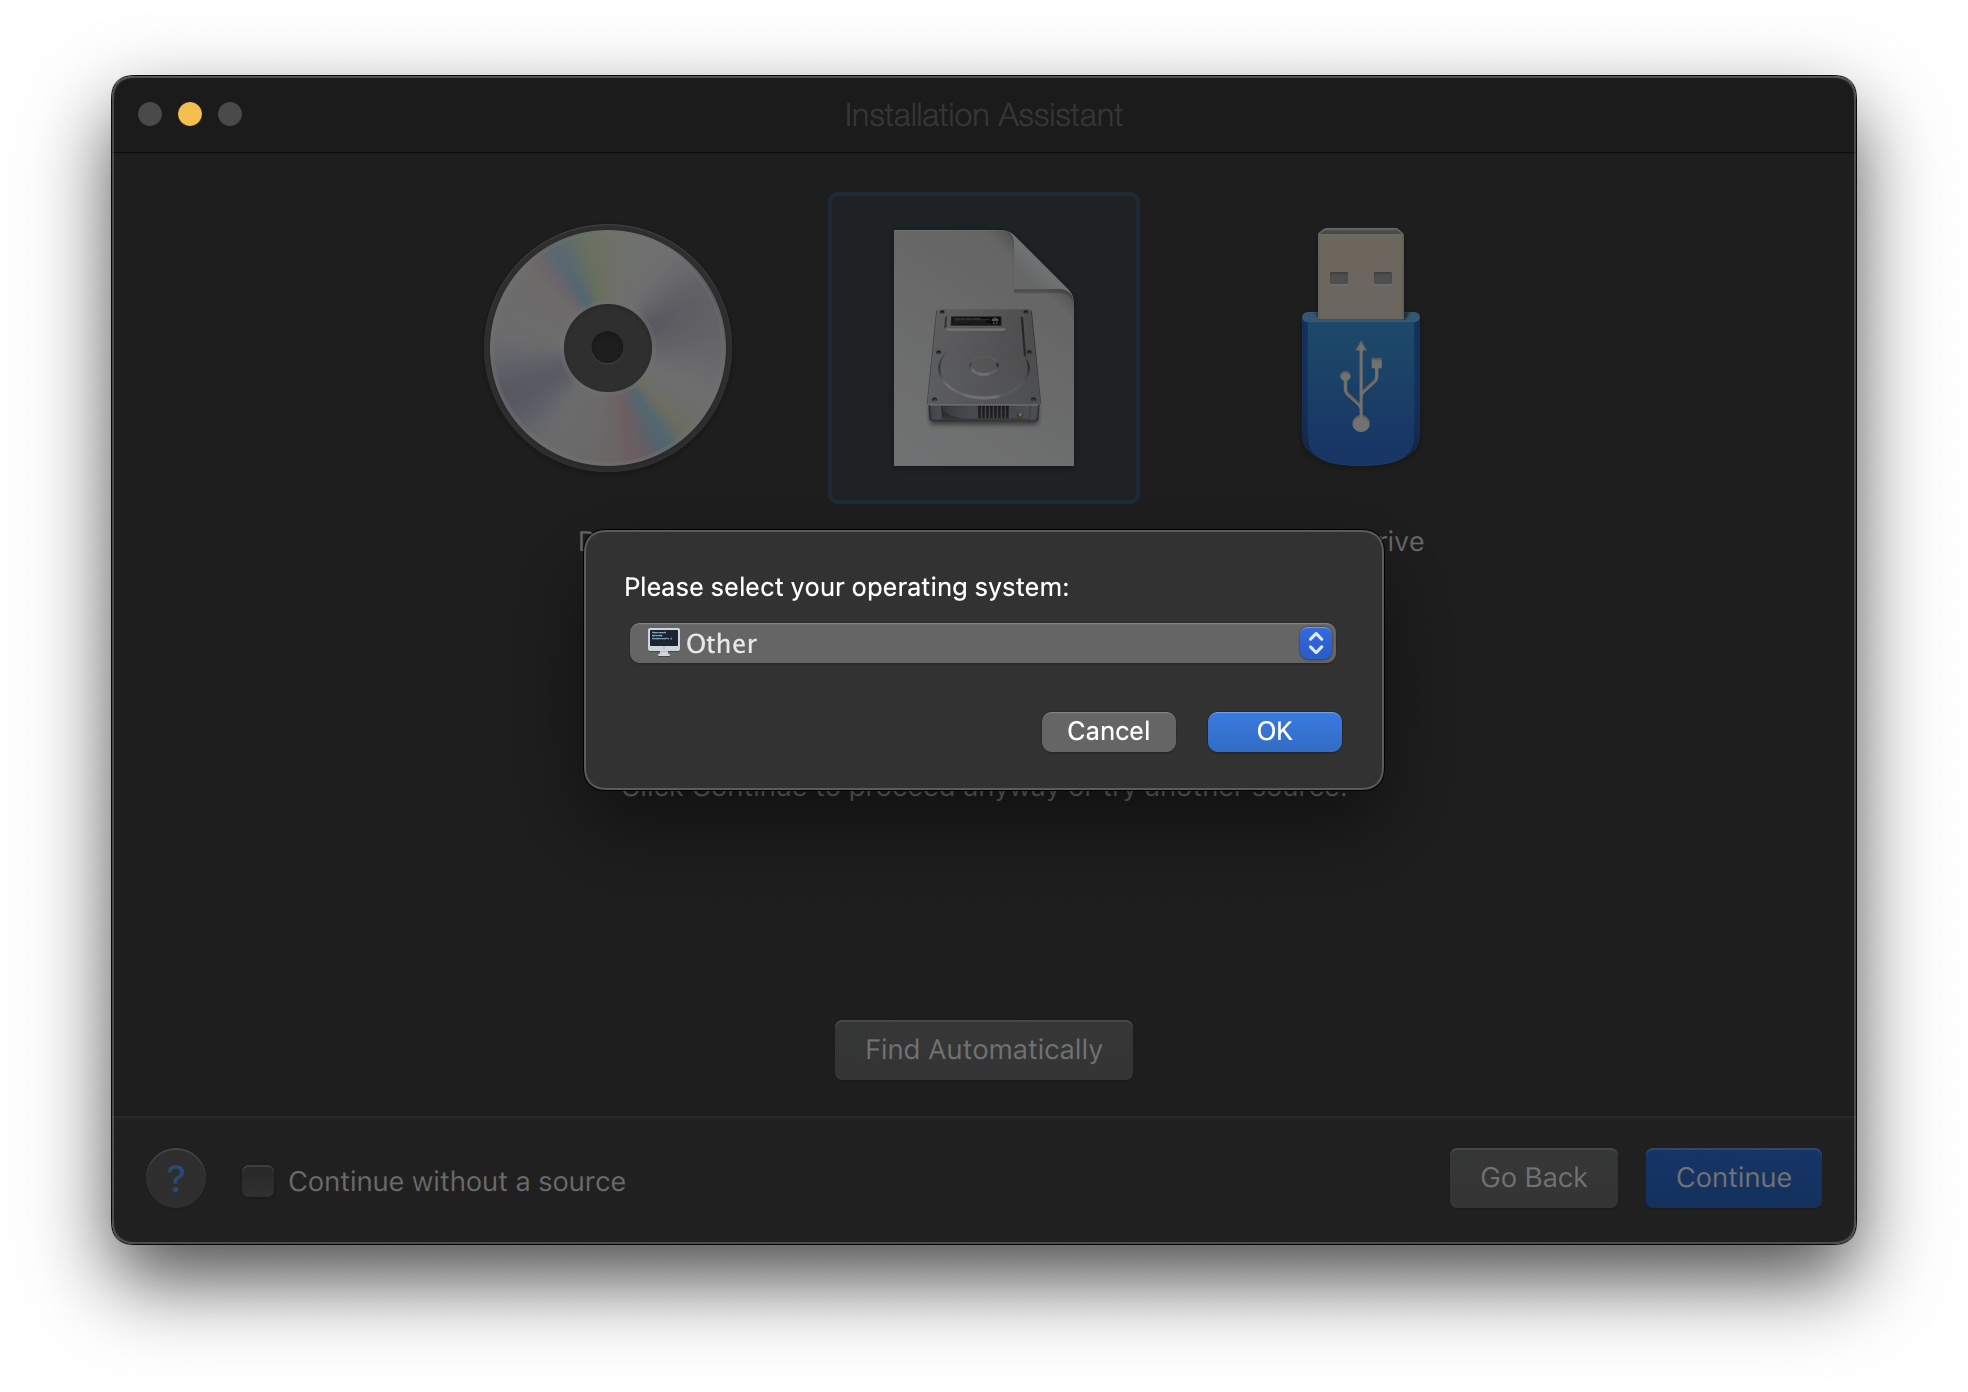
Choose Other as operating system.
Choosing FreeBSD will cause boot error on startup. |
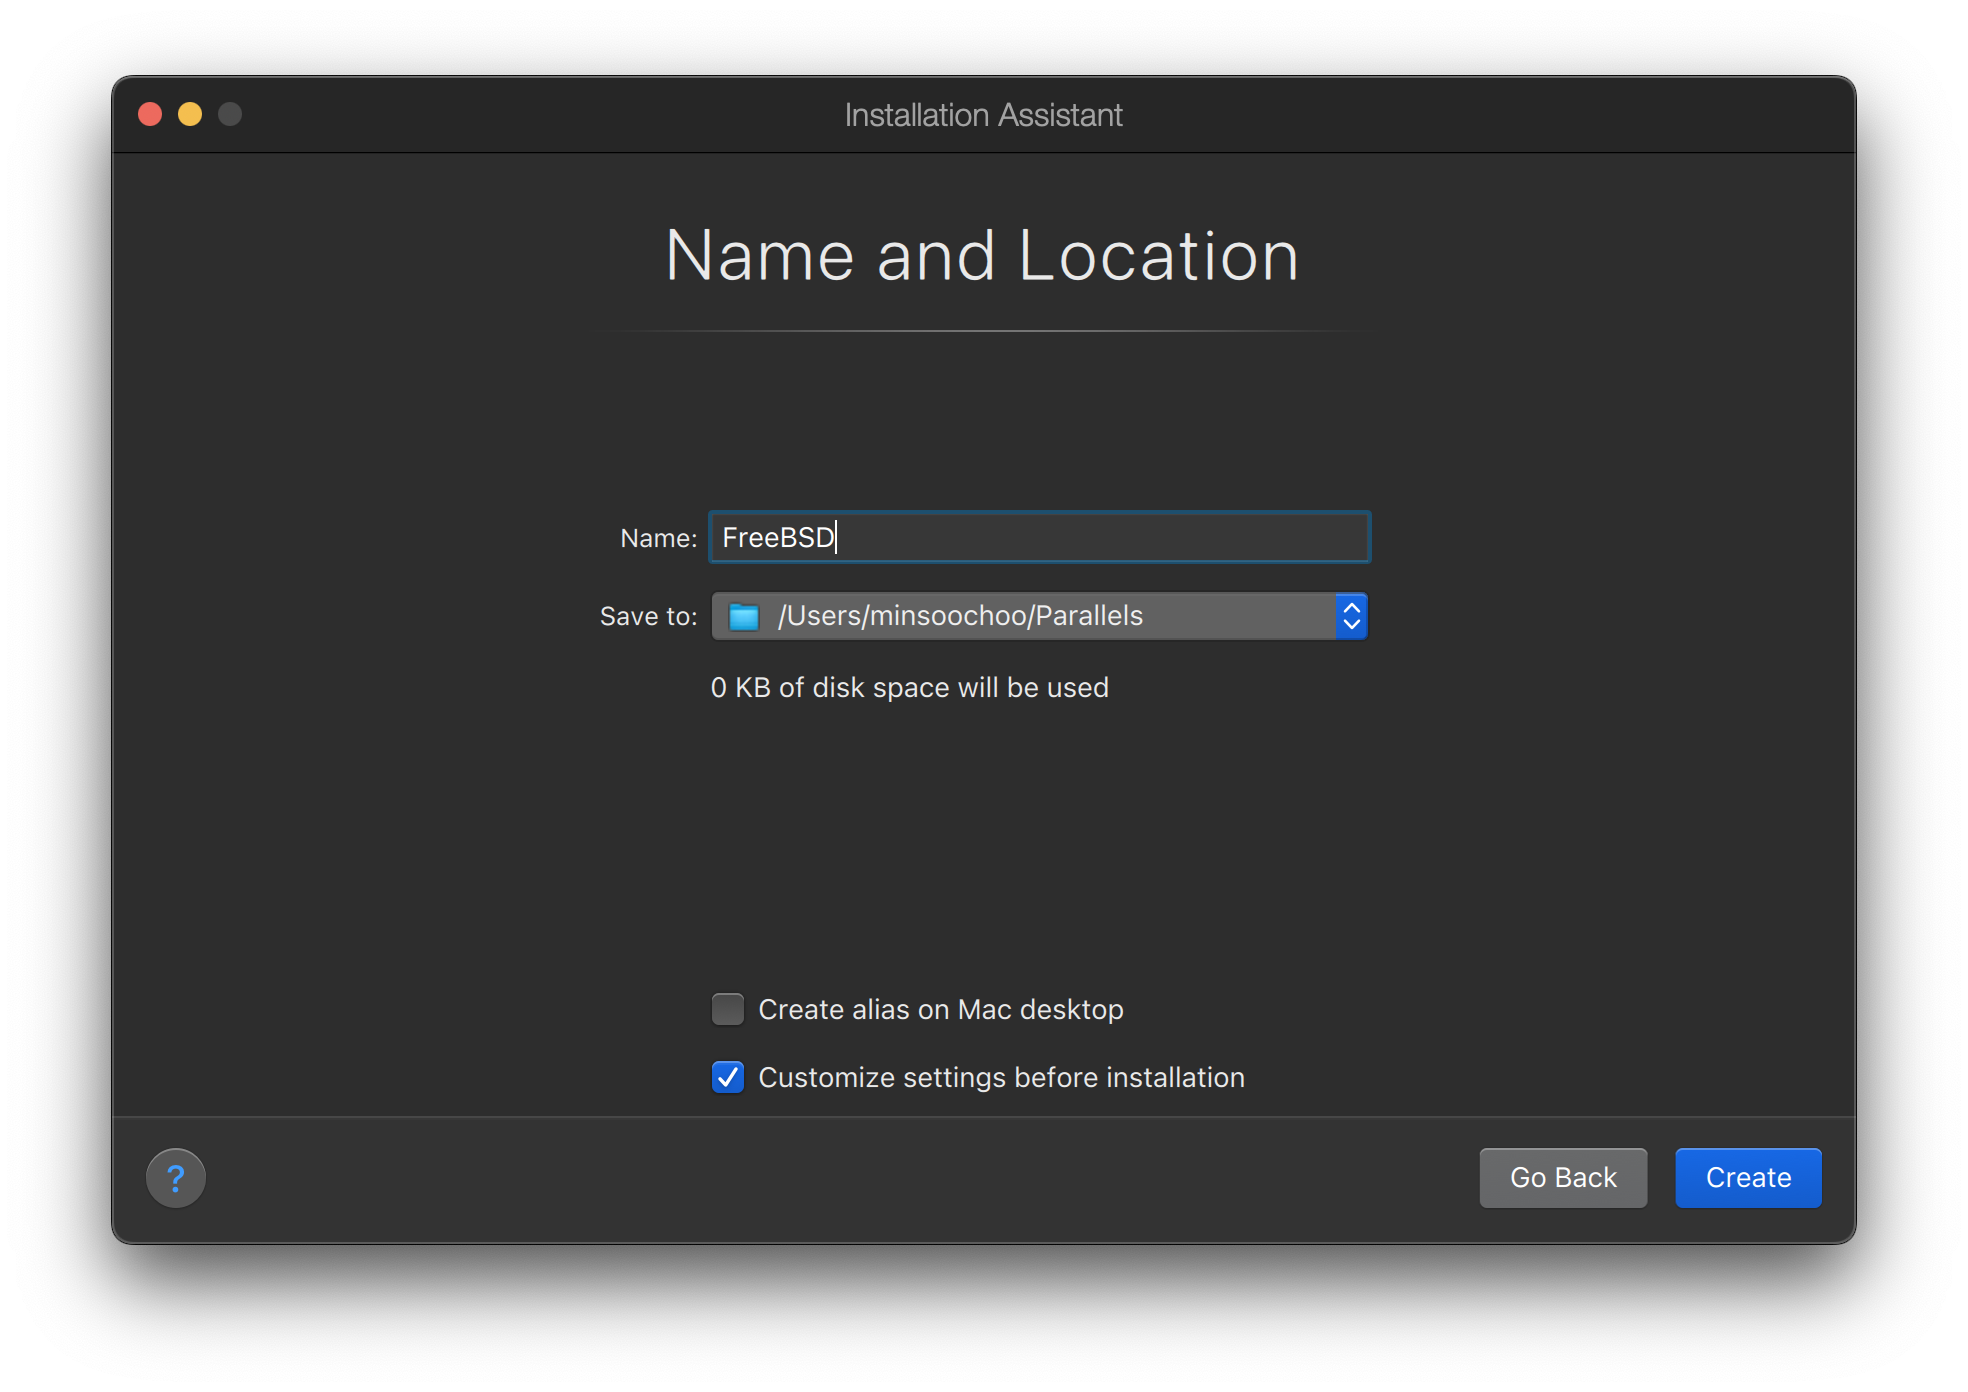
Name the virtual machine and check Customize settings before installation
When the configuration window pops up, go to Hardware tab, choose Boot order, and click Advanced. Then, choose EFI 64-bit as BIOS.
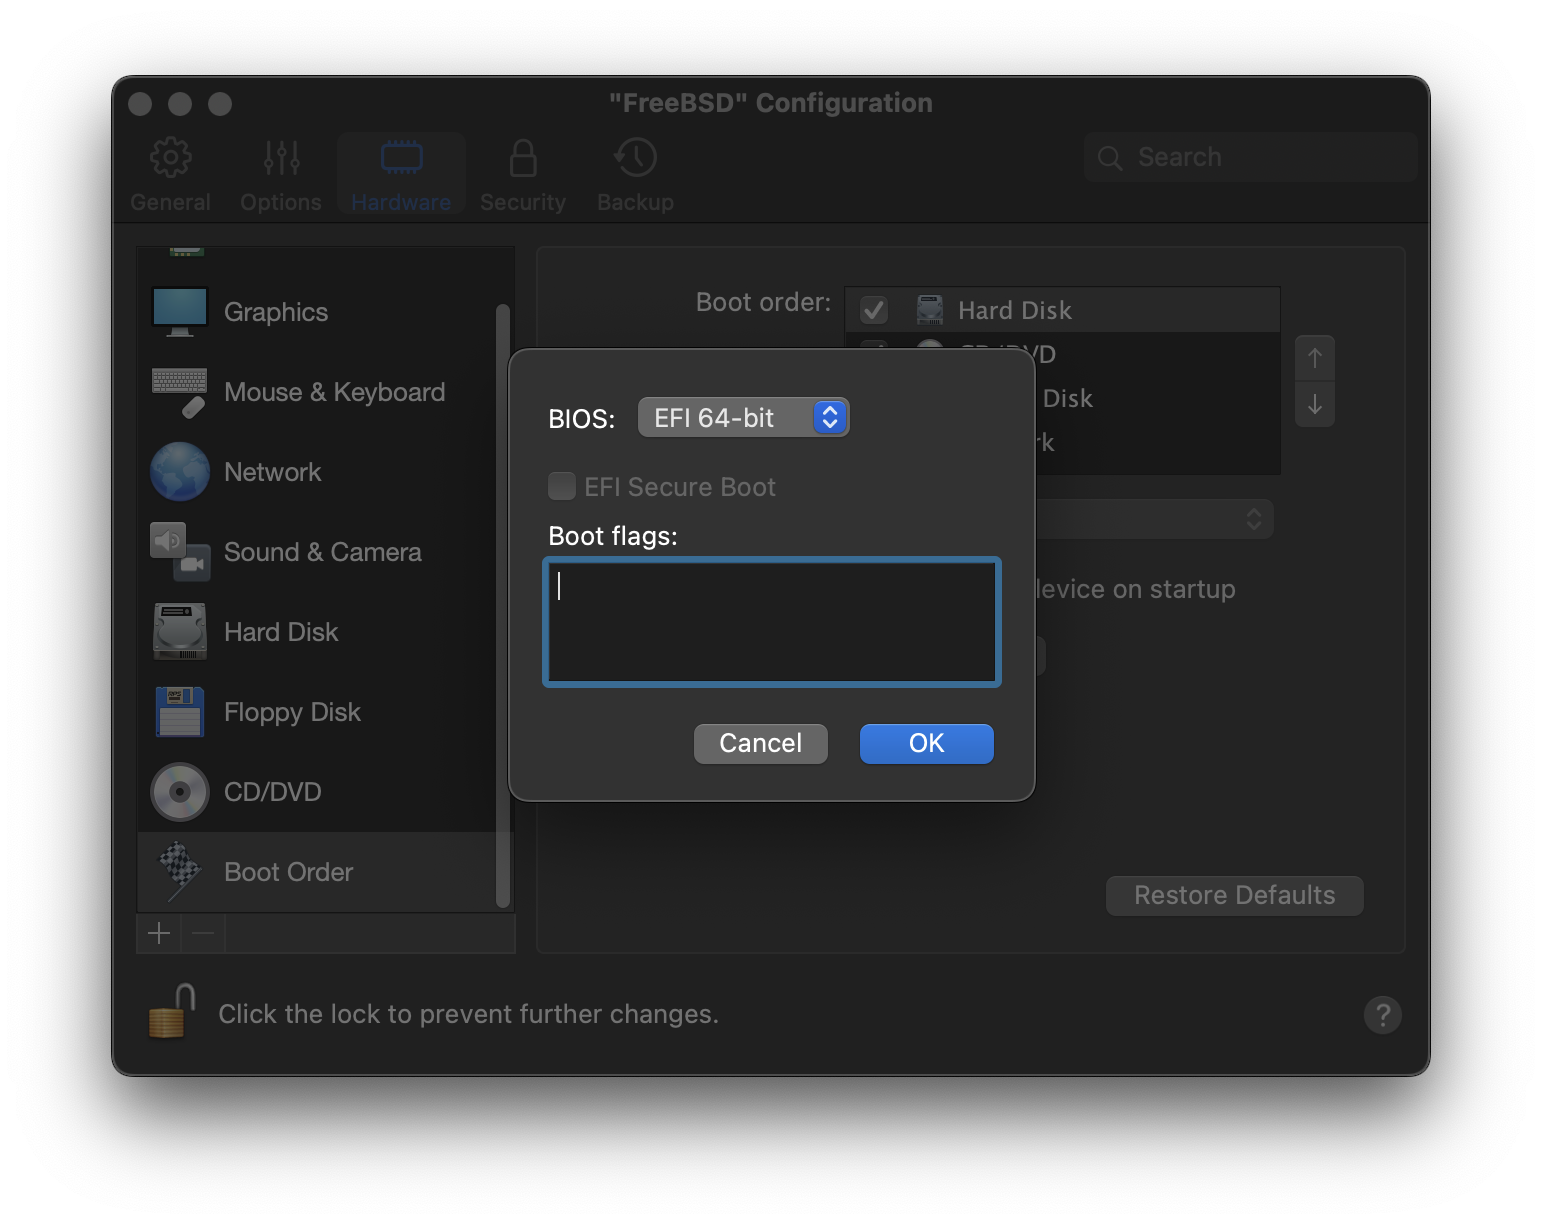
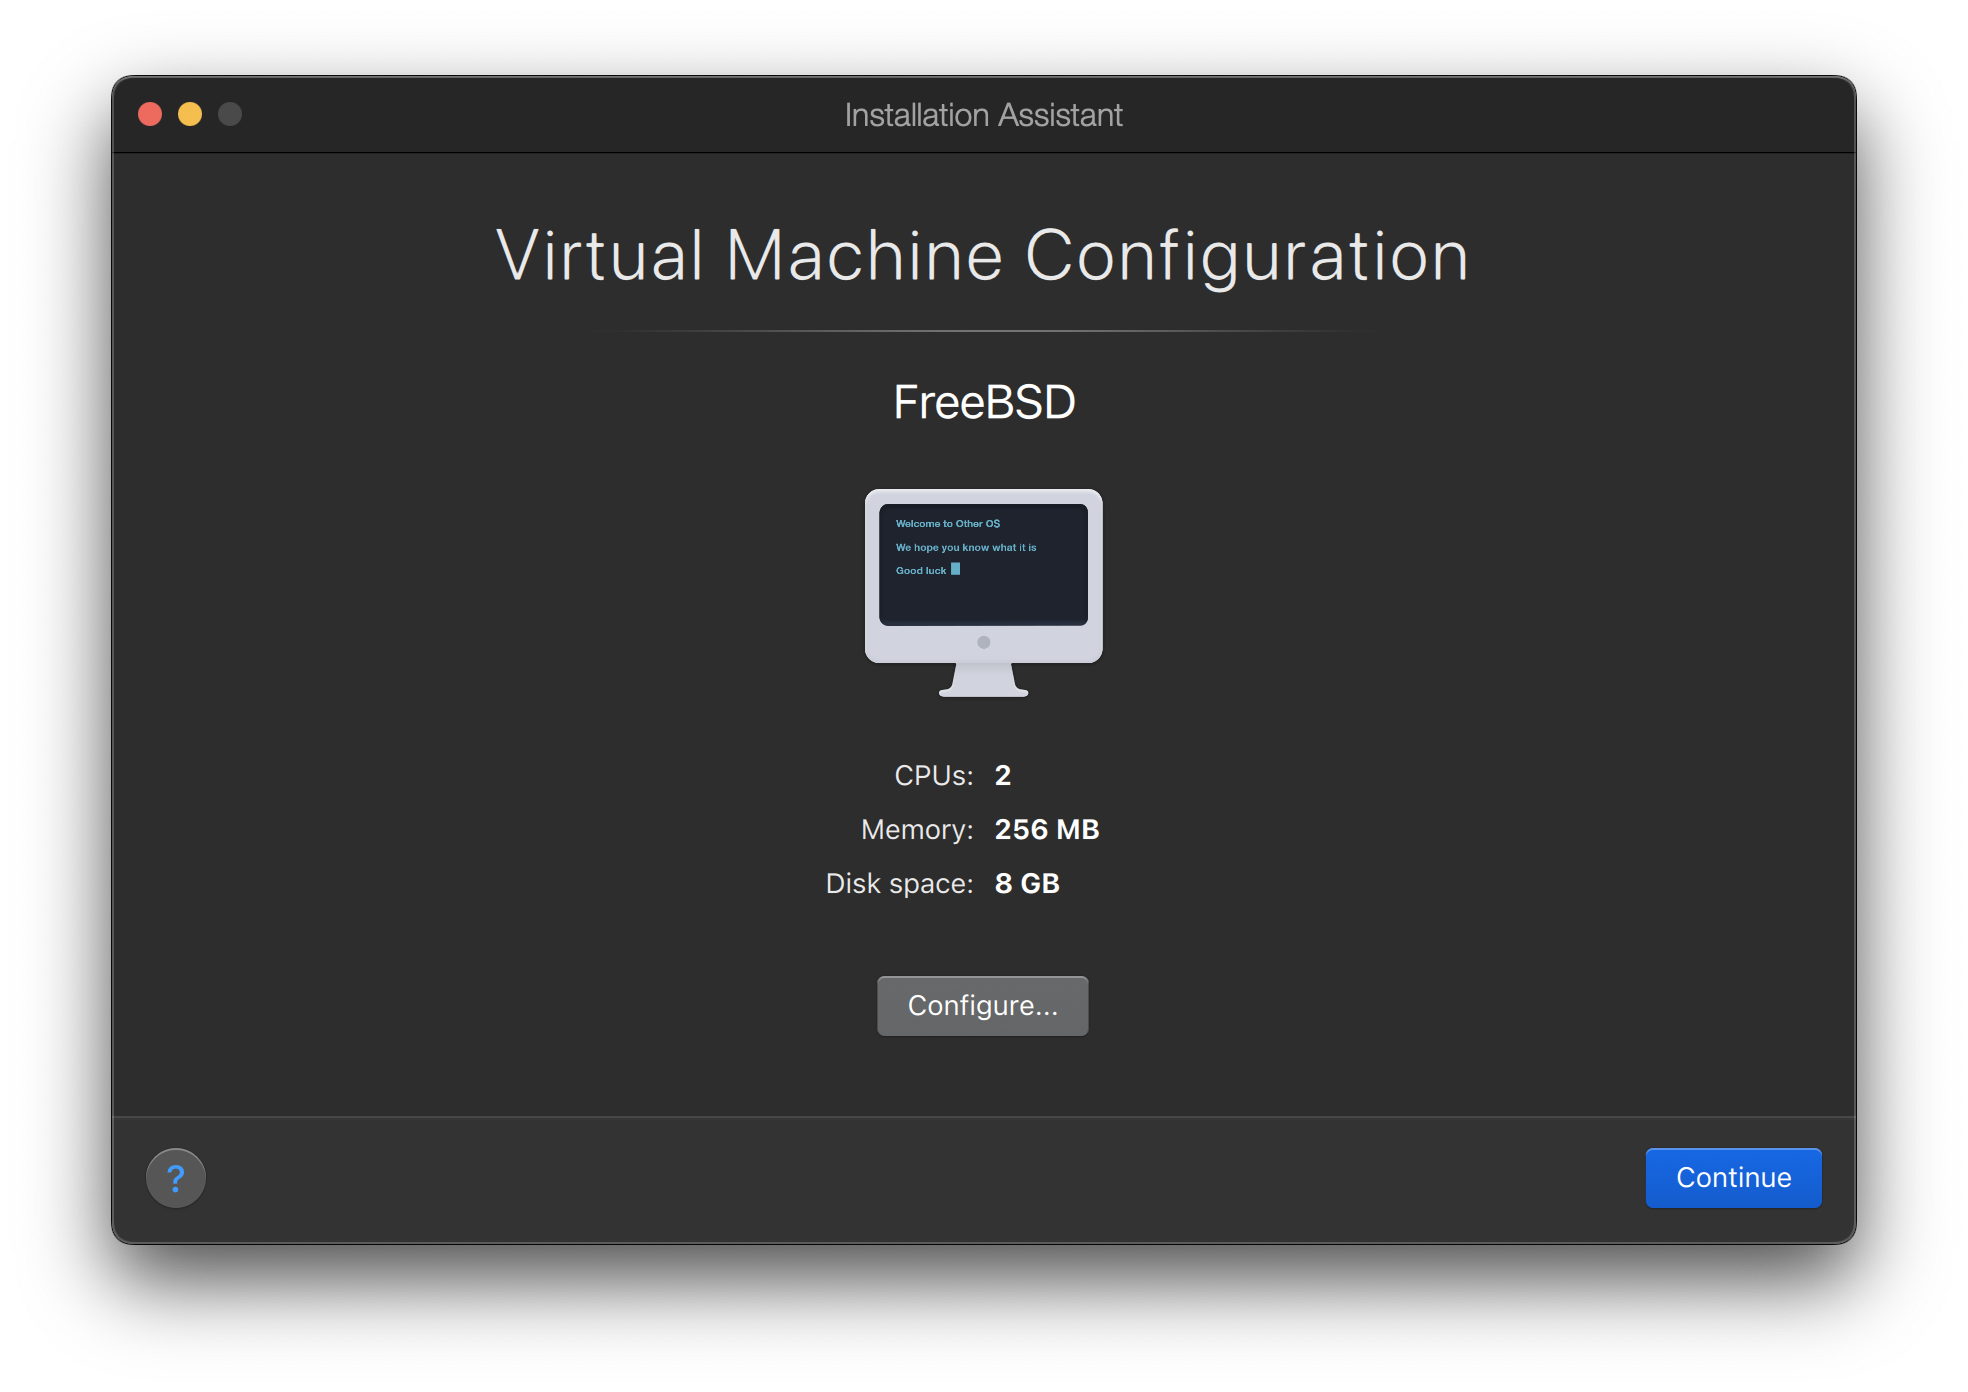
Click OK, close the configuration window, and click Continue.
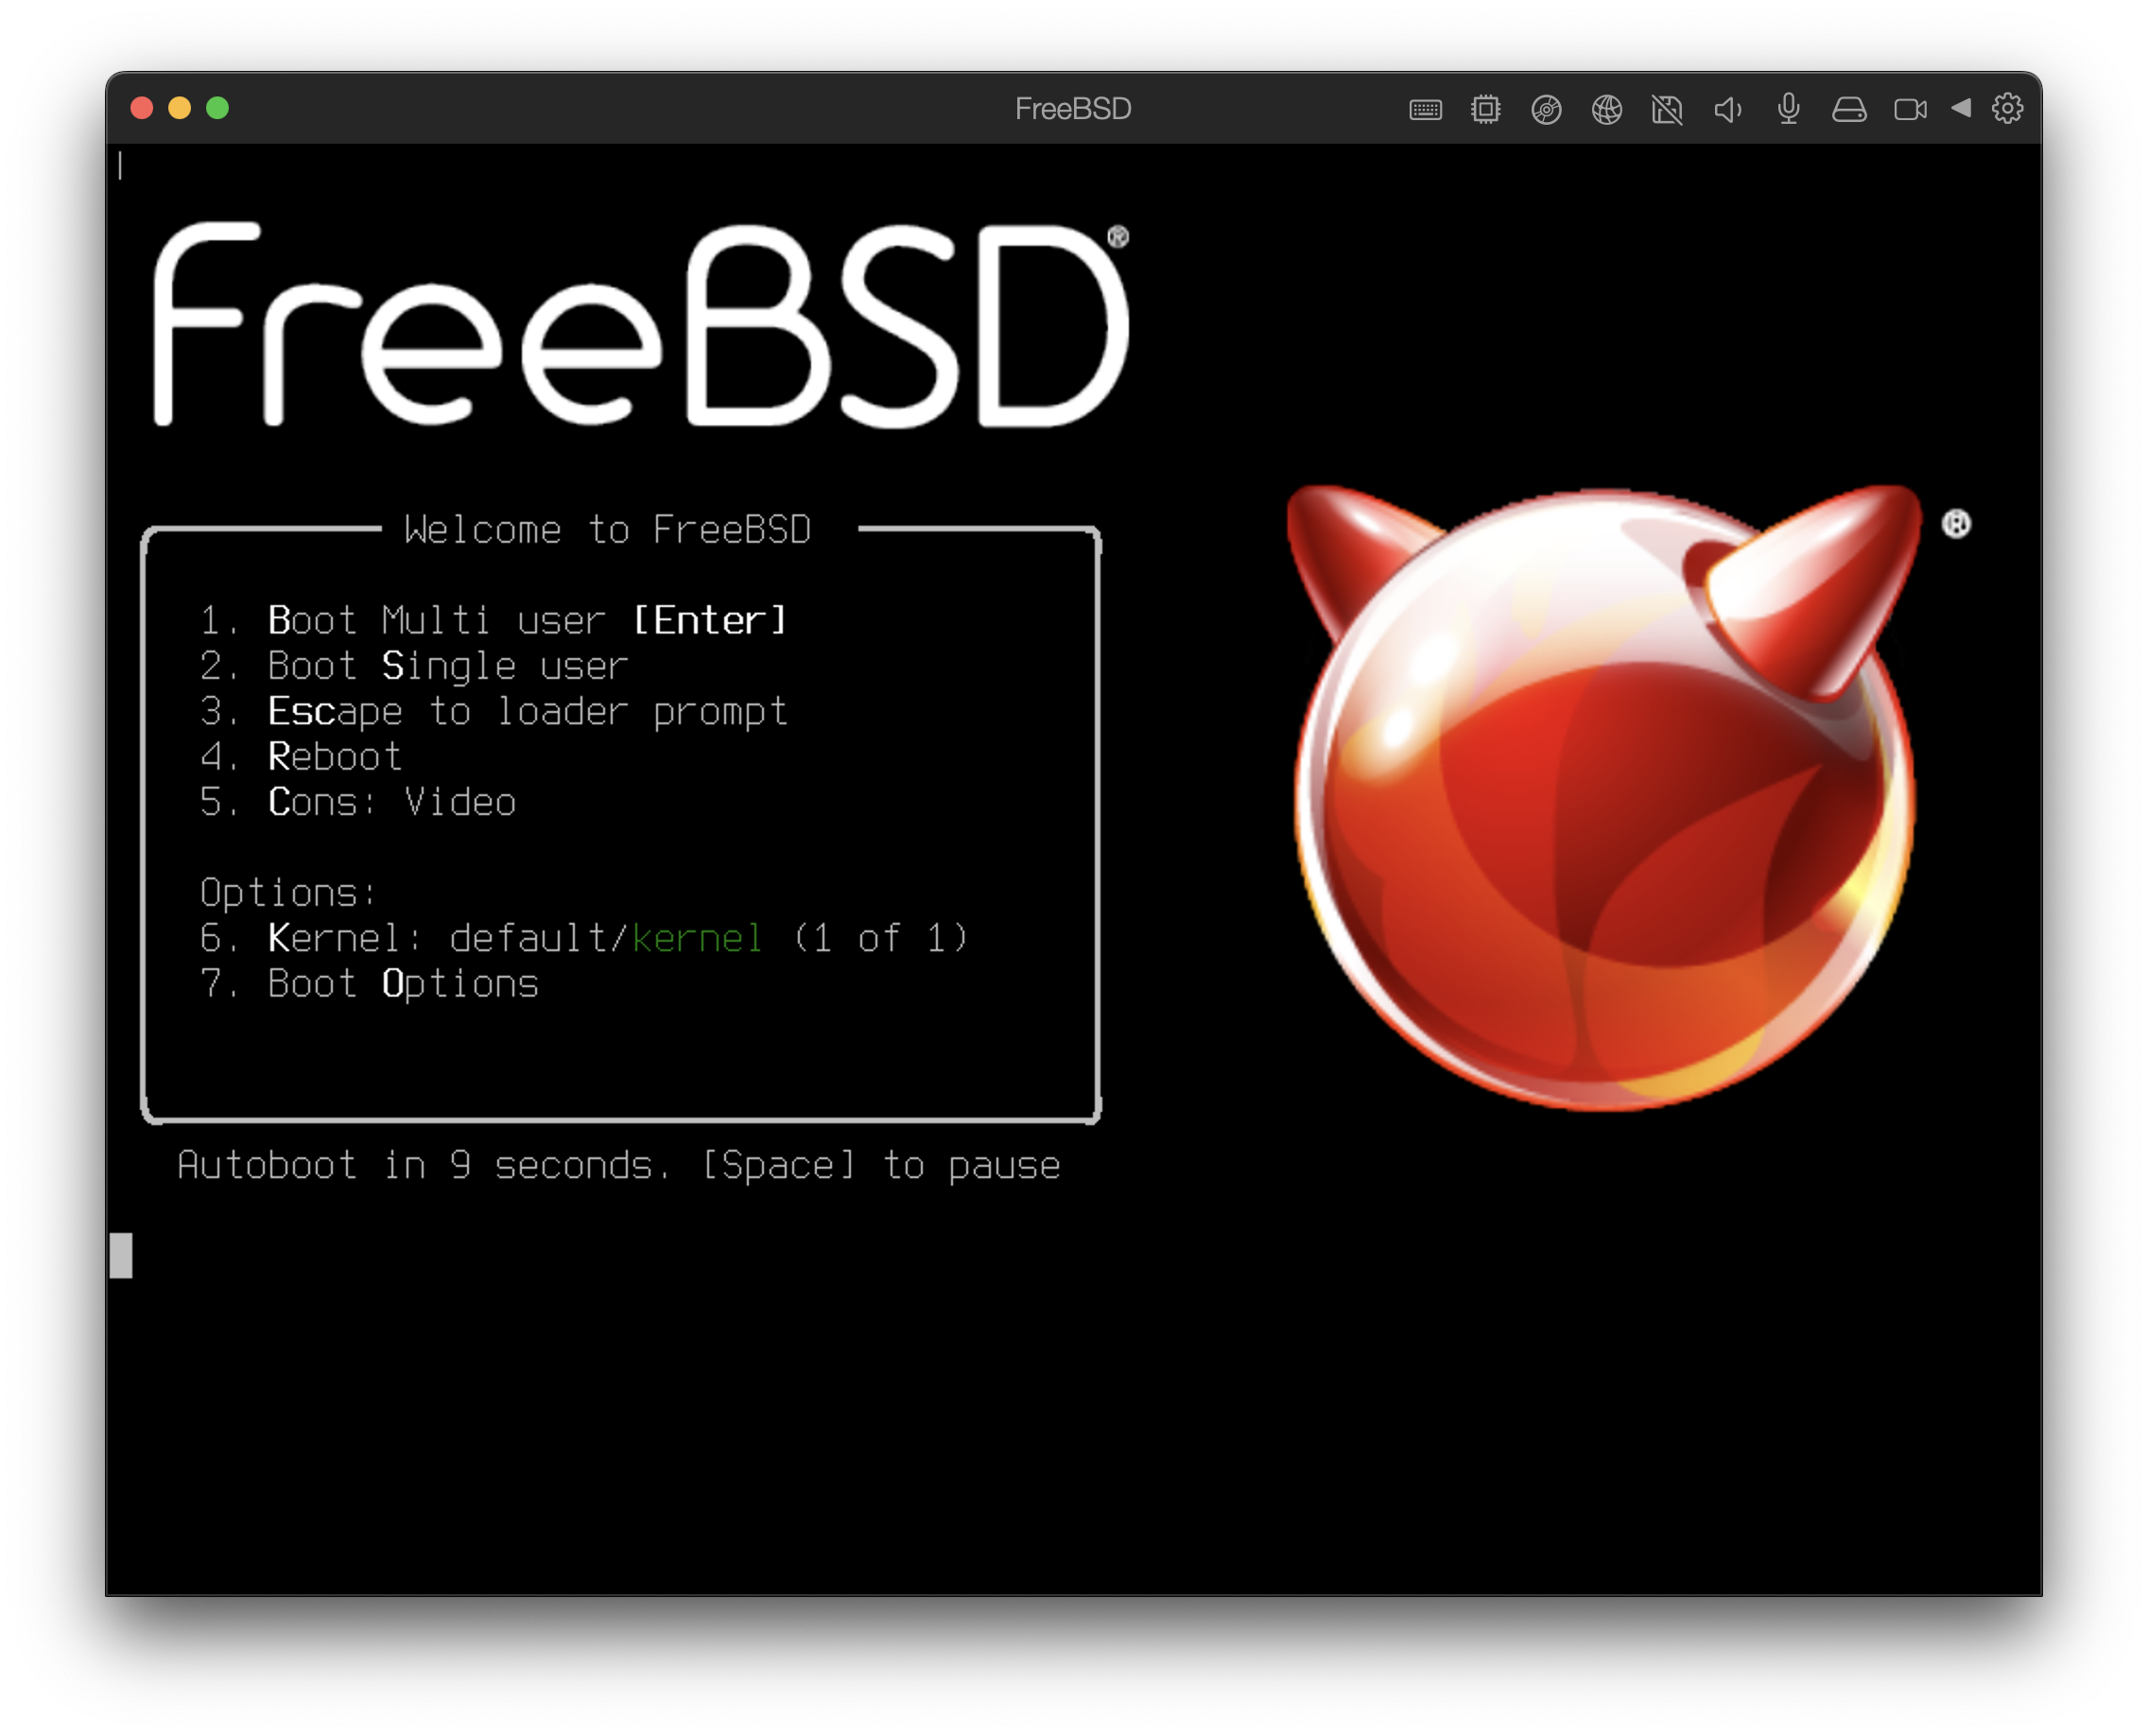
The virtual machine will automatically boot. Install FreeBSD following the general steps.
24.2.2. Configuring FreeBSD on Parallels
After FreeBSD has been successfully installed on macOS® X with Parallels, there are a number of configuration steps that can be taken to optimize the system for virtualized operation.
Set Boot Loader Variables
The most important step is to reduce the
kern.hztunable to reduce the CPU utilization of FreeBSD under the Parallels environment. This is accomplished by adding the following line to /boot/loader.conf:kern.hz=100
Without this setting, an idle FreeBSD Parallels guest will use roughly 15% of the CPU of a single processor iMac®. After this change the usage will be closer to 5%.
If installing FreeBSD 14.0 or later, and CPU utilization is still high, add the following additional line to /boot/loader.conf:
debug.acpi.disabled="ged"
Create a New Kernel Configuration File
Configure Networking
The most basic networking setup uses DHCP to connect the virtual machine to the same local area network as the host Mac®. This can be accomplished by adding
ifconfig_ed0="DHCP"to /etc/rc.conf. More advanced networking setups are described in Advanced Networking.
24.3. FreeBSD as a Guest on VMware Fusion for macOS®
VMware Fusion for Mac® is a commercial software product available for Apple® Mac® computers running macOS® 12 or higher. FreeBSD is a fully supported guest operating system. Once VMware Fusion has been installed on macOS®, the user can configure a virtual machine and then install the desired guest operating system.
24.3.1. Installing FreeBSD on VMware Fusion
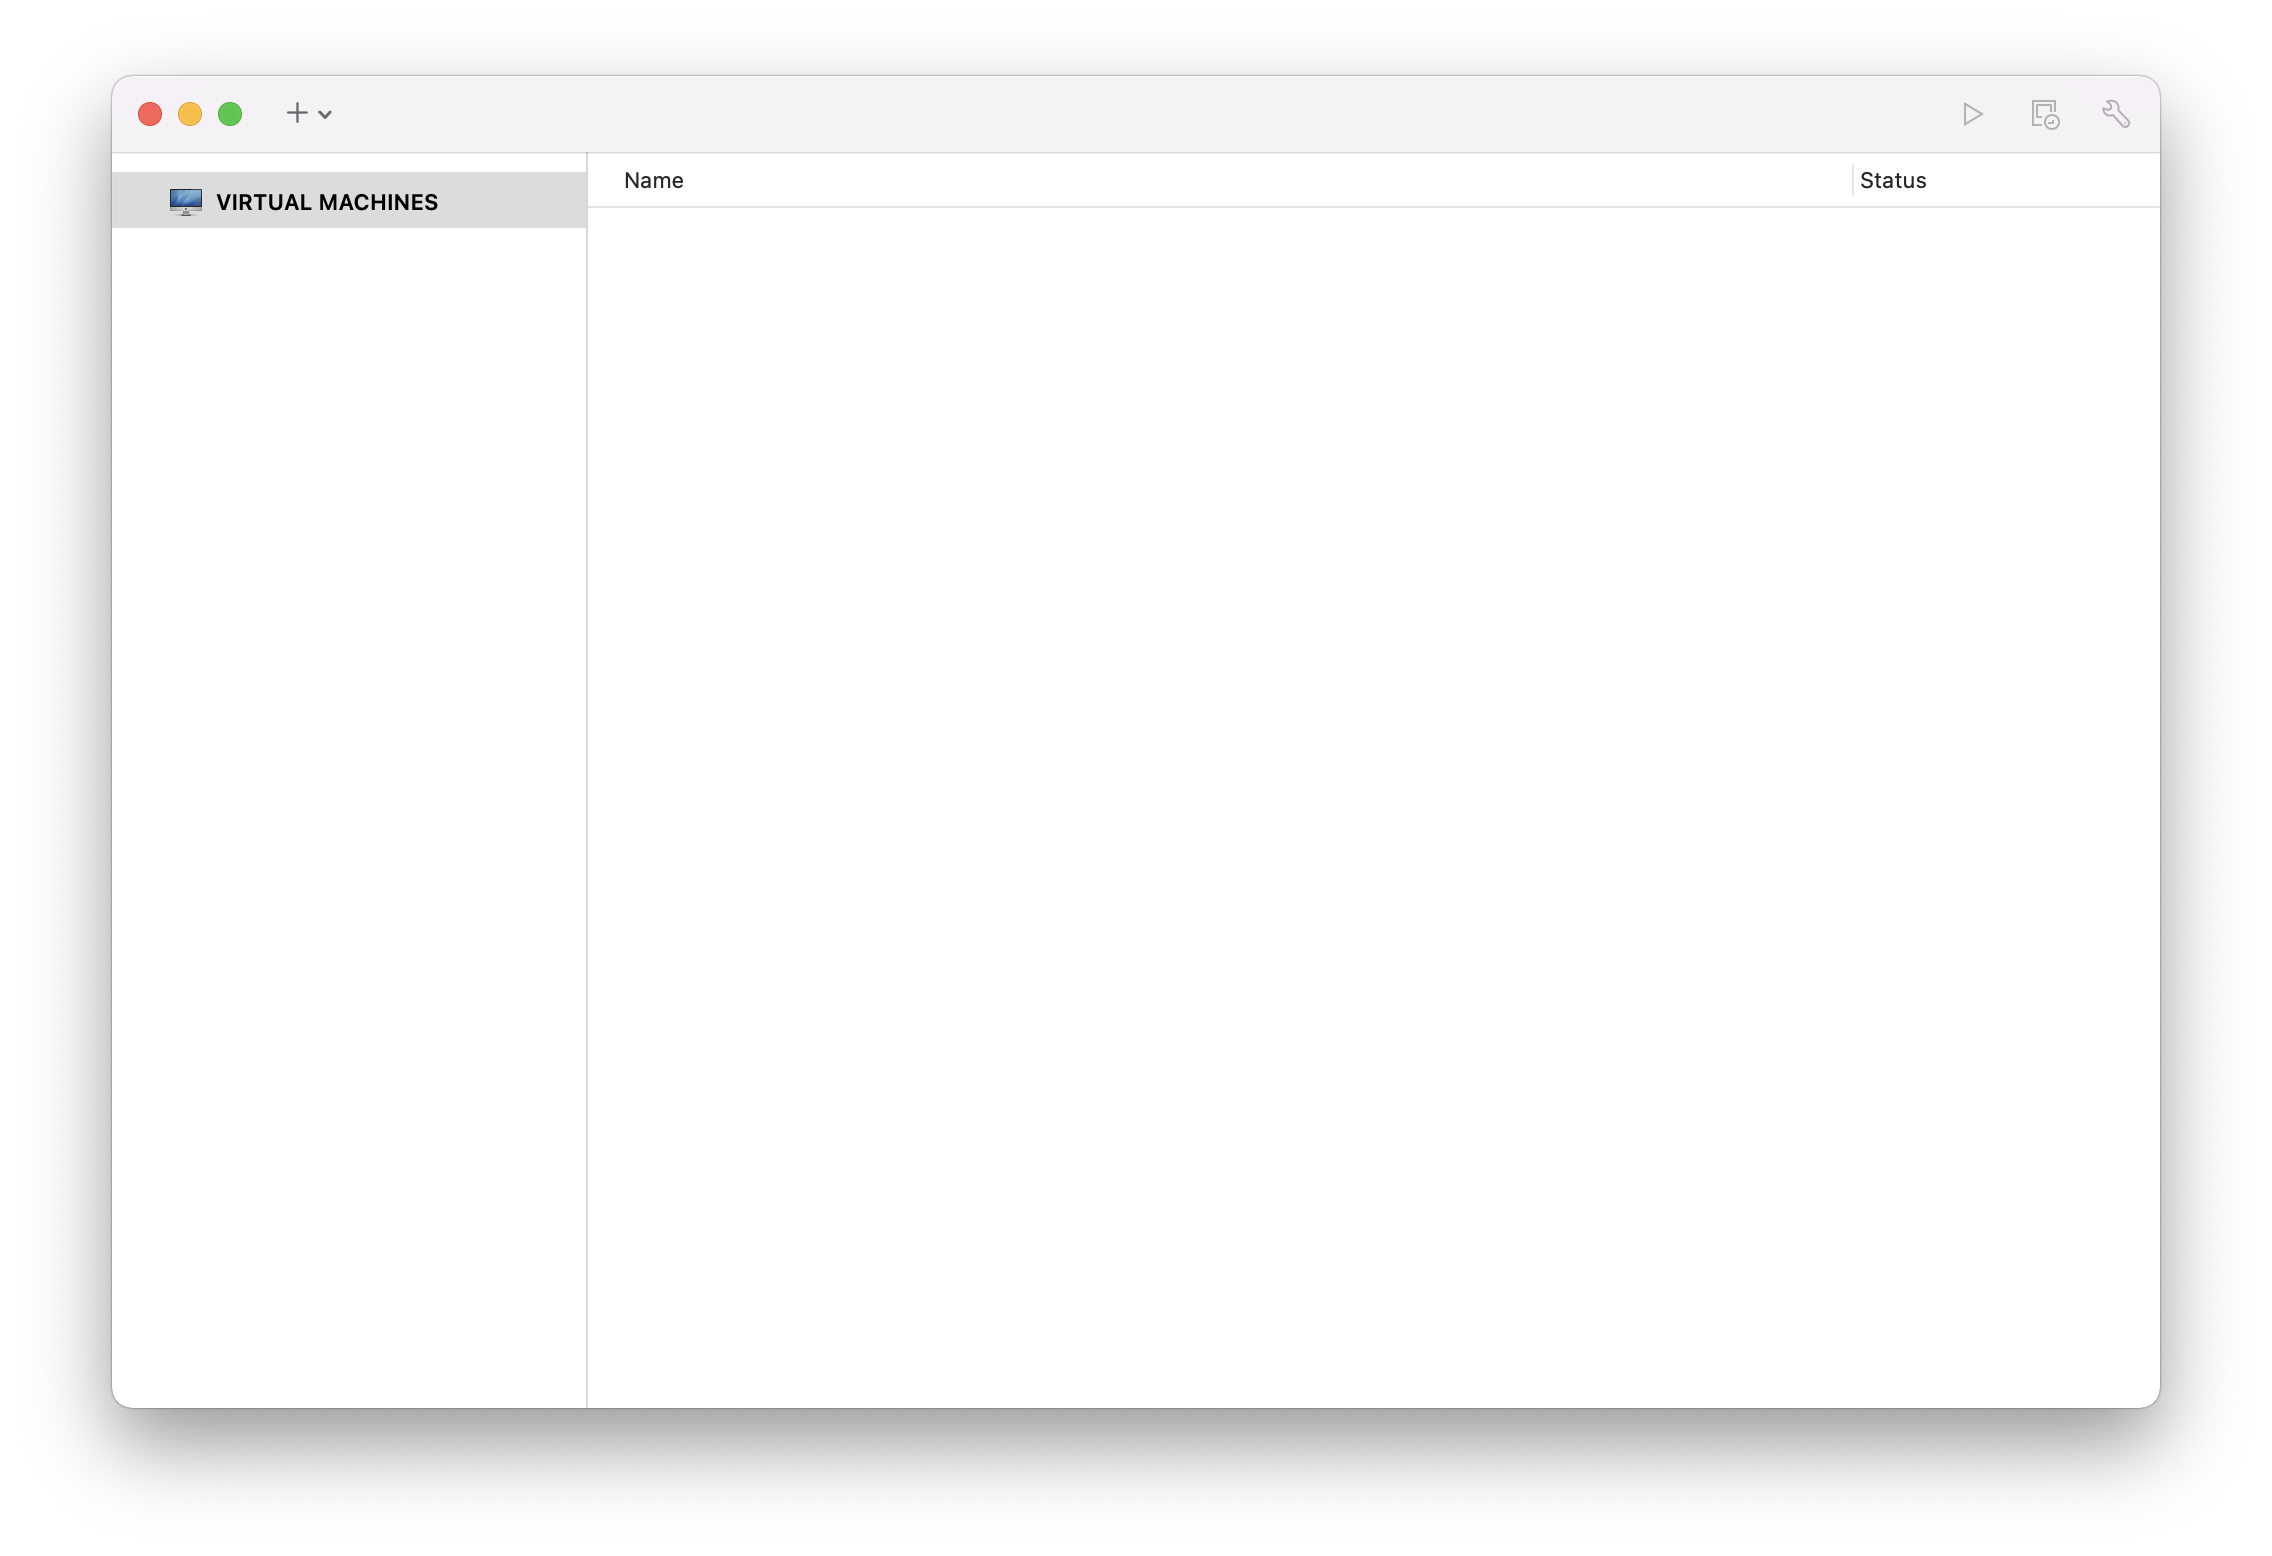
The first step is to start VMware Fusion which will load the Virtual Machine Library. Click to create the virtual machine:
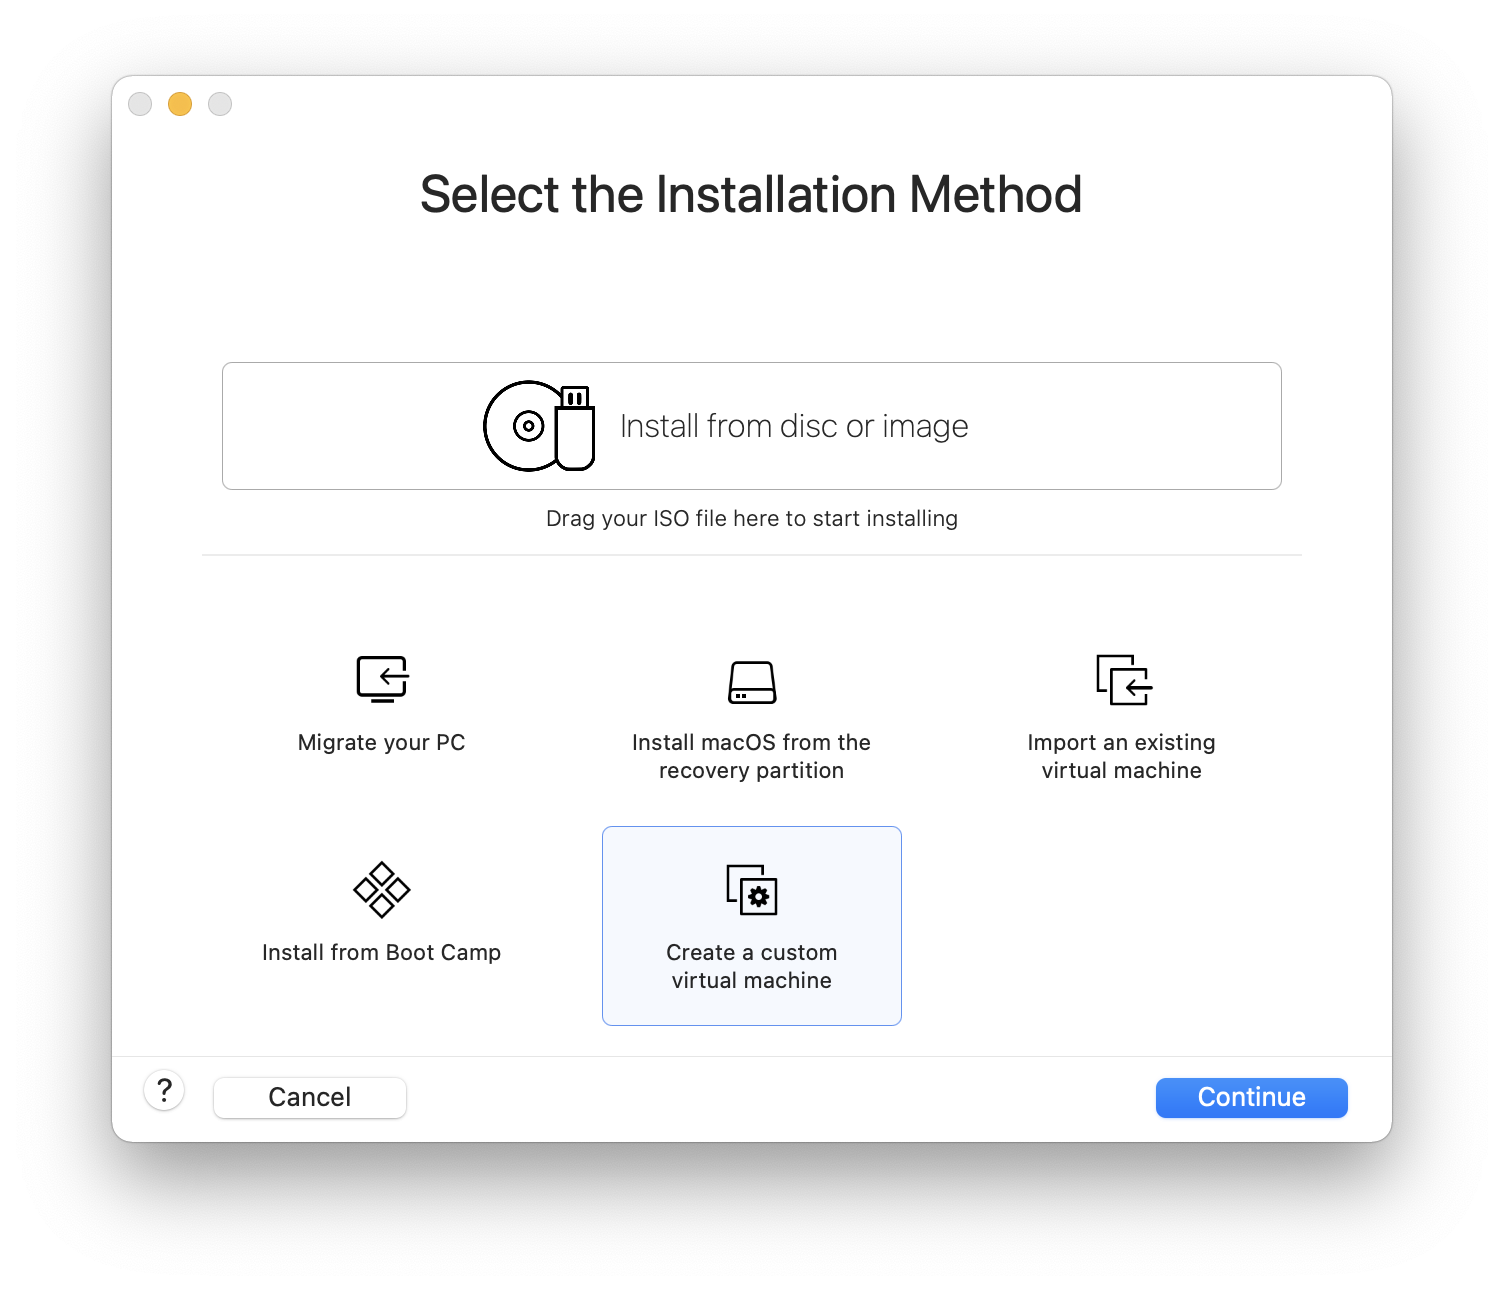
This will load the New Virtual Machine Assistant. Choose and click to proceed:
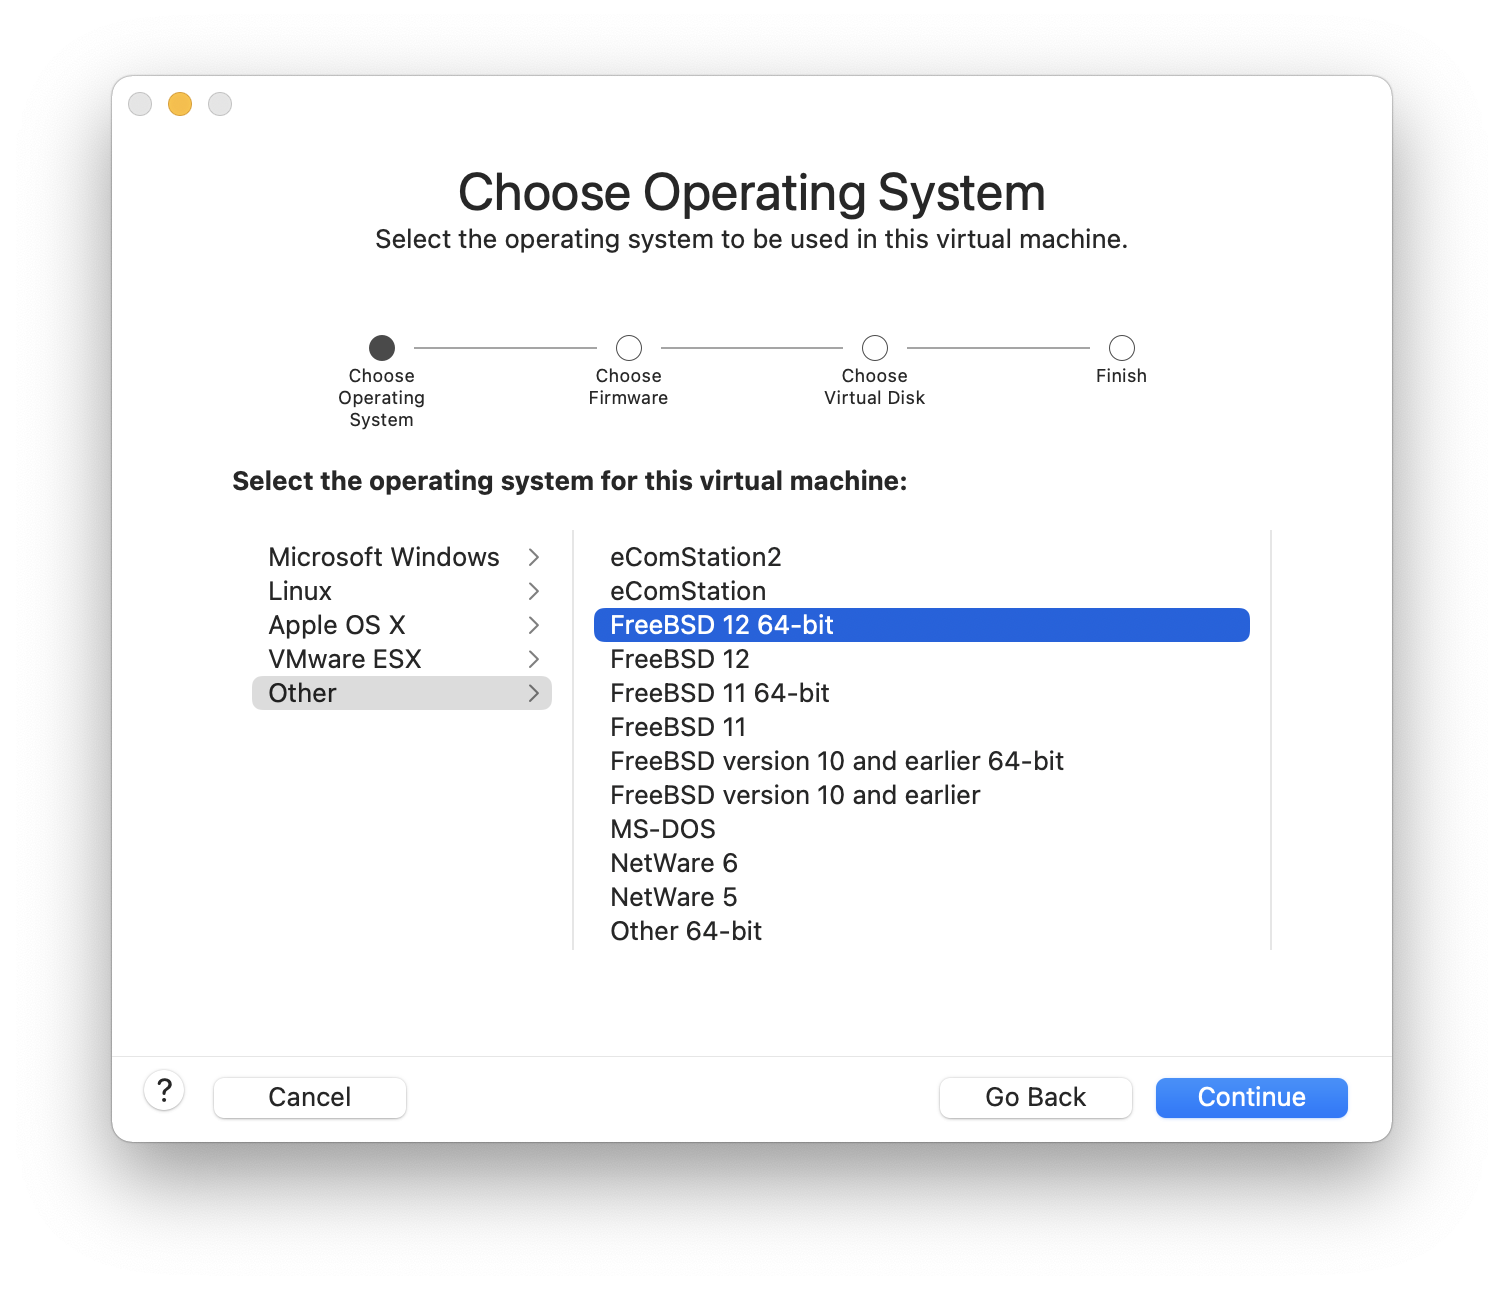
Select as the and either or , as the Version when prompted:
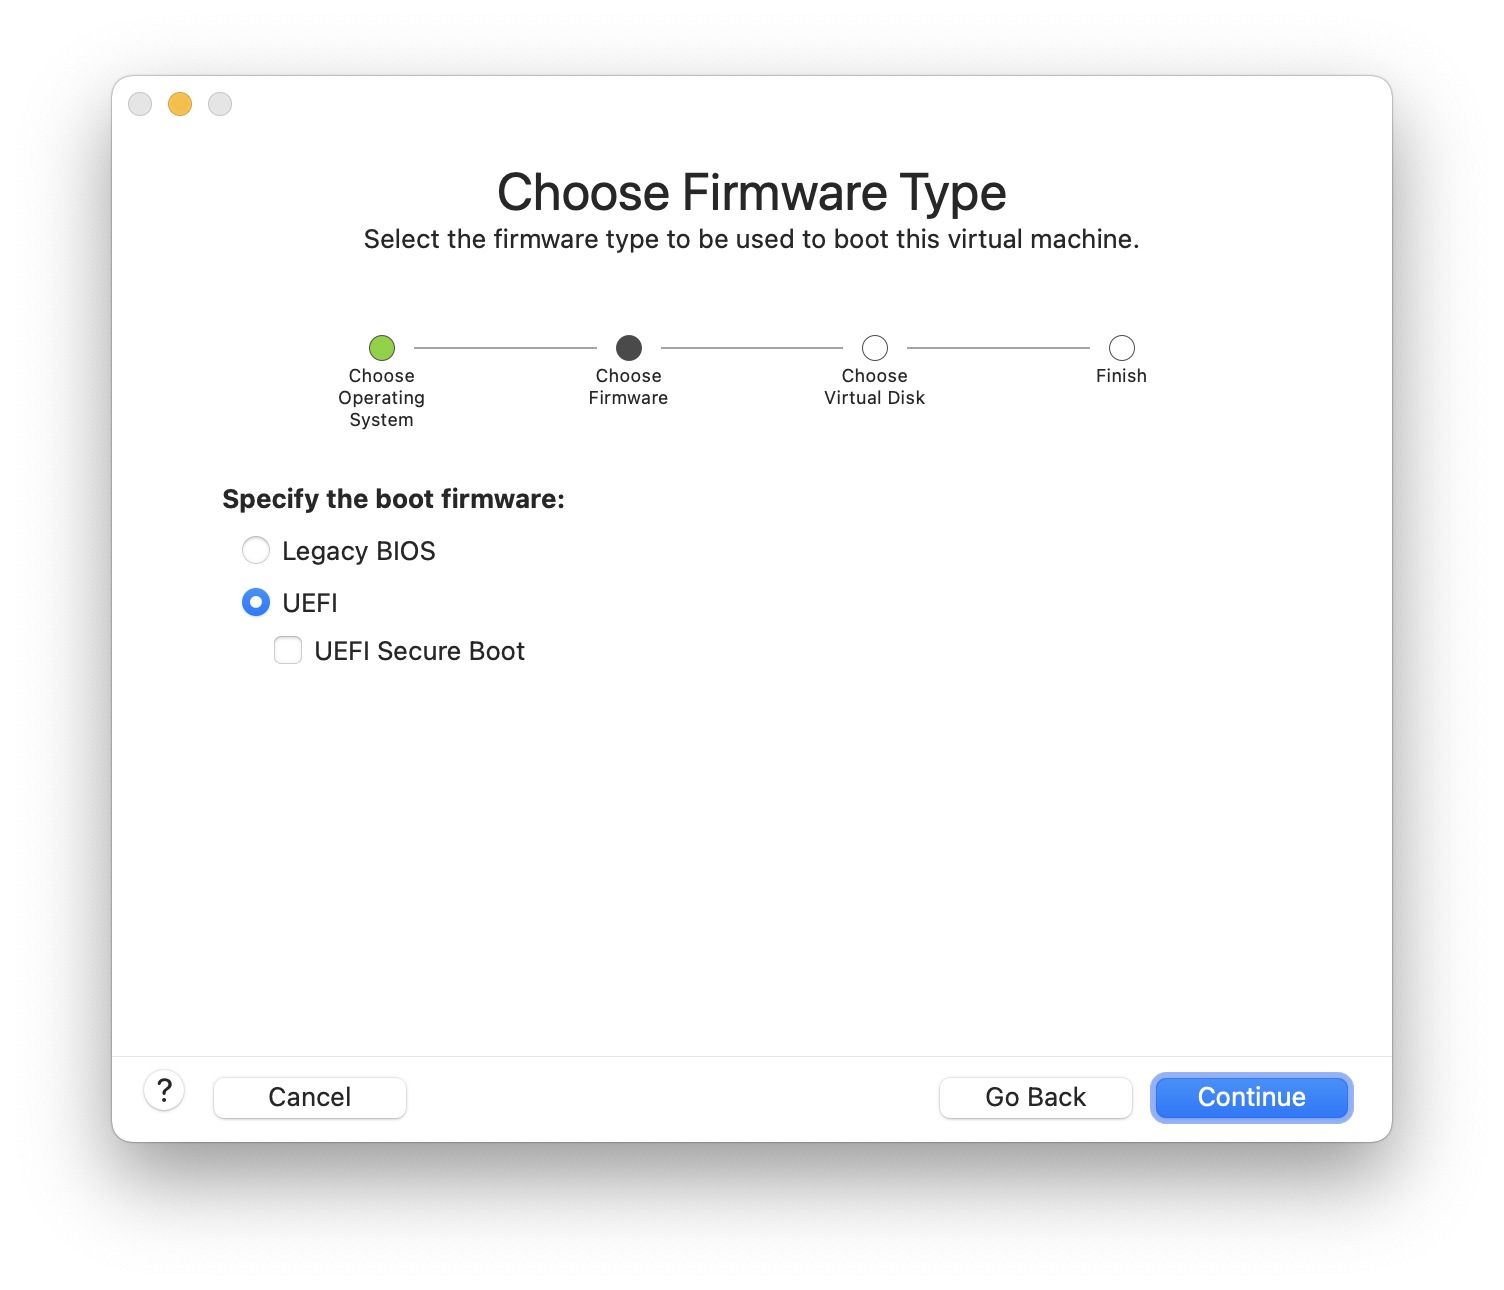
Choose the firmware(UEFI is recommended):
Choose and click :
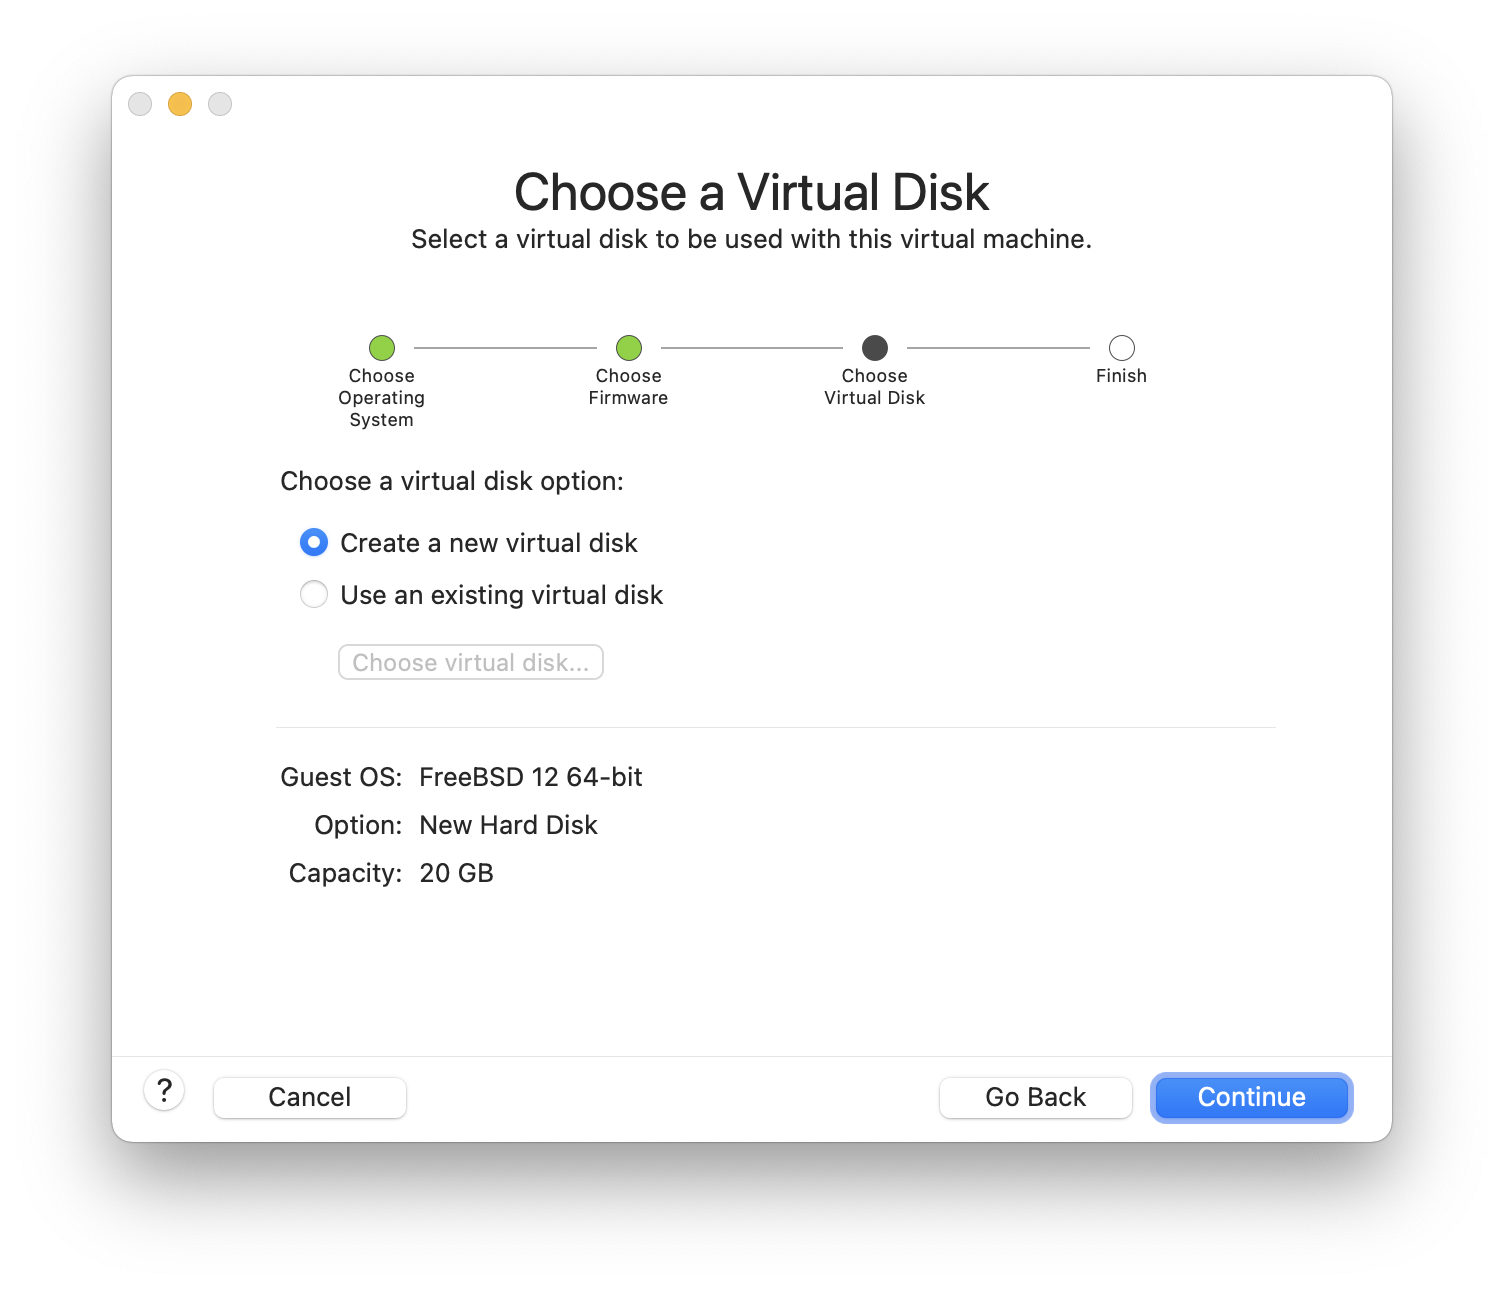
Check the configuration and click :
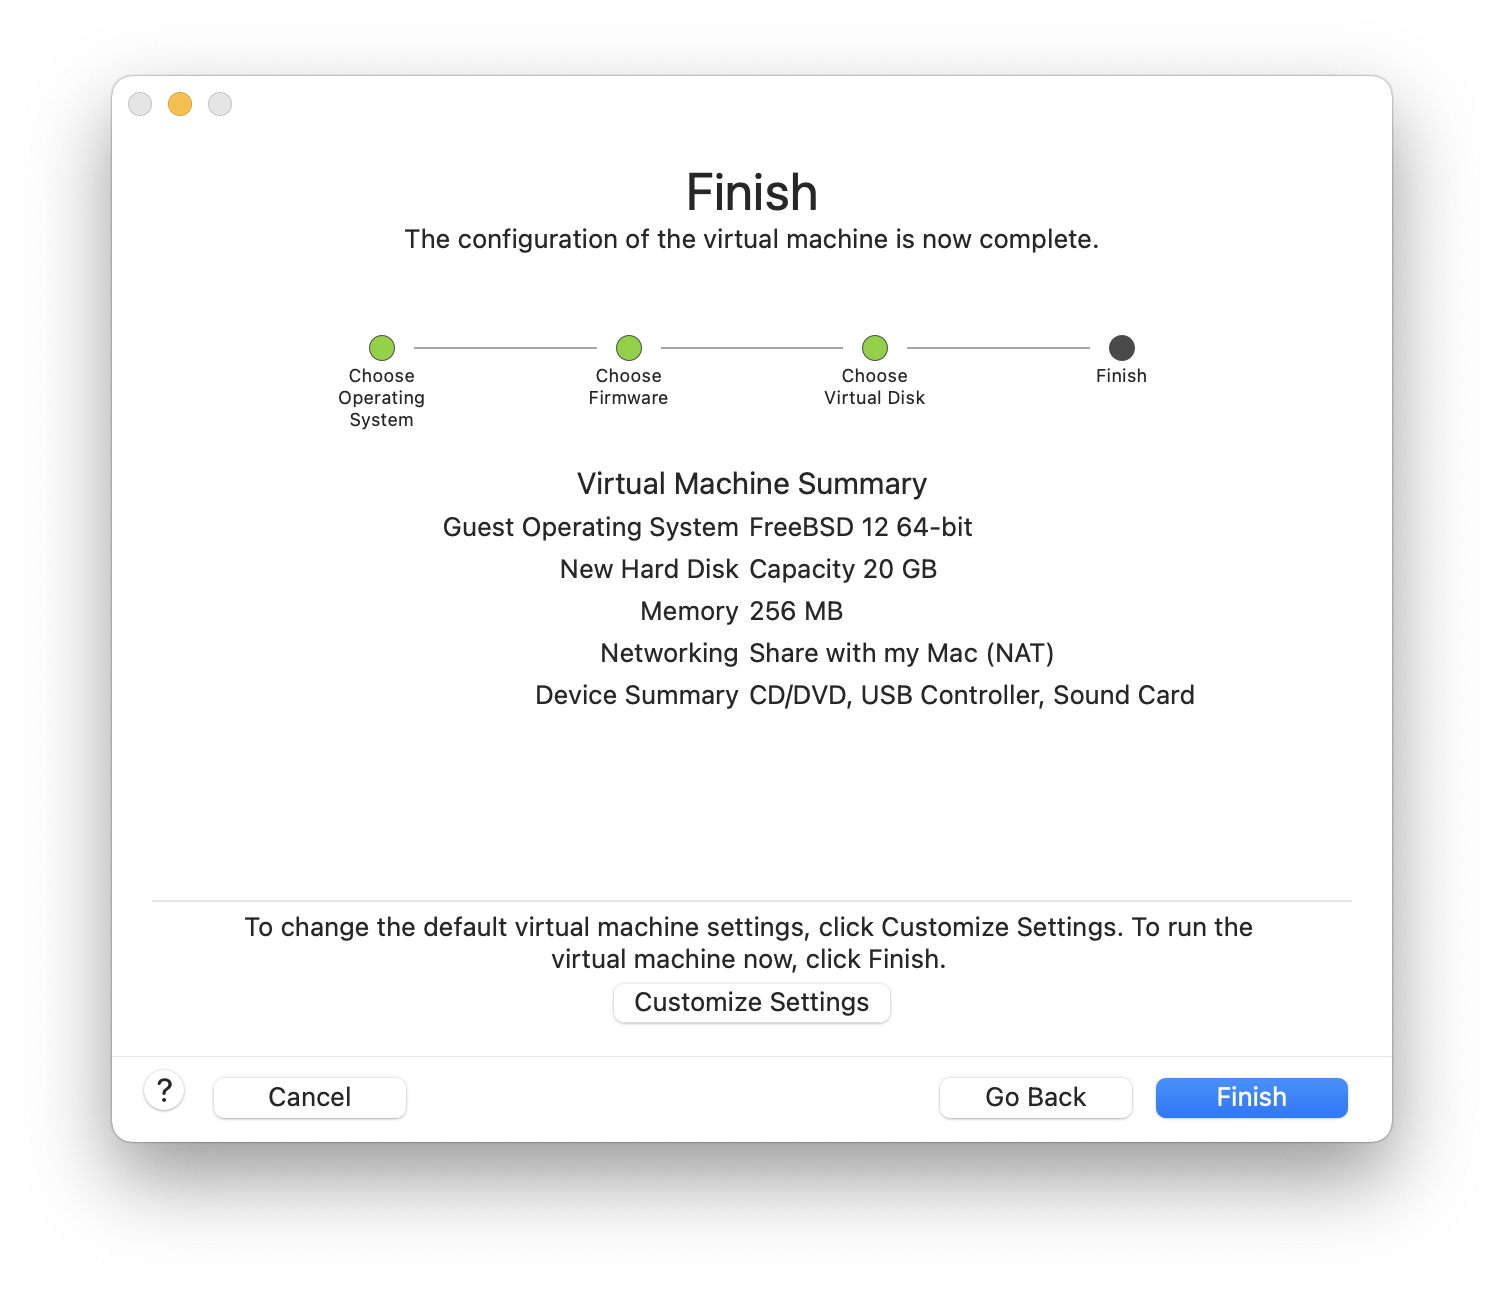
Choose the name of the virtual machine and the directory where it should be saved:
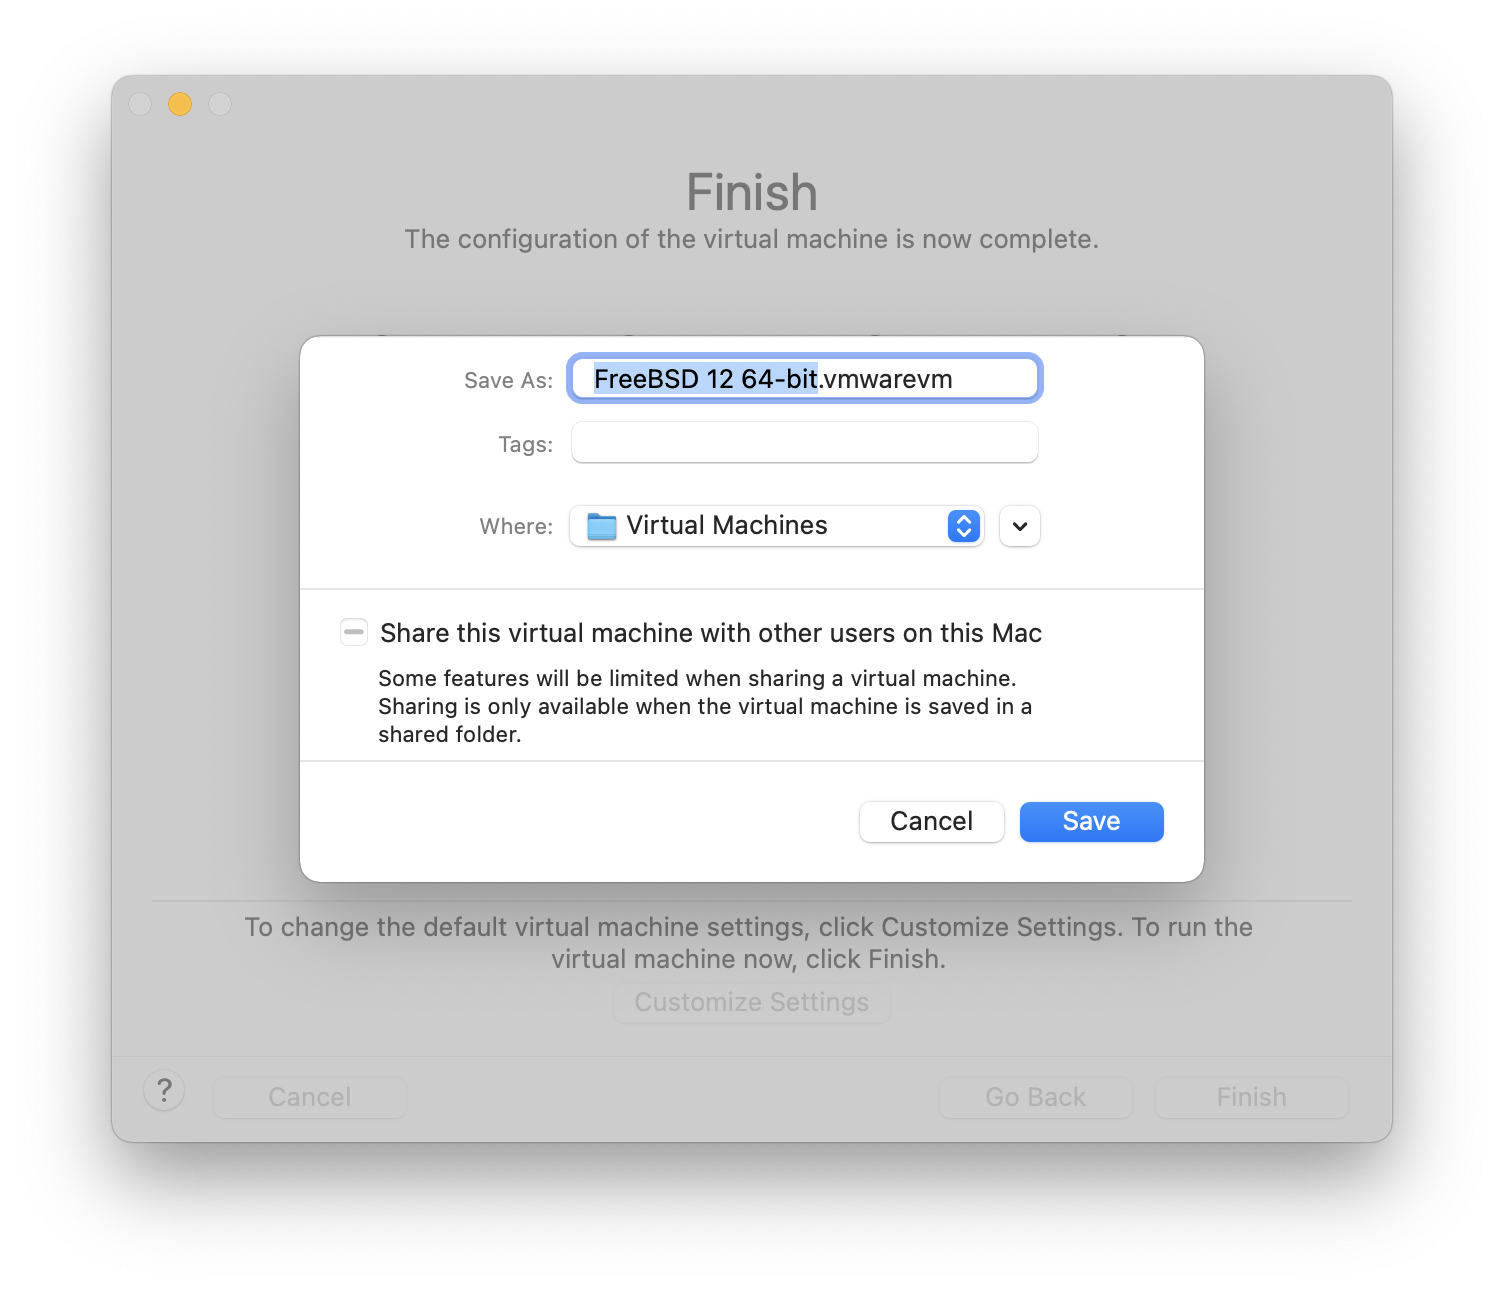
Press command+E to open virtual machine settings and click :
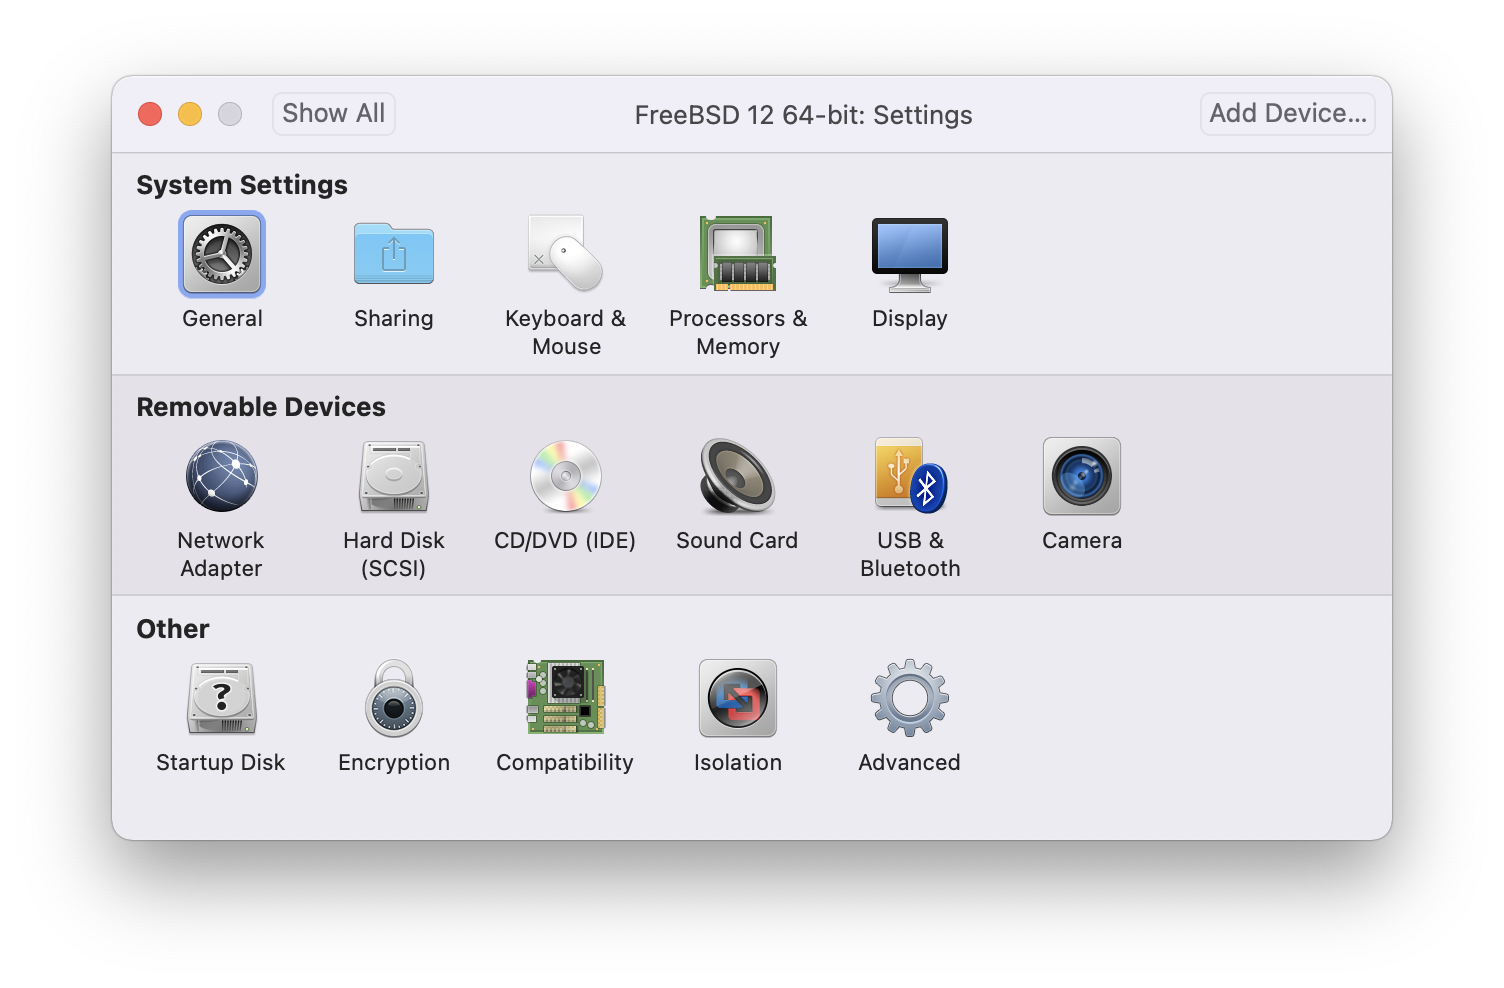
Choose FreeBSD ISO image or from a CD/DVD:
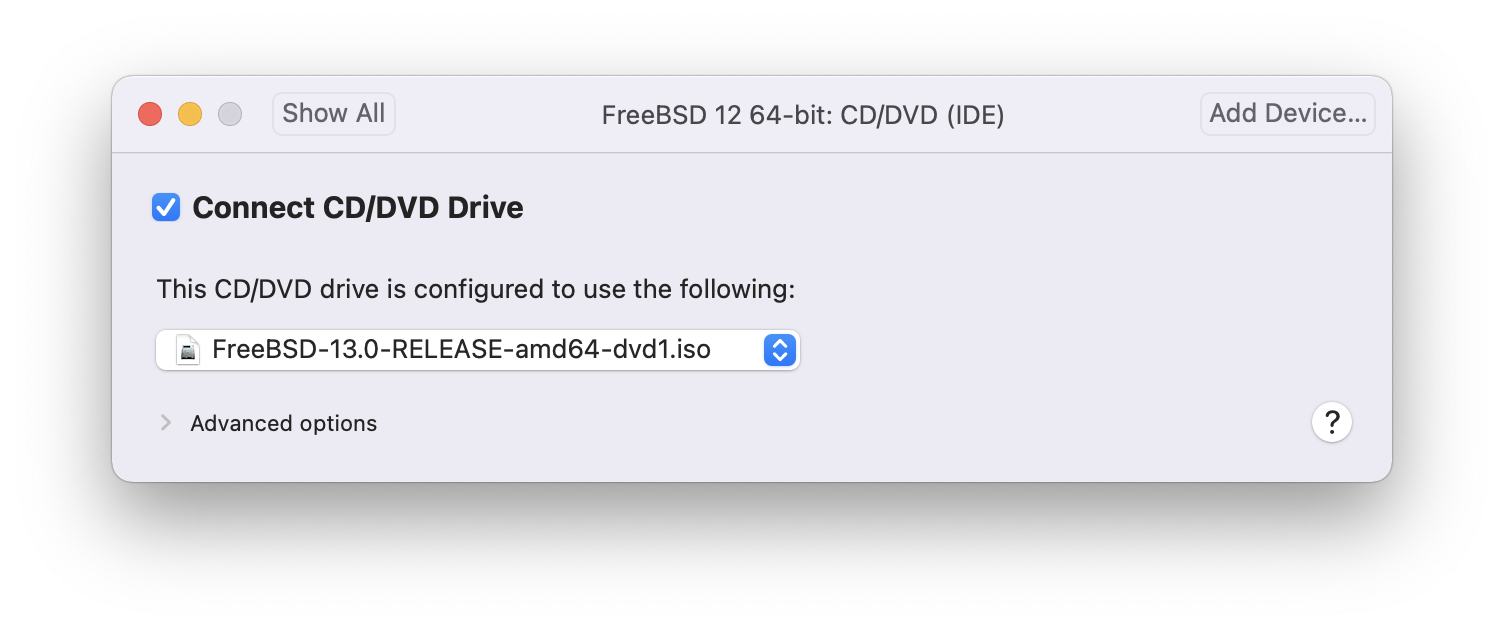
Start the virtual machine:
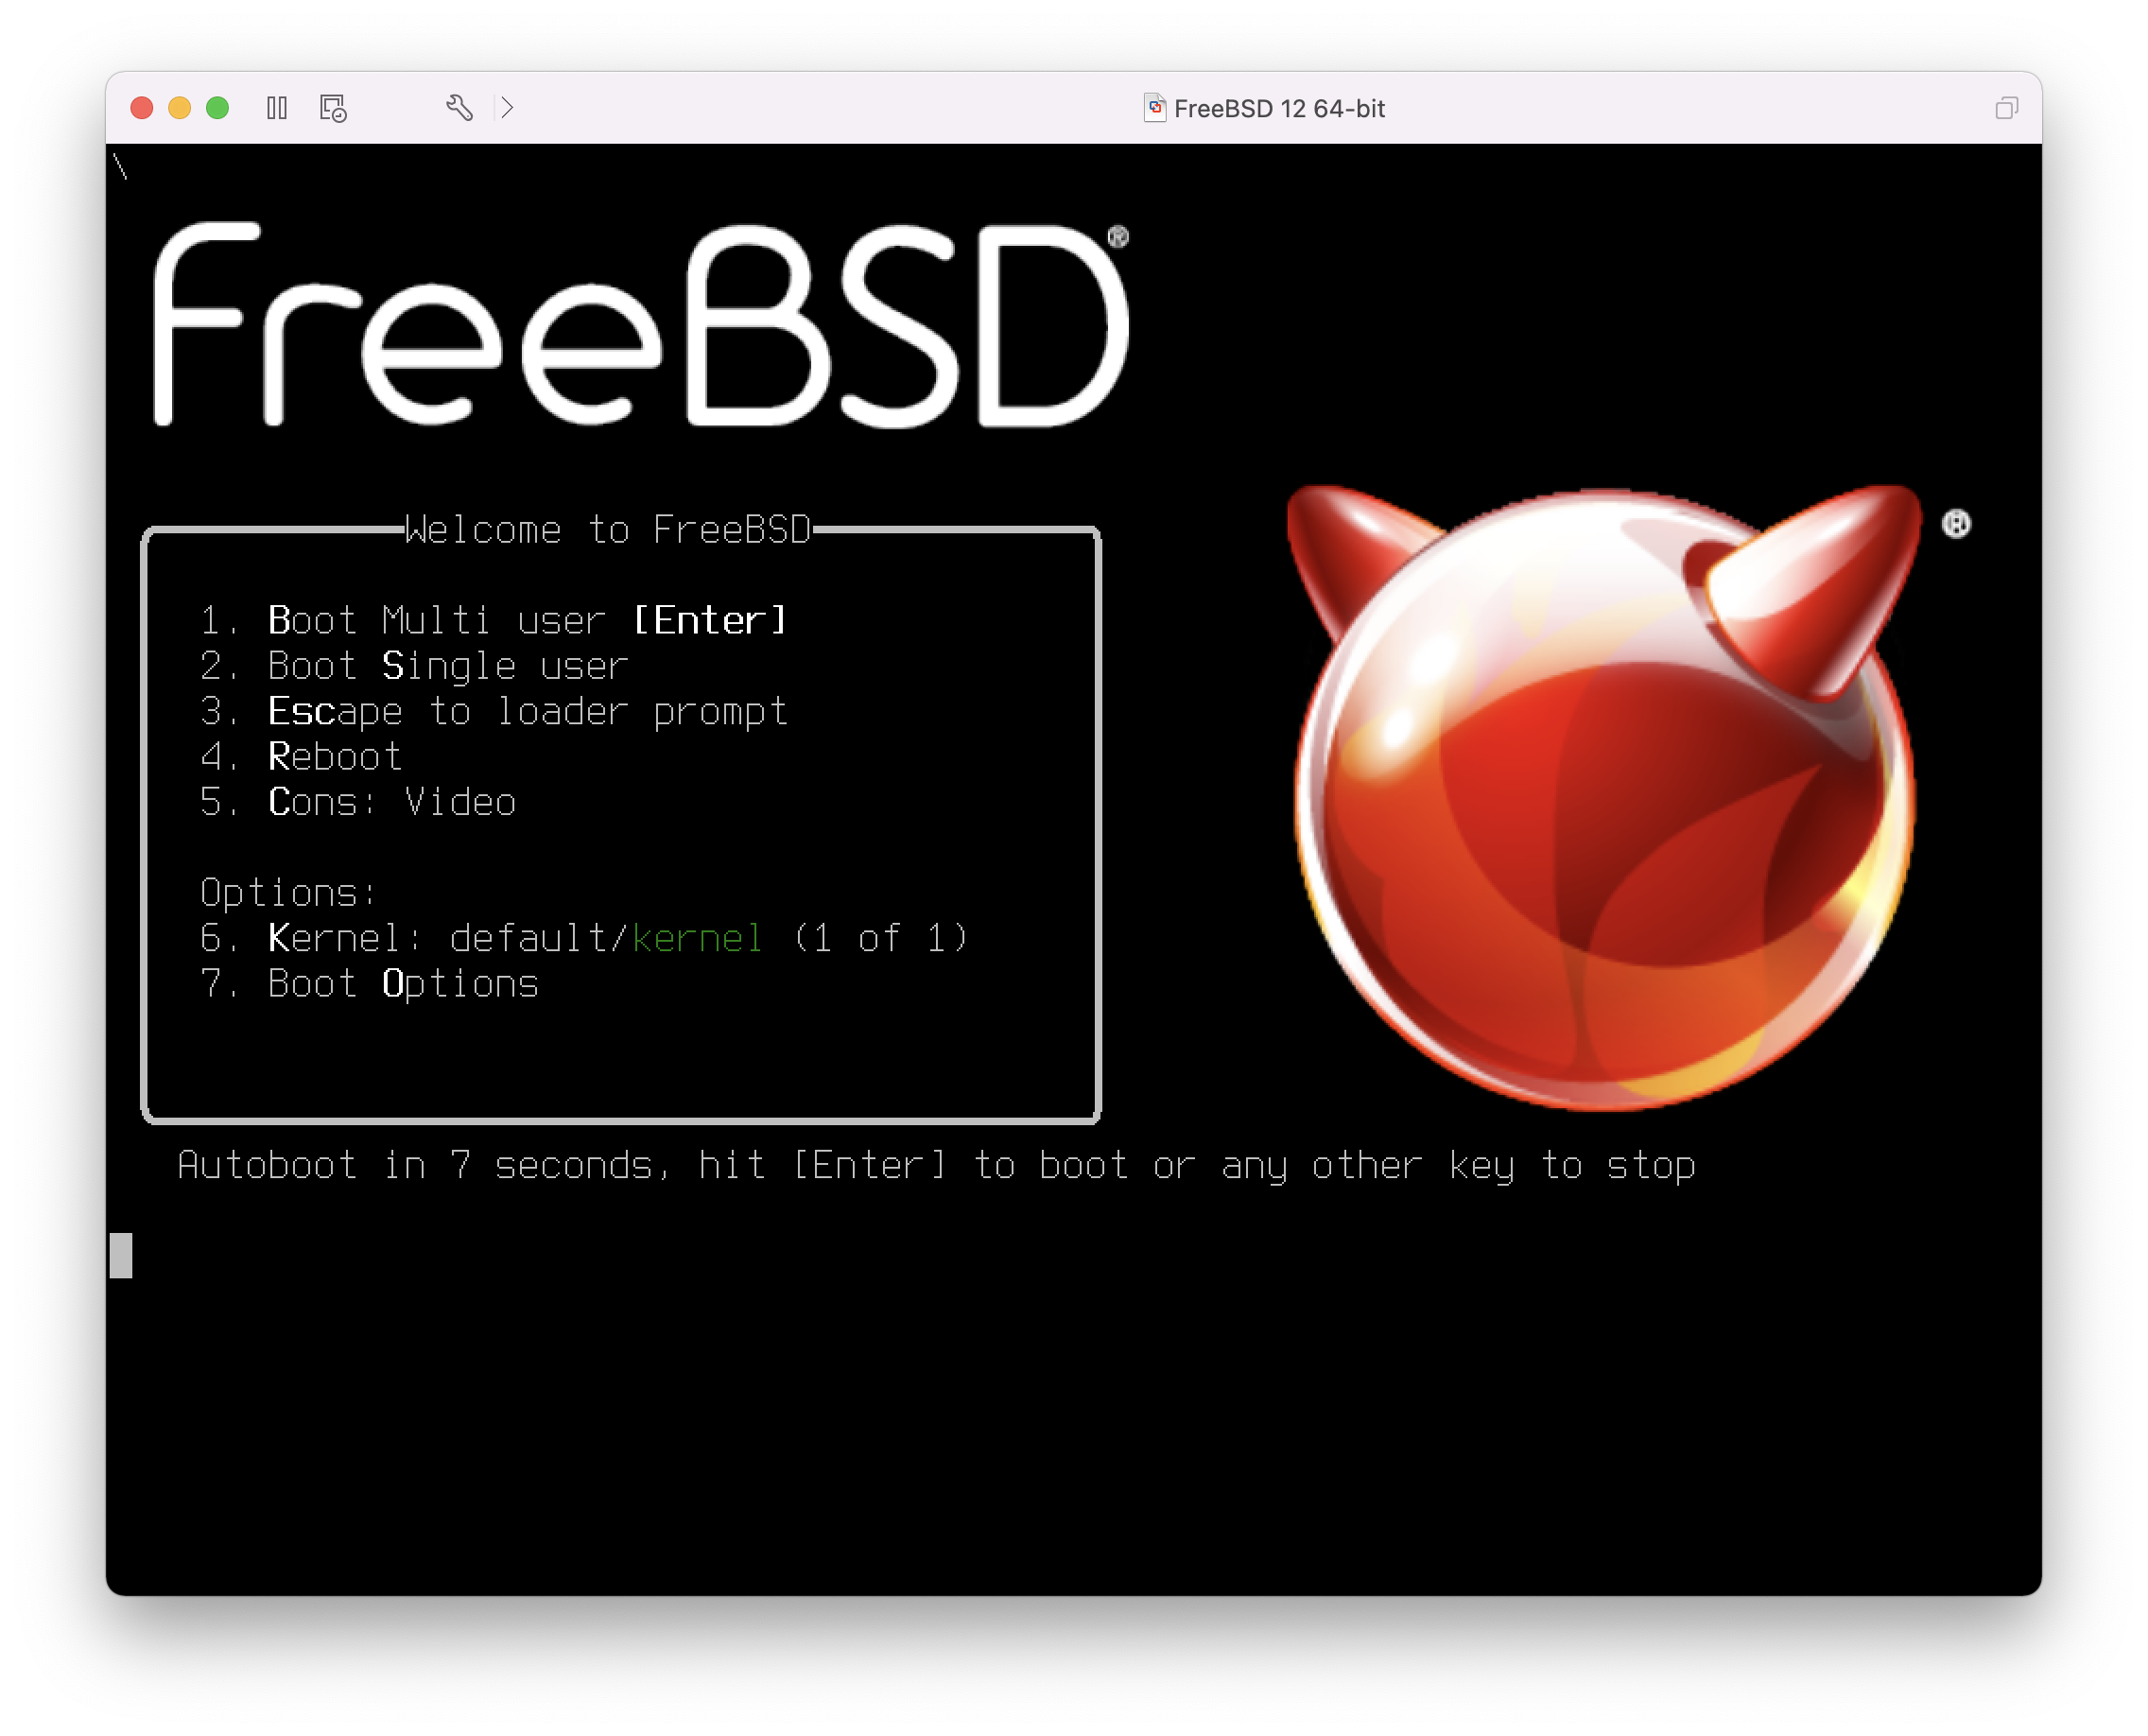
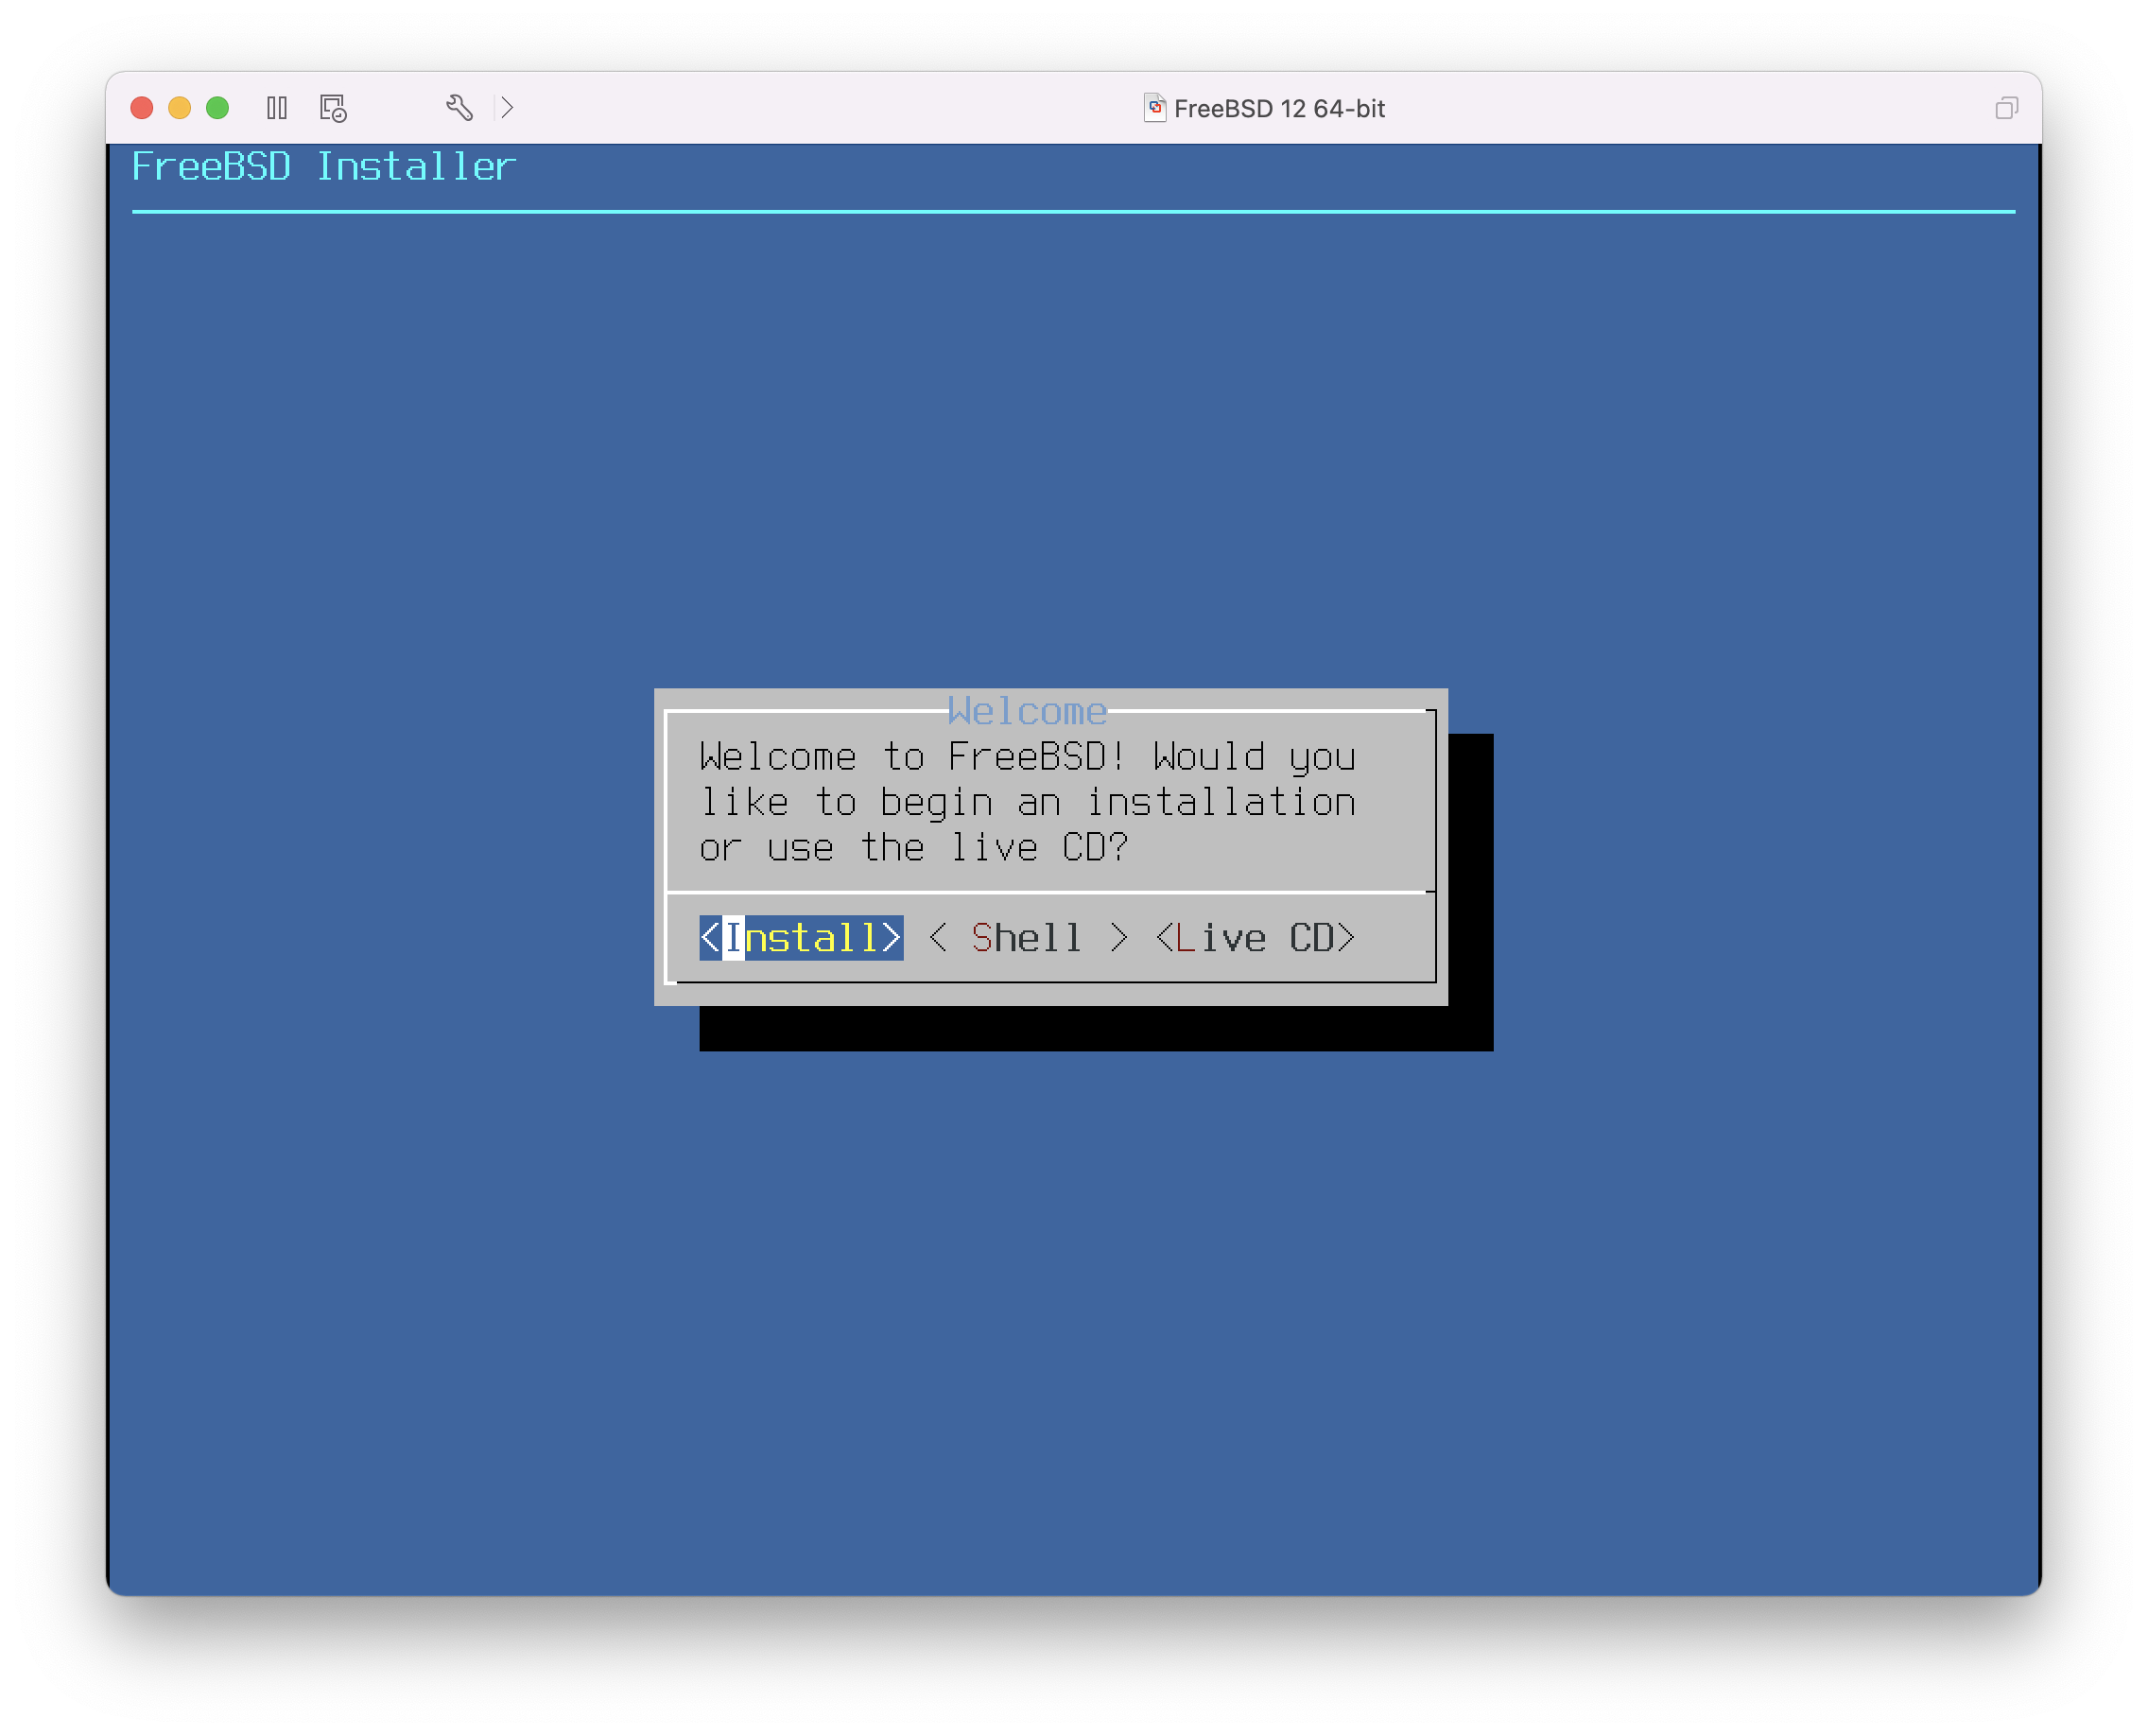
Install FreeBSD as usual:
Once the install is complete, the settings of the virtual machine can be modified, such as memory usage and the number of CPUs the virtual machine will have access to:
The System Hardware settings of the virtual machine cannot be modified while the virtual machine is running. |
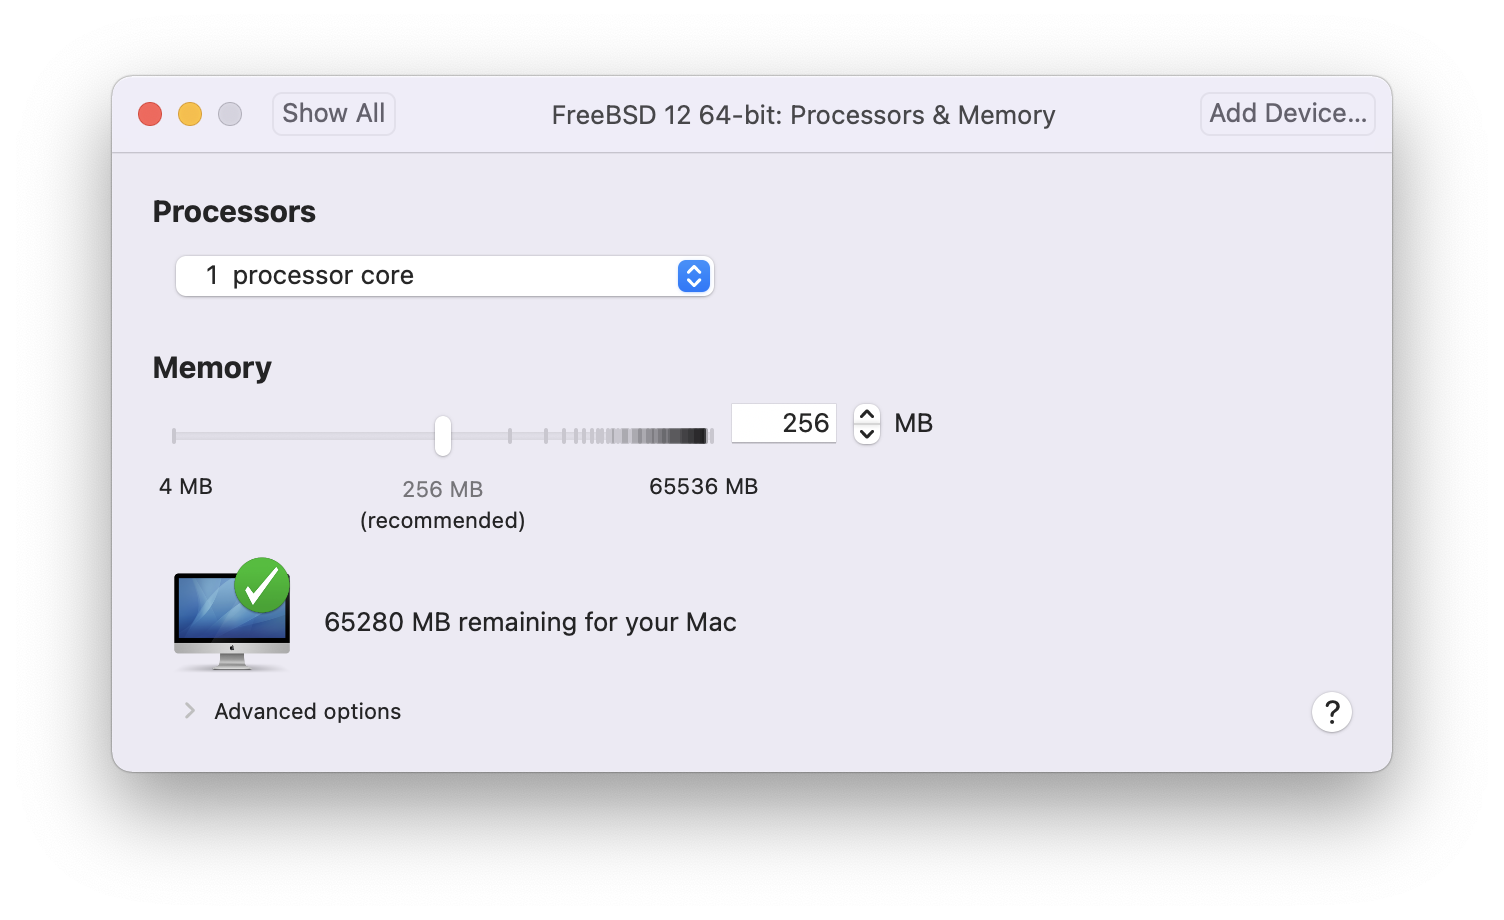
The status of the CD-ROM device. Normally the CD/DVD/ISO is disconnected from the virtual machine when it is no longer needed.

The last thing to change is how the virtual machine will connect to the network. To allow connections to the virtual machine from other machines besides the host, choose . Otherwise, is preferred so that the virtual machine can have access to the Internet, but the network cannot access the virtual machine.
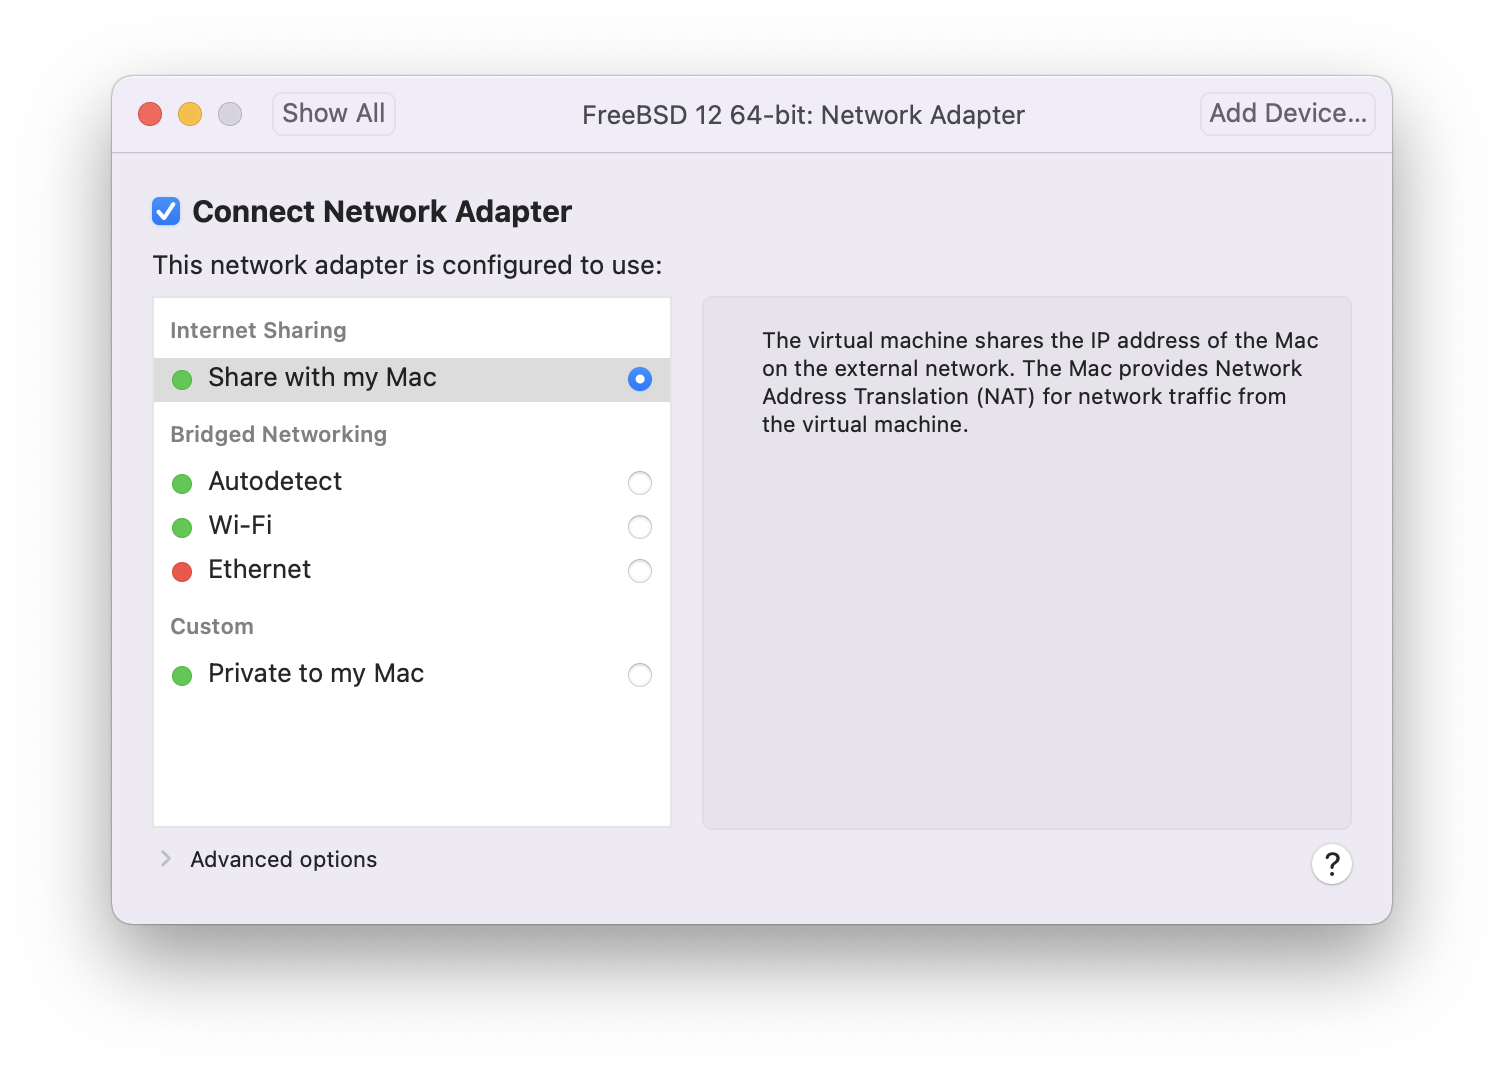
After modifying the settings, boot the newly installed FreeBSD virtual machine.
24.3.2. Configuring FreeBSD on VMware Fusion
After FreeBSD has been successfully installed on macOS® X with VMware Fusion, there are a number of configuration steps that can be taken to optimize the system for virtualized operation.
Set Boot Loader Variables
The most important step is to reduce the
kern.hztunable to reduce the CPU utilization of FreeBSD under the VMware Fusion environment. This is accomplished by adding the following line to /boot/loader.conf:kern.hz=100
Without this setting, an idle FreeBSD VMware Fusion guest will use roughly 15% of the CPU of a single processor iMac®. After this change, the usage will be closer to 5%.
Create a New Kernel Configuration File
Configure Networking
The most basic networking setup uses DHCP to connect the virtual machine to the same local area network as the host Mac®. This can be accomplished by adding
ifconfig_em0="DHCP"to /etc/rc.conf. More advanced networking setups are described in Advanced Networking.Install drivers and open-vm-tools
To run FreeBSD smoothly on VMWare, drivers should be installed:
# pkg install xf86-video-vmware xf86-input-vmmouse open-vm-tools
24.4. FreeBSD as a Guest on VirtualBox™
FreeBSD works well as a guest in VirtualBox™. The virtualization software is available for most common operating systems, including FreeBSD itself.
The VirtualBox™ guest additions provide support for:
Clipboard sharing.
Mouse pointer integration.
Host time synchronization.
Window scaling.
Seamless mode.
These commands are run in the FreeBSD guest. |
First, install the emulators/virtualbox-ose-additions package or port in the FreeBSD guest. This will install the port:
# cd /usr/ports/emulators/virtualbox-ose-additions && make install cleanAdd these lines to /etc/rc.conf:
vboxguest_enable="YES"
vboxservice_enable="YES"
If ntpd(8) or ntpdate(8) is used, disable host time synchronization:
vboxservice_flags="--disable-timesync"
Xorg will automatically recognize the vboxvideo driver.
It can also be manually entered in /etc/X11/xorg.conf:
Section "Device"
	Identifier "Card0"
	Driver "vboxvideo"
	VendorName "InnoTek Systemberatung GmbH"
	BoardName "VirtualBox Graphics Adapter"
EndSection
To use the vboxmouse driver, adjust the mouse section in /etc/X11/xorg.conf:
Section "InputDevice"
	Identifier "Mouse0"
	Driver "vboxmouse"
EndSection
Shared folders for file transfers between host and VM are accessible by mounting them using mount_vboxvfs.
A shared folder can be created on the host using the VirtualBox GUI or via vboxmanage.
For example, to create a shared folder called myshare under /mnt/bsdboxshare for the VM named BSDBox, run:
# vboxmanage sharedfolder add 'BSDBox' --name myshare --hostpath /mnt/bsdboxshareNote that the shared folder name must not contain spaces. Mount the shared folder from within the guest system like this:
# mount_vboxvfs -w myshare /mnt24.5. FreeBSD as a Host with VirtualBox™
VirtualBox™ is an actively developed, complete virtualization package, that is available for most operating systems including Windows®, macOS®, Linux® and FreeBSD. It is equally capable of running Windows® or UNIX®-like guests. It is released as open source software, but with closed-source components available in a separate extension pack. These components include support for USB 2.0 devices. More information may be found on the Downloads page of the VirtualBox™ wiki. Currently, these extensions are not available for FreeBSD.
24.5.1. Installing VirtualBox™
VirtualBox™ is available as a FreeBSD package or port in emulators/virtualbox-ose. The port can be installed using these commands:
# cd /usr/ports/emulators/virtualbox-ose
# make install clean
One useful option in the port’s configuration menu is the GuestAdditions suite of programs.
These provide a number of useful features in guest operating systems, like mouse pointer integration (allowing the mouse to be shared between host and guest without the need to press a special keyboard shortcut to switch) and faster video rendering, especially in Windows® guests.
The guest additions are available in the Devices menu, after the installation of the guest is finished.
A few configuration changes are needed before VirtualBox™ is started for the first time. The port installs a kernel module in /boot/modules which must be loaded into the running kernel:
# kldload vboxdrvTo ensure the module is always loaded after a reboot, add this line to /boot/loader.conf:
vboxdrv_load="YES"
To use the kernel modules that allow bridged or host-only networking, add this line to /etc/rc.conf and reboot the computer:
vboxnet_enable="YES"
The vboxusers group is created during installation of VirtualBox™.
All users that need access to VirtualBox™ will have to be added as members of this group.
pw can be used to add new members:
# pw groupmod vboxusers -m yourusernameThe default permissions for /dev/vboxnetctl are restrictive and need to be changed for bridged networking:
# chown root:vboxusers /dev/vboxnetctl
# chmod 0660 /dev/vboxnetctl
To make this permissions change permanent, add these lines to /etc/devfs.conf:
own     vboxnetctl root:vboxusers
perm    vboxnetctl 0660
To launch VirtualBox™, type from an Xorg session:
% VirtualBoxFor more information on configuring and using VirtualBox™, refer to the official website. For FreeBSD-specific information and troubleshooting instructions, refer to the relevant page in the FreeBSD wiki.
24.5.2. VirtualBox™ USB Support
VirtualBox™ can be configured to pass USB devices through to the guest operating system. The host controller of the OSE version is limited to emulating USB 1.1 devices until the extension pack supporting USB 2.0 and 3.0 devices becomes available on FreeBSD.
For VirtualBox™ to be aware of USB devices attached to the machine, the user needs to be a member of the operator group.
# pw groupmod operator -m yourusernameThen, add the following to /etc/devfs.rules, or create this file if it does not exist yet:
[system=10]
add path 'usb/*' mode 0660 group operator
To load these new rules, add the following to /etc/rc.conf:
devfs_system_ruleset="system"
Then, restart devfs:
# service devfs restartRestart the login session and VirtualBox™ for these changes to take effect, and create USB filters as necessary.
24.5.3. VirtualBox™ Host DVD/CD Access
Access to the host DVD/CD drives from guests is achieved through the sharing of the physical drives.
Within VirtualBox™, this is set up from the Storage window in the Settings of the virtual machine.
If needed, create an empty IDECD/DVD device first.
Then choose the Host Drive from the popup menu for the virtual CD/DVD drive selection.
A checkbox labeled Passthrough will appear. This allows the virtual machine to use the hardware directly.
For example, audio CDs or the burner will only function if this option is selected.
In order for users to be able to use VirtualBox™DVD/CD functions, they need access to /dev/xpt0, /dev/cdN, and /dev/passN.
This is usually achieved by making the user a member of operator.
Permissions to these devices have to be corrected by adding these lines to /etc/devfs.conf:
perm cd* 0660
perm xpt0 0660
perm pass* 0660
# service devfs restart24.6. Virtualization with QEMU on FreeBSD
QEMU is a generic machine emulator and virtualizer that is completely open source software. It is developed by a large, active community and provides support for FreeBSD, OpenBSD, and NetBSD as well as other operating systems.
From the QEMU documentation:
QEMU can be used in several different ways. The most common is for System Emulation, where it provides a virtual model of an entire machine (CPU, memory, and emulated devices) to run a guest OS. In this mode the CPU may be fully emulated, or it may work with a hypervisor such as
KVM,XenorHypervisor.Frameworkto allow the guest to run directly on the host CPU.The second supported way to use QEMU is User Mode Emulation, where QEMU can launch processes compiled for one CPU on another CPU. In this mode the CPU is always emulated.
QEMU also provides a number of standalone command line utilities, such as the qemu-img(1) disk image utility that allows one to create, convert, and modify disk images.
QEMU can emulate a wide number of architectures including Arm™, i386, x86_64, MIPS™, s390X, SPARC™ (Sparc™ and Sparc64™), and others.
The list of QEMU System Emulator Targets is regularly kept up to date.
This section describes how to use QEMU for both System Emulation and User Mode Emulation on FreeBSD, and provides examples of using QEMU commands and command line utilities.
24.6.1. Installing QEMU Software
QEMU is available as a FreeBSD package or as a port in emulators/qemu. The package build includes reasonable options and defaults for most users and is the recommended method of installation.
# pkg install qemuThe package installation includes several dependencies. Once the installation is complete, create a link to the host version of QEMU that will be used most often. If the host is an Intel™ or AMD™ 64 bit system that will be:
# ln -s /usr/local/bin/qemu-system-x86_64 /usr/local/bin/qemuTest the installation by running the following command as a non-root user:
% qemuThis brings up a window with QEMU actively trying to boot from hard disk, floppy disk, DVD/CD, and PXE. Nothing has been set up yet, so the command will produce several errors and end with "No bootable device" as shown in Figure 1. However, it does show that the QEMU software has been installed correctly.
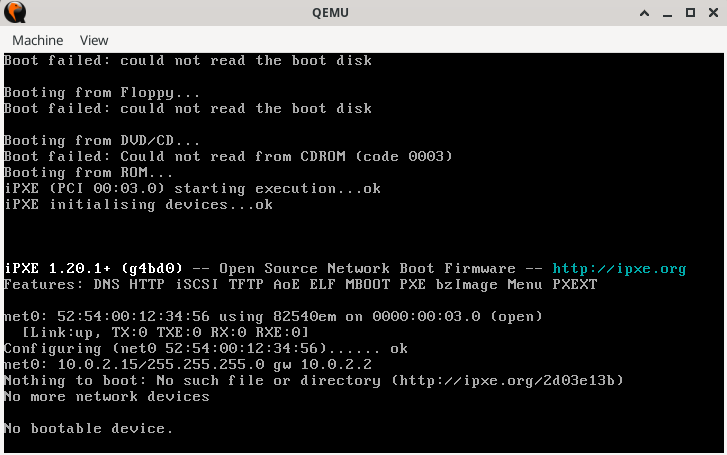
Figure 1. QEMU with no bootable image
24.6.2. Virtual Machine Install
QEMU is under very active development. Features and command options can change from one version to the next. This section provides examples developed with QEMU version 9.0.1 (August, 2024). When in doubt, always consult the QEMU Documentation particularly the About QEMU page which has links to supported build platforms, emulation, deprecated features, and removed features. |
Follow the steps below to create two virtual machines named "left", and "right". Most, but not all commands can be performed without root privileges.
Create a test environment to work with QEMU:
% mkdir -p ~/QEMU ~/QEMU/SCRIPTS ~/QEMU/ISO ~/QEMU/VMThe SCRIPTS directory is for startup scripts and utilities. The ISO directory is for the guest ISO boot images. The VM directory is where the virtual machine images (
VMs) will reside.Download a recent copy of FreeBSD into ~/QEMU/ISO:
% cd ~/QEMU/ISO
% fetch https://download.freebsd.org/releases/ISO-IMAGES/14.1/FreeBSD-14.1-RELEASE-amd64-dvd1.iso
Once the download is complete create a shorthand link. This shorthand link is used in the startup scripts below.
% ln -s FreeBSD-14.1-RELEASE-amd64-dvd1.iso fbsd.isoChange directory to the location for virtual machines (~/QEMU/VM). Run qemu-img(1) to create the disk images for the “left” VM:
% cd ~/QEMU/VM
% qemu-img create -f raw  left.img   15G
The QEMU
rawformat is designed for performance. The format is straightforward and has no overhead which makes it faster, especially for high performance or high throughput scenarios. The use case is for maximum performance where no additional features, such as snapshots, are needed. This format is used in the script for the "left" VM below.A separate format is
qcow2which uses QEMU’s "copy on write" technique for managing disk space. This technique does not require a complete 15G disk, just a stub version that is managed directly by the VM. The disk grows dynamically as the VM writes to it. This format supports snapshots, compression, and encryption. The use case for this format is for development, testing, and scenarios with the need of these advanced features. This format is used in the script for the "right" VM below.Run qemu-img(1) again to create the disk image for the "right" VM using
qcow2:% qemu-img create -f qcow2 -o preallocation=full,cluster_size=512K,lazy_refcounts=on right.qcow2 20GTo see the actual size of the file use:
% du -Ah right.qcow2Set up networking for both virtual machines with the following commands. In this example the host network interface is
em0. If necessary, change it to fit the interface for the host system. This must be done after every host machine restart to enable the QEMU guest VMs to communicate.# ifconfig tap0 create # ifconfig tap1 create # sysctl net.link.tap.up_on_open=1 net.link.tap.up_on_open: 0 -> 1 # sysctl net.link.tap.user_open=1 net.link.tap.user_open: 0 -> 1 # ifconfig bridge0 create # ifconfig bridge0 addm tap0 addm tap1 addm em0 # ifconfig bridge0 upThe above commands create two tap(4) devices (
tap0,tap1) and one if_bridge(4) device (bridge0). Then, they add thetapdevices and the local host interface (em0) to thebridge, and set two sysctl(8) entries to allow for normal users to open the tap device. These commands will allow the virtual machines to talk to the network stack on the host.Change to ~/QEMU/SCRIPTS, use the following script to start the first virtual machine, "left". This script uses the QEMU raw disk format.
# /usr/local/bin/qemu-system-x86_64  -monitor none \
  -cpu qemu64 \
  -vga std \
  -m 4096 \
  -smp 4   \
  -cdrom ../ISO/fbsd.iso \
  -boot order=cd,menu=on \
  -blockdev driver=file,aio=threads,node-name=imgleft,filename=../VM/left.img \
  -blockdev driver=raw,node-name=drive0,file=imgleft \
  -device virtio-blk-pci,drive=drive0,bootindex=1  \
  -netdev tap,id=nd0,ifname=tap0,script=no,downscript=no,br=bridge0 \
  -device e1000,netdev=nd0,mac=02:20:6c:65:66:74 \
  -name \"left\"
Save the above into a file (for example |
QEMU will start up a virtual machine in a separate window and boot the FreeBSD iso as shown in Figure 2.
All command options such as -cpu and -boot are fully described in the QEMU man page qemu(1).
If the mouse is clicked in the QEMU console window, QEMU will “grab” the mouse as shown in Figure 3. Type Ctl+Alt+G” to release the mouse. |

Figure 3. When QEMU Has Grabbed the Mouse
On FreeBSD, an initial QEMU installation can be somewhat slow. This is because the emulator writes filesystem formatting and metadata during first use. Subsequent operations are generally much faster. |
During the installation there are several points to note:
Select UFS as the filesystem. ZFS does not perform well with small memory sizes.
For networking use DHCP. If desired, configure IPv6 if supported by the local LAN.
When adding the default user, ensure they are a member of the wheel group.
Once the installation completes, the virtual machine reboots into the newly installed FreeBSD image.
Login as root and update the system as follows:
# freebsd-update fetch install
# reboot
After a successful installation, QEMU will boot the operating system installed on the disk, and not the installation program. |
QEMU supports a |
Login as root again and add any packages desired.
To utilize the X Window system in the guest, see the section "Using the X Window System" below.
This completes the setup of the "left" VM.
To install the "right" VM, run the following script: This script has the modifications needed for tap1, format=qcow2, the image filename, the MAC address, and the terminal window name. If desired, include the "-runas" parameter as described in the above note.
# /usr/local/bin/qemu-system-x86_64  -monitor none \
  -cpu qemu64 \
  -vga cirrus \
  -m 4096  -smp 4   \
  -cdrom ../ISO/fbsd.iso \
  -boot order=cd,menu=on \
  -drive if=none,id=drive0,cache=writeback,aio=threads,format=qcow2,discard=unmap,file=../VM/right.qcow2 \
  -device virtio-blk-pci,drive=drive0,bootindex=1  \
  -netdev tap,id=nd0,ifname=tap1,script=no,downscript=no,br=bridge0 \
  -device e1000,netdev=nd0,mac=02:72:69:67:68:74 \
  -name \"right\"
Once the installation is complete, the "left" and "right" machines can communicate with each other and with the host. If there are strict firewall rules on the host, consider adding or modifying rules to allow the bridge and tap devices to communicate with each other.
24.6.3. Usage Tips
24.6.3.1. Using the X Window System
Installing Xorg describes how to set up the X Window system.
Refer to that guide for initial X Window setup then consult Desktop Environments on how to set up a complete desktop.
This section demonstrates use of the XFCE desktop.
Once the installation is complete, login as a regular user, then type:
% startxThe XFCE4 window manager should start up and present a functioning graphical desktop as in Figure 4. On initial startup, it may take up to a minute to display the desktop. See the documentation at the XFCE website for usage details.
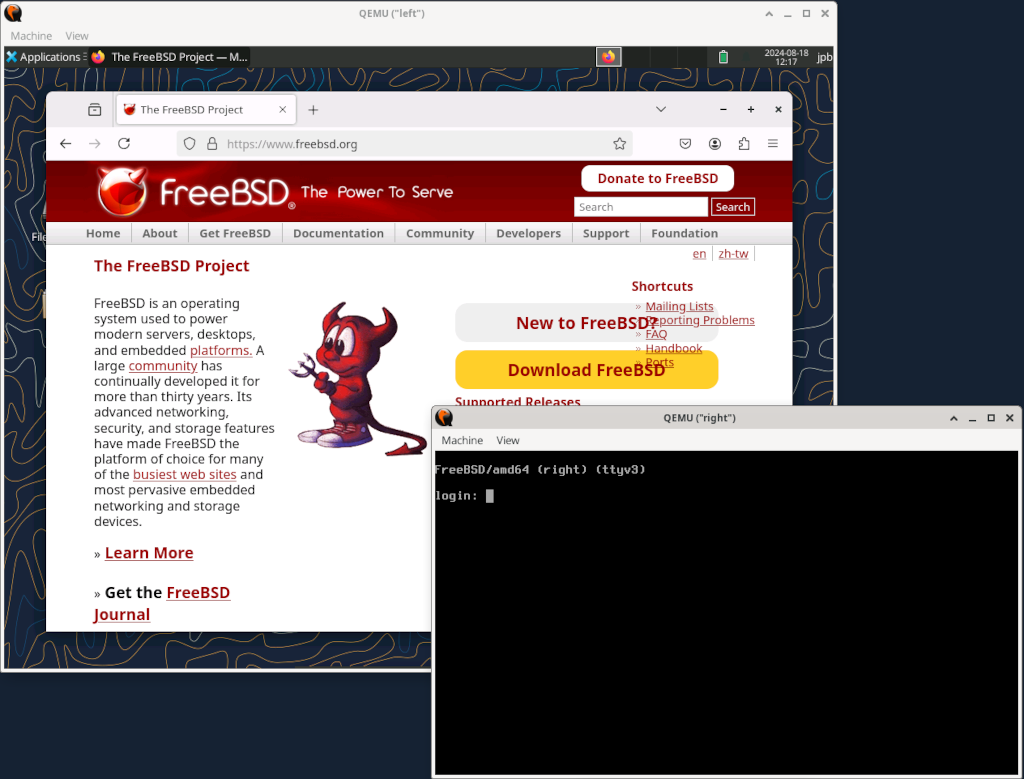
Figure 4. Both QEMU VMs
Adding more memory to the guest system may speed up the graphical user interface. |
Here, the "left" VM has had the X Window system installed, while the "right" VM is still in text mode.
24.6.3.2. Using the QEMU Window
The QEMU window functions as a full FreeBSD console, and is capable of running multiple virtual terminals, just like a bare-metal system.
To switch to another virtual console, click into the QEMU window and type Alt+F2 or Alt+F3.
FreeBSD should switch to another virtual console.
Figure 5 shows the "left" VM displaying the virtual console on ttyv3.
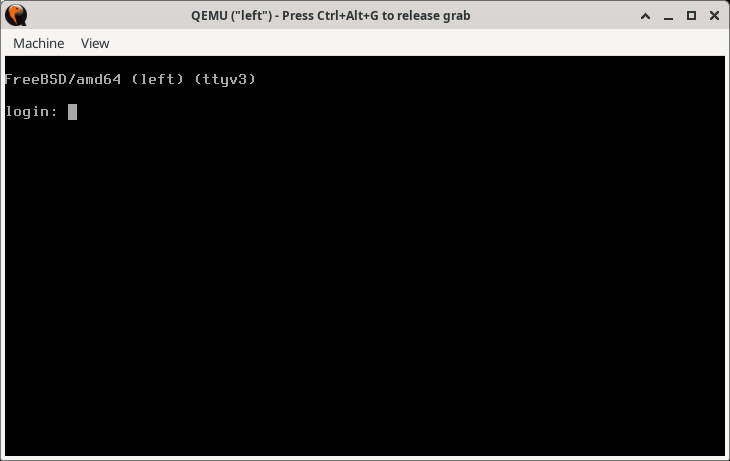
Figure 5. Switching to Another Virtual Console in the QEMU Window
The host current desktop manager or window manager may be already setup for another function with the Alt+F1, Alt+F2 key sequences. If so, try typing Ctl+Alt+F1, Ctl+Alt+F2, or some other similar key combination. Check the window manager or desktop manager documentation for details. |
24.6.3.3. Using the QEMU Window Menus
Another feature of the QEMU window is the View menu and the Zoom controls.
The most useful is Zoom to Fit.
When this menu selection is clicked, it is then possible to resize the QEMU window by clicking the window corner controls and resizing the window.
Figure 6 shows the effect of resizing the "left" window while in graphics mode.
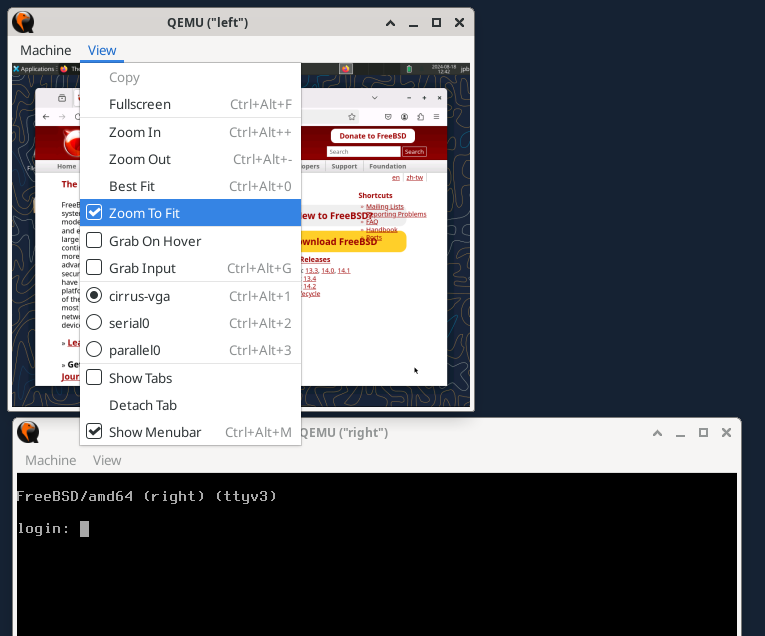
Figure 6. Using the View Menu
Zoom to Fit Option24.6.3.4. Other QEMU Window Menu Options
Also shown in the View menu are
cirrus-vga,serial0, andparallel0options. These allow for switching input/output to the selected device.
The QEMU window Machine menu allows for four types of control over the guest VM:
Pauseallows for pausing the QEMU virtual machine. This may be helpful in freezing a fast scrolling window.Resetimmediately resets the virtual machine back at cold "power on" state. As with a real machine, it is not recommended unless absolutely necessary.Power Downsimulates an ACPI shutdown signal and the operating system goes through a graceful shutdown.Quitpowers off the virtual machine immediately - also not recommended unless necessary.
24.6.4. Adding a Serial Port Interface to a Guest VM
To implement a serial console, a guest VM running FreeBSD needs to insert
console="comconsole"
in /boot/loader.conf to allow the use of the FreeBSD serial console.
The updated configuration below shows how to implement the serial console on the guest VM. Run the script to start the VM.
echo
echo "NOTE: telnet startup server running on guest VM!"
echo "To start QEMU, start another session and telnet to localhost port 4410"
echo

# /usr/local/bin/qemu-system-x86_64  -monitor none \
  -serial telnet:localhost:4410,server=on,wait=on\
  -cpu qemu64 \
  -vga std \
  -m 4096 \
  -smp 4   \
  -cdrom ../ISO/fbsd.iso \
  -boot order=cd,menu=on \
  -blockdev driver=file,aio=threads,node-name=imgleft,filename=../VM/left.img \
  -blockdev driver=raw,node-name=drive0,file=imgleft \
  -device virtio-blk-pci,drive=drive0,bootindex=1  \
  -netdev tap,id=nd0,ifname=tap0,script=no,downscript=no,br=bridge0 \
  -device e1000,netdev=nd0,mac=02:20:6c:65:66:74 \
  -name \"left\"
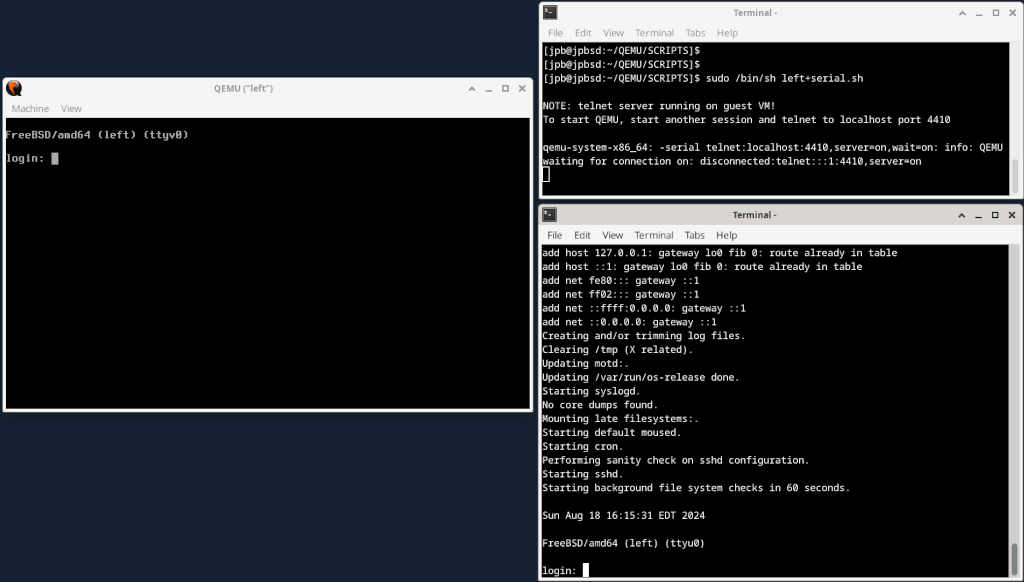
Figure 7. Enabling a Serial Port over TCP
In Figure 7, the serial port is redirected to a TCP port on the host system at VM startup and the QEMU monitor waits (wait=on) to activate the guest VM until a telnet(1) connection occurs on the indicated localhost port.
After receiving a connection from a separate session, the FreeBSD system starts booting and looks for a console directive in /boot/loader.conf.
With the directive "console=comconsole", FreeBSD starts up a console session on a serial port.
The QEMU monitor detects this and directs the necessary character I/O on that serial port to the telnet session on the host.
The system boots and once finished, login prompts are enabled on the serial port (ttyu0) and on the console (ttyv0).
It is important to note that the this serial redirect over TCP takes place outside the virtual machine. There is no interaction with any network on the virtual machine and therefore it is not subject to any firewall rules. Think of it like a dumb terminal sitting on an RS-232 or USB port on a real machine.
24.6.4.1. Notes on Using the Serial Console
On the serial console, if the window is resized, execute resizewin(1) to update the terminal size.
It may be desirable (even necessary) to stop syslog message from being sent to the console (both the QEMU console and the serial port). Consult syslog.conf(5) for details on redirecting console messages.
Once the /boot.loader.conf has been updated to permit a serial console, the guest VM will attempt to boot from the serial port every time. Ensure that the serial port is enabled as shown in the listing above, or update the /boot/loader.conf file to not require a serial console. |
24.6.5. QEMU User Mode Emulation
QEMU also supports running applications that are precompiled on an architecture different from the host CPU. For example, it is possible to run a Sparc64 architecture operating system on an x86_64 host. This is demonstrated in the next section.
24.6.5.1. Setting up a SPARC64 Guest VM on an x86_64 Host
Setting up a new VM with an architecture different from the host involves several steps:
Getting the software that will run on the guest VM
Creating a new disk image for the guest VM
Setting up a new QEMU script with the new architecture
Performing the install
In the following procedure a copy of OpenBSD 6.8 SPARC64 software is used for this QEMU User Mode Emulation exercise.
Not all versions of OpenBSD Sparc64 work on QEMU. OpenBSD version 6.8 is known to work and was selected as the example for this section. |
Download OpenBSD 6.8 Sparc64 from an OpenBSD archive.
On the OpenBSD download sites, only the most current versions are maintained. It is necessary to search an archive to obtain past releases.
% cd ~/QEMU/ISO
% fetch https://mirror.planetunix.net/pub/OpenBSD-archive/6.8/sparc64/install68.iso
Creating a new disk image for the Sparc64 VM is similar to the "right" VM above. This case uses the QEMU qcow2 format for the disk:
% cd ~/QEMU/VM
qemu-img create -f qcow2 -o preallocation=full,lazy_refcounts=on sparc64.qcow2 16G
Use the script below for the new Sparc64 architecture. As with the above example, run the script, then start a new session and
telnetto localhost on the port indicated:echo echo "NOTE: telnet startup server running on guest VM!" echo "To start QEMU, start another session and telnet to localhost port 4410" echo # /usr/local/bin/qemu-system-sparc64 \ -serial telnet:localhost:4410,server=on,wait=on \ -machine sun4u,usb=off \ -smp 1,sockets=1,cores=1,threads=1 \ -rtc base=utc \ -m 1024 \ -boot d \ -drive file=../VM/sparc64.qcow2,if=none,id=drive-ide0-0-1,format=qcow2,cache=none \ -cdrom ../ISO/install68.iso \ -device ide-hd,bus=ide.0,unit=0,drive=drive-ide0-0-1,id=ide0-0-1 \ -msg timestamp=on \ -net nic,model=sunhme -net user \ -nographic \ -name \"sparc64\"
Note the following:
The
-boot doption boots from the QEMU CDROM device which is set as-cdrom ../ISO/install68.iso.As before, the
telnetserver option is set to wait for a separate connection on port 4410. Start up another session and use telnet(1) to connect to localhost on port 4410.The script sets the
-nographicoption meaning there is only serial port I/O. There is no graphical interface.Networking is not set up through the tap(4) / if_bridge(4) combination. This example uses a separate method of QEMU networking known as "Serial Line Internet Protocol" (SLIRP), sometimes referred to as "User Mode Networking". Documentation on this and other QEMU networking methods is here: QEMU Networking Documentation
If everything is set correctly, the system will boot as shown in Figure 8.
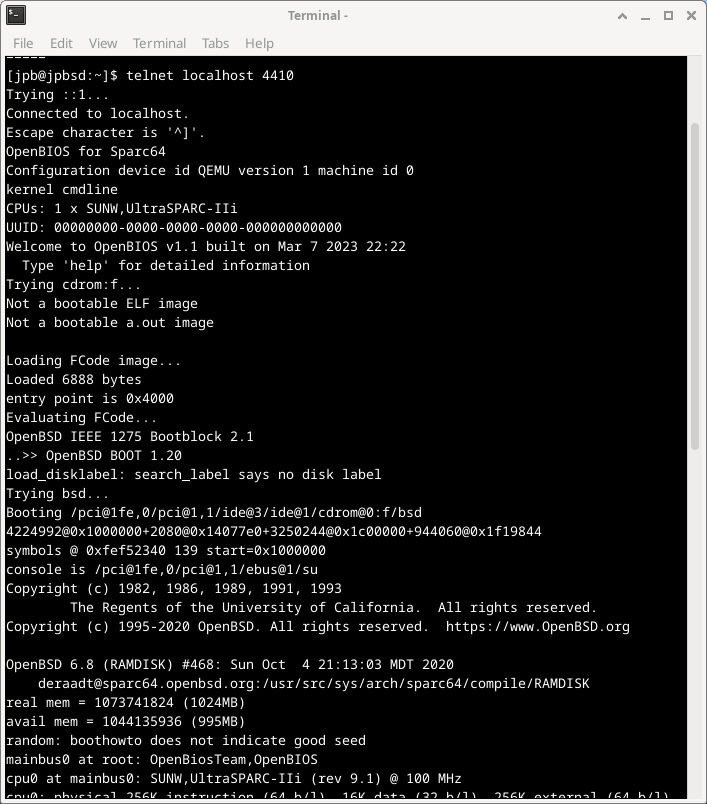
Figure 8. QEMU Booting OpenBSD 6.8 Sparc64 from CDROM During User Mode Emulation
Once the system is installed, modify the script and change the boot parameter to -boot c.
This will indicate to QEMU to boot from the supplied hard disk, not the CDROM.
The installed system can be used just like any other guest virtual machine. However, the underlying architecture of the guest is Sparc64, not x86_64.
If the system is halted at the OpenBios console prompt |
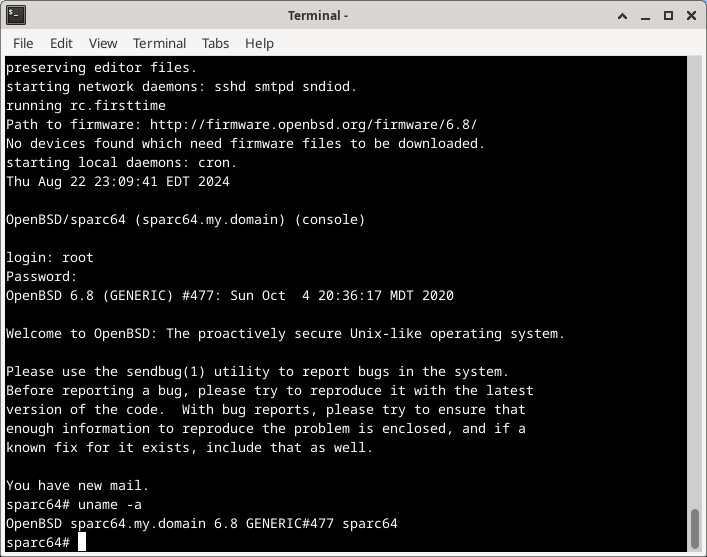
Figure 9. QEMU Booting from CDROM During User Mode Emulation
24.6.6. Using the QEMU Monitor
The QEMU monitor controls a running QEMU emulator (guest VM).
Using the monitor, it is possible to:
Dynamically remove or insert devices, including disks, network interfaces, CD-ROMs, or floppies
Freeze/unfreeze the guest VM, and save or restore its state from a disk file
Gather information about the state of the VM and devices
Change device settings on the fly
As well as many other operations.
The most common uses of the monitor are to examine the state of the VM, and to add, delete, or change devices. Some operations such as migrations are only available under hypervisor accelerators such as KVM, Xen, etc. and are not supported on FreeBSD hosts.
When using a graphical desktop environment, the simplest way to use the QEMU monitor is the -monitor stdio option when launching QEMU from a terminal session.
# /usr/local/bin/qemu-system-x86_64  -monitor stdio \
  -cpu qemu64 \
  -vga cirrus \
  -m 4096  -smp 4   \
  ...
This results in a new prompt (qemu) in the terminal window as shown in Figure 10.
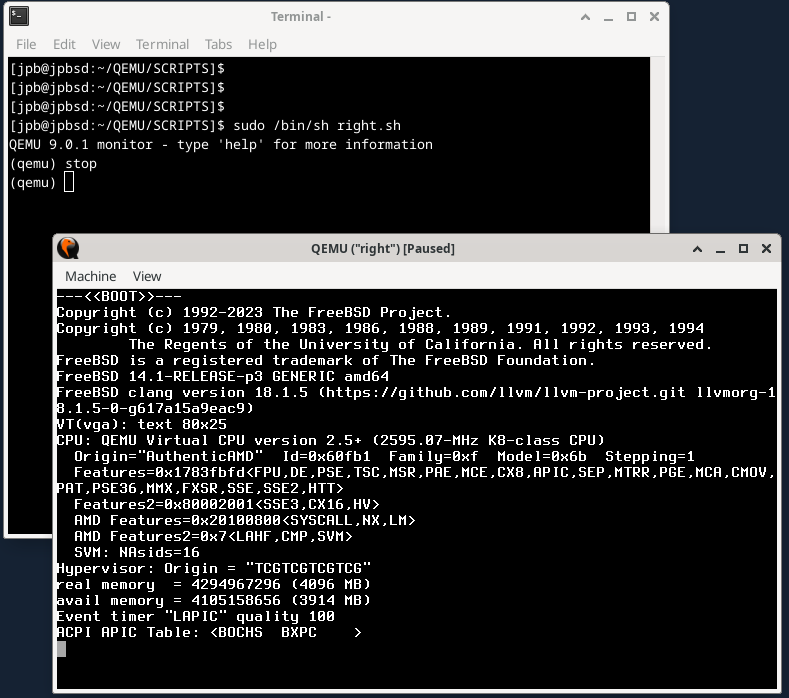
Figure 10. QEMU Monitor Prompt and "stop" Command
The image also shows the stop command freezing the system during the FreeBSD boot sequence.
The system will remain frozen until the cont command is entered in the monitor.
24.6.6.1. Adding a New Disk to the VM
To add a new disk to a running VM, the disk needs to be prepared as above:
% cd ~/QEMU/VM
% qemu-img create -f raw  new10G.img  10G
Figure 11 shows the monitor command sequence needed to add a new disk in the VM.
Once the device has been added with the device_add command in the monitor it shows up on the FreeBSD system console shown in the lower part of the figure.
The disk can be configured as needed.
Note that the new disk must be added to the startup script if it is to be used after a VM reboot.
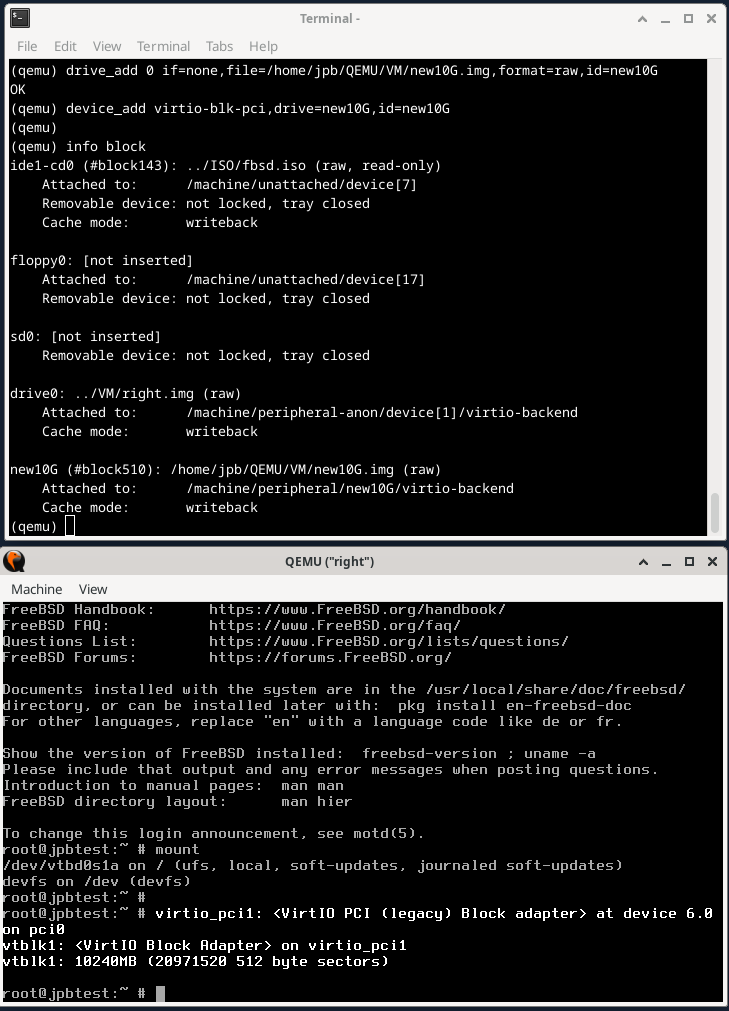
Figure 11. QEMU Monitor Commands to Add a New Disk
24.6.6.2. Using the QEMU Monitor to Manage Snapshots
QEMU’s documentation describes several similar concepts when using the term snapshot.
There is the -snapshot option on the command line which refers to using a drive or portion of a drive to contain a copy of a device.
Then there are the monitor commands snapshot_blkdev and snapshot_blkdev_internal which describe the actual act of copying the blockdev device.
Finally, there are the monitor commands savevm, loadvm, and delvm commands which refer to creating and saving, loading, or deleting a copy of an entire virtual machine.
Along with the latter, the monitor info snapshots command lists out details of recent snapshots.
This section will focus on creating, saving, and loading a complete VM image and will use the term snapshot for this purpose.
To start, recreate the "left" VM from scratch, this time using the qcow2 format.
% cd ~/QEMU/VM
% rm left.img
% qemu-img create -f qcow2 left.qcow2 16G  # Clean file for a new FreeBSD installation.
% cd ../SCRIPTS
# /bin/sh left.sh                     # See the below program listing.
Once the installation is complete, reboot, this time using the -monitor stdio option to allow use of the monitor.
# /usr/local/bin/qemu-system-x86_64  -monitor stdio \
  -cpu qemu64 \
  -vga std \
  -m 4096 \
  -smp 4   \
  -cdrom ../ISO/fbsd.iso \
  -boot order=cd,menu=on \
  -blockdev driver=file,aio=threads,node-name=imgleft,filename=../VM/left.qcow2 \
  -blockdev driver=qcow2,node-name=drive0,file=imgleft \
  -device virtio-blk-pci,drive=drive0,bootindex=1  \
  -netdev tap,id=nd0,ifname=tap0,script=no,downscript=no,br=bridge0 \
  -device e1000,netdev=nd0,mac=02:20:6c:65:66:74 \
  -name \"left\"
To demonstrate snapshots, the following procedure can be used:
Install FreeBSD from scratch
Prepare the environment and take a snapshot with the
savevmmonitor commandInstall several packages
Shut down the system
Restart a bare QEMU instance and utilize the monitor command
loadvmto restore the VMObserve that the restored VM does not have any packages
During the "Prepare the environment" step, in a separate virtual console (ttyv1), an editing session with vi(1) is initiated simulating user activity. Additional programs may be started if desired. The snapshot should account for the state of all applications running at the time the snapshot is taken.
Figure 12 shows the newly installed FreeBSD system with no packages, and separately, the editing session on ttyv1.
The vi(1) editor is currently in insert mode with the typist typing the word "broadcast".
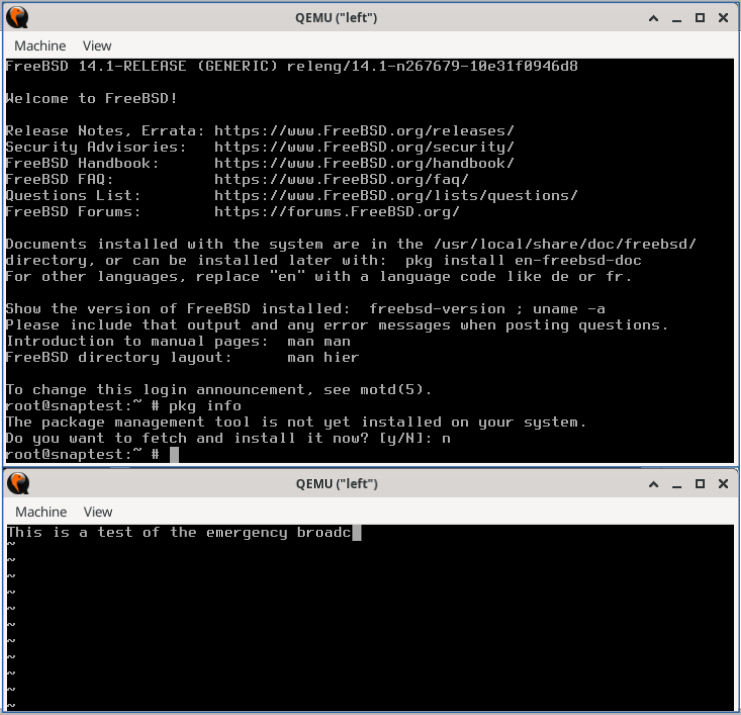
Figure 12. QEMU VM Before First Snapshot
To generate the snapshot, enter savevm in the monitor.
Be sure to give it a tag (such as original_install).
QEMU 9.0.1 monitor - type 'help' for more information
(qemu)
(qemu) savevm original_install
Next, in the main console window, install a package, such as zip(1) which has no dependencies.
Once that completes, reenter the monitor and create another snapshot (snap1_pkg+zip).
Figure 13 shows the results of the above commands and the output of the info shapshots command.
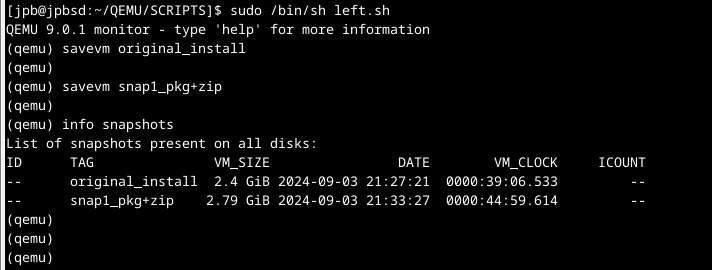
Figure 13. QEMU Using Monitor Commands for Snapshots
Reboot the system, and before FreeBSD starts up, switch to the monitor and enter stop.
The VM will stop.
Enter loadvm with the tag you used above (here original_install).
QEMU 9.0.1 monitor - type 'help' for more information
(qemu) stop
(qemu) loadvm original_install
(qemu) cont
Immediately, the VM screen will switch to the exact moment the savevm command was entered above.
Note that the VM is still stopped.
Enter cont to start the VM, switch to the editing session on ttyv1, and type one letter on the keyboard.
The editor, still in insert mode, should respond accordingly.
Any other programs running at the time the snapshot was taken should be unaffected.
The above steps show how a snapshot can be taken, the system modified, and then "rolled back" by restoring the previous snapshot.
By default QEMU stores snapshot data in the same file as the image. View the list of snapshots with qemu-img(1) as shown below in Figure 14.
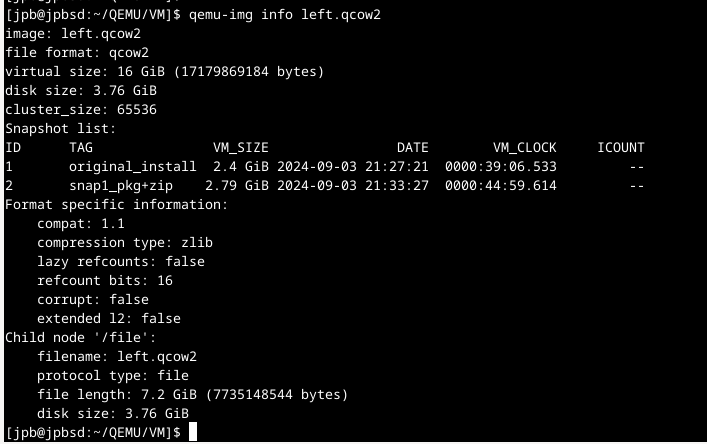
Figure 14. QEMU Using qemu-img(1) to Examine Snapshots
24.6.7. Using QEMU USB Devices
QEMU supports the creation of virtual USB devices that are backed by an image file. These are virtual USB devices that can be partitioned, formatted, mounted, and used just like a real USB device.
# /usr/local/bin/qemu-system-x86_64  -monitor stdio \
  -cpu qemu64 \
  -vga cirrus \
  -m 4096  -smp 4   \
  -cdrom ../ISO/fbsd.iso \
  -boot order=cd,menu=on \
  -drive if=none,id=usbstick,format=raw,file=../VM/foo.img \
  -usb \
  -device usb-ehci,id=ehci \
  -device usb-storage,bus=ehci.0,drive=usbstick \
  -device usb-mouse \
  -blockdev driver=file,node-name=img1,filename=../VM/right.qcow2 \
  -blockdev driver=qcow2,node-name=drive0,file=img1 \
  -device virtio-blk-pci,drive=drive0,bootindex=1  \
  -netdev tap,id=nd0,ifname=tap1,script=no,downscript=no,br=bridge0 \
  -device e1000,netdev=nd0,mac=02:72:69:67:68:74 \
  -name \"right\"
This configuration includes a -drive specification with the id=usbstick, raw format, and an image file (must be created by qemu-img(1)).
The next line contains the -device usb-ehci specification for a USB EHCI controller, with id=ehci.
Finally, a -device usb-storage specification ties the above drive to the EHCI USB bus.
When the system is booted, FreeBSD will recognize a USB hub, add the attached USB device, and assign it to da0 as shown in Figure 15.

Figure 15. QEMU Created USB Hub and Mass Storage Device
The device is ready to be partitioned with gpart(8), and formatted with newfs(8). Because the USB device is backed by a qemu-img(1) created file, data written to the device will persist across reboots.
24.6.8. Using Host USB Devices via Passthrough
QEMU USB passthrough support is listed as experimental in version 9.0.1 (August, 2024). However, the following steps show how a USB stick mounted on the host can be used by the guest VM.
For more information and examples, see:
The upper part of Figure 16 shows the QEMU monitor commands:
info usbhostshows information about all USB devices on the host system. Find the desired USB device on the host system and note the two hexadecimal values on that line. (In the example below the host USB device is a Memorex Mini, with vendorid 0718, and productid 0619.) Use the two values shown by theinfo usbhostcommand in thedevice_addstep below.device_addadds a USB device to the guest VM.
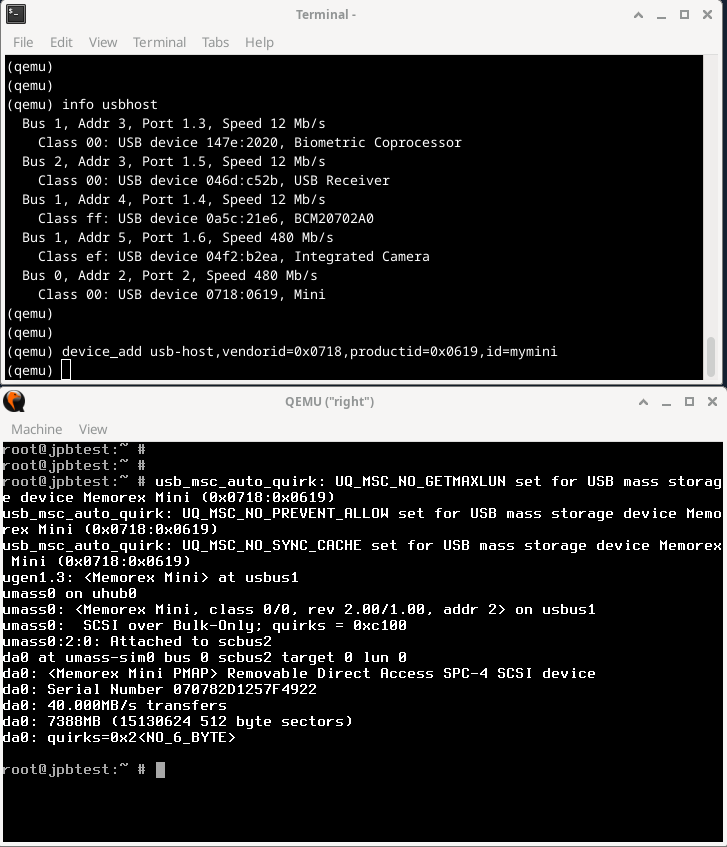
Figure 16. QEMU Monitor Commands to Access a USB Device on the Host
As before, once device_add completes, the FreeBSD kernel recognizes a new USB device, as shown in the lower half of the Figure.
Using the new device is shown in Figure 17.
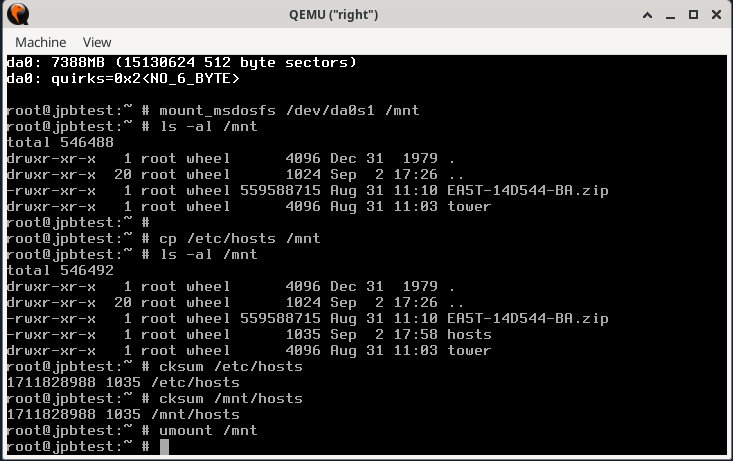
Figure 17. Using the Host USB Device via Passthrough
If the USB device is formatted as a FAT16 or FAT32 filesystem it can be mounted as an MS-DOS™ filesystem with mount_msdosfs(8) as in the example shown.
The /etc/hosts file is copied to the newly mounted drive and checksums are taken to verify the integrity of the file on the USB device.
The device is then unmounted with umount(8).
If the USB device is formatted with NTFS it is necessary to install the fusefs-ntfs package and use ntfs-3g(8) to access the device:
# pkg install fusefs-ntfs
# kldload fusefs
# gpart show da1
# ntfs-3g /dev/da1s1 /mnt

Access the drive as needed.  When finished:

# umount /mnt
Change the above device identifiers to match the installed hardware. Consult ntfs-3g(8) for additional information on working with NTFS filesystems.
24.6.9. QEMU on FreeBSD Summary
As noted above, QEMU works with several different hypervisor accelerators.
The list of Virtualization Accelerators supported by QEMU includes:
KVMon Linux supporting 64 bit Arm, MIPS, PPC, RISC-V, s390x, and x86Xenon Linux as dom0 supporting Arm, x86Hypervisor Framework (hvf)on MacOS supporting x86 and Arm (both 64 bit only)Windows Hypervisor Platform (whpx)on Windows supporting x86NetBSD Virtual Machine Monitor (nvmm)on NetBSD supporting x86Tiny Code Generator (tcg)on Linux and other POSIX, Windows, MacOS supporting Arm, x86, Loongarch64, MIPS, PPC, s390x, and Sparc64.
All the examples in this section used the Tiny Code Generator (tcg) accelerator as that is the only supported accelerator on FreeBSD at present.
24.7. FreeBSD as a Host with bhyve
The bhyve BSD-licensed hypervisor became part of the base system with FreeBSD 10.0-RELEASE. This hypervisor supports several guests, including FreeBSD, OpenBSD, many Linux® distributions, and Microsoft Windows®. By default, bhyve provides access to a serial console and does not emulate a graphical console. Virtualization offload features of newer CPUs are used to avoid the legacy methods of translating instructions and manually managing memory mappings.
The bhyve design requires
an Intel® processor that supports Intel Extended Page Tables (EPT),
or an AMD® processor that supports AMD Rapid Virtualization Indexing (RVI), or Nested Page Tables (NPT),
or an ARM® aarch64 CPU.
Only pure ARMv8.0 virtualization is supported on ARM, the Virtualization Host Extensions are not currently used. Hosting Linux® guests or FreeBSD guests with more than one vCPU requires VMX unrestricted mode support (UG).
The easiest way to tell if an Intel or AMD processor supports bhyve is to run dmesg or look in /var/run/dmesg.boot for the POPCNT processor feature flag on the Features2 line for AMD® processors or EPT and UG on the VT-x line for Intel® processors.
24.7.1. Preparing the Host
The first step to creating a virtual machine in bhyve is configuring the host system. First, load the bhyve kernel module:
# kldload vmmThere are several ways to connect a virtual machine guest to a host’s network; one straightforward way to accomplish this is to create a tap interface for the network device in the virtual machine to attach to. For the network device to participate in the network, also create a bridge interface containing the tap interface and the physical interface as members. In this example, the physical interface is igb0:
# ifconfig tap0 create
# sysctl net.link.tap.up_on_open=1
net.link.tap.up_on_open: 0 -> 1
# ifconfig bridge0 create
# ifconfig bridge0 addm igb0 addm tap0
# ifconfig bridge0 up
24.7.2. Creating a FreeBSD Guest
Create a file to use as the virtual disk for the guest machine. Specify the size and name of the virtual disk:
# truncate -s 16G guest.imgDownload an installation image of FreeBSD to install:
# fetch https://download.freebsd.org/releases/ISO-IMAGES/14.0/FreeBSD-14.0-RELEASE-amd64-bootonly.iso
FreeBSD-14.0-RELEASE-amd64-bootonly.iso                426 MB   16 MBps    22s
FreeBSD comes with an example script vmrun.sh for running a virtual machine in bhyve.
It will start the virtual machine and run it in a loop, so it will automatically restart if it crashes.
vmrun.sh takes several options to control the configuration of the machine, including:
-ccontrols the number of virtual CPUs,-mlimits the amount of memory available to the guest,-tdefines which tap device to use,-dindicates which disk image to use,-itells bhyve to boot from the CD image instead of the disk, and-Idefines which CD image to use.
The last parameter is the name of the virtual machine and is used to track the running machines. The following command lists all available program argument options:
# sh /usr/share/examples/bhyve/vmrun.sh -hThis example starts the virtual machine in installation mode:
# sh /usr/share/examples/bhyve/vmrun.sh -c 1 -m 1024M -t tap0 -d guest.img \
     -i -I FreeBSD-14.0-RELEASE-amd64-bootonly.iso guestname
The virtual machine will boot and start the installer. After installing a system in the virtual machine, when the system asks about dropping into a shell at the end of the installation, choose Yes.
Reboot the virtual machine.
While rebooting the virtual machine causes bhyve to exit, the vmrun.sh script runs bhyve in a loop and will automatically restart it.
When this happens, choose the reboot option from the boot loader menu to escape the loop.
Now the guest can be started from the virtual disk:
# sh /usr/share/examples/bhyve/vmrun.sh -c 4 -m 1024M -t tap0 -d guest.img guestname24.7.3. Creating a Linux® Guest
Linux guests can be booted either like any other regular UEFI-based guest virtual machine, or alternatively, you can make use of the sysutils/grub2-bhyve port.
To do this, first ensure that the port is installed, then create a file to use as the virtual disk for the guest machine:
# truncate -s 16G linux.imgStarting a Linux virtual machine with grub2-bhyve is a two-step process.
First a kernel must be loaded, then the guest can be started.
The Linux® kernel is loaded with sysutils/grub2-bhyve.
Create a device.map that grub will use to map the virtual devices to the files on the host system:
(hd0) ./linux.img
(cd0) ./somelinux.iso
Use sysutils/grub2-bhyve to load the Linux® kernel from the ISO image:
# grub-bhyve -m device.map -r cd0 -M 1024M linuxguestThis will start grub.
If the installation CD contains a grub.cfg, a menu will be displayed.
If not, the vmlinuz and initrd files must be located and loaded manually:
grub> ls
(hd0) (cd0) (cd0,msdos1) (host)
grub> ls (cd0)/isolinux
boot.cat boot.msg grub.conf initrd.img isolinux.bin isolinux.cfg memtest
splash.jpg TRANS.TBL vesamenu.c32 vmlinuz
grub> linux (cd0)/isolinux/vmlinuz
grub> initrd (cd0)/isolinux/initrd.img
grub> boot
Now that the Linux® kernel is loaded, the guest can be started:
# bhyve -A -H -P -s 0:0,hostbridge -s 1:0,lpc -s 2:0,virtio-net,tap0 \
    -s 3:0,virtio-blk,./linux.img -s 4:0,ahci-cd,./somelinux.iso \
    -l com1,stdio -c 4 -m 1024M linuxguest
The system will boot and start the installer. After installing a system in the virtual machine, reboot the virtual machine. This will cause bhyve to exit. The instance of the virtual machine needs to be destroyed before it can be started again:
# bhyvectl --destroy --vm=linuxguestNow the guest can be started directly from the virtual disk. Load the kernel:
# grub-bhyve -m device.map -r hd0,msdos1 -M 1024M linuxguest
grub> ls
(hd0) (hd0,msdos2) (hd0,msdos1) (cd0) (cd0,msdos1) (host)
(lvm/VolGroup-lv_swap) (lvm/VolGroup-lv_root)
grub> ls (hd0,msdos1)/
lost+found/ grub/ efi/ System.map-2.6.32-431.el6.x86_64 config-2.6.32-431.el6.x
86_64 symvers-2.6.32-431.el6.x86_64.gz vmlinuz-2.6.32-431.el6.x86_64
initramfs-2.6.32-431.el6.x86_64.img
grub> linux (hd0,msdos1)/vmlinuz-2.6.32-431.el6.x86_64 root=/dev/mapper/VolGroup-lv_root
grub> initrd (hd0,msdos1)/initramfs-2.6.32-431.el6.x86_64.img
grub> boot
Boot the virtual machine:
# bhyve -A -H -P -s 0:0,hostbridge -s 1:0,lpc -s 2:0,virtio-net,tap0 \
    -s 3:0,virtio-blk,./linux.img -l com1,stdio -c 4 -m 1024M linuxguest
Linux® will now boot in the virtual machine and eventually present you with the login prompt. Login and use the virtual machine. When you are finished, reboot the virtual machine to exit bhyve. Destroy the virtual machine instance:
# bhyvectl --destroy --vm=linuxguest24.7.4. Booting bhyve Virtual Machines with UEFI Firmware
In addition to bhyveload and grub-bhyve, the bhyve hypervisor can also boot virtual machines using the UEFI firmware.
This option may support guest operating systems that are not supported by the other loaders.
To make use of the UEFI support in bhyve, first obtain the UEFI firmware images. This can be done by installing sysutils/bhyve-firmware port or package.
With the firmware in place, add the flags -l bootrom,/path/to/firmware to your bhyve command line.
The actual bhyve command may look like this:
# bhyve -AHP -s 0:0,hostbridge -s 1:0,lpc \
  	-s 2:0,virtio-net,tap1 -s 3:0,virtio-blk,./disk.img \
	-s 4:0,ahci-cd,./install.iso -c 4 -m 1024M \
	-l bootrom,/usr/local/share/uefi-firmware/BHYVE_UEFI.fd \
	guest
To allow a guest to store UEFI variables, you can use a variables file appended to the -l flag.
Note that bhyve will write guest modifications to the given variables file.
Therefore, be sure to first create a per-guest-copy of the variables template file:
# cp /usr/local/share/uefi-firmware/BHYVE_UEFI_VARS.fd /path/to/vm-image/BHYVE_UEFI_VARS.fdThen, add that variables file into your bhyve arguments:
# bhyve -AHP -s 0:0,hostbridge -s 1:0,lpc \
  	-s 2:0,virtio-net,tap1 -s 3:0,virtio-blk,./disk.img \
	-s 4:0,ahci-cd,./install.iso -c 4 -m 1024M \
	-l bootrom,/usr/local/share/uefi-firmware/BHYVE_UEFI.fd,/path/to/vm-image/BHYVE_UEFI_VARS.fd \
	guest
Some Linux distributions require the use of UEFI variables to store the path for their UEFI boot file (using |
To view or modify the variables file contents, use efivar(8) from the host.
sysutils/bhyve-firmware also contains a CSM-enabled firmware, to boot guests with no UEFI support in legacy BIOS mode:
# bhyve -AHP -s 0:0,hostbridge -s 1:0,lpc \
  	-s 2:0,virtio-net,tap1 -s 3:0,virtio-blk,./disk.img \
	-s 4:0,ahci-cd,./install.iso -c 4 -m 1024M \
	-l bootrom,/usr/local/share/uefi-firmware/BHYVE_UEFI_CSM.fd \
	guest
24.7.5. Graphical UEFI Framebuffer for bhyve Guests
The UEFI firmware support is particularly useful with predominantly graphical guest operating systems such as Microsoft Windows®.
Support for the UEFI-GOP framebuffer may also be enabled with the -s 29,fbuf,tcp=0.0.0.0:5900 flags.
The framebuffer resolution may be configured with w=800 and h=600, and bhyve can be instructed to wait for a VNC connection before booting the guest by adding wait.
The framebuffer may be accessed from the host or over the network via the VNC protocol.
Additionally, -s 30,xhci,tablet can be added to achieve precise mouse cursor synchronization with the host.
The resulting bhyve command would look like this:
# bhyve -AHP -s 0:0,hostbridge -s 31:0,lpc \
  	-s 2:0,virtio-net,tap1 -s 3:0,virtio-blk,./disk.img \
	-s 4:0,ahci-cd,./install.iso -c 4 -m 1024M \
	-s 29,fbuf,tcp=0.0.0.0:5900,w=800,h=600,wait \
	-s 30,xhci,tablet \
	-l bootrom,/usr/local/share/uefi-firmware/BHYVE_UEFI.fd \
	guest
Note, in BIOS emulation mode, the framebuffer will cease receiving updates once control is passed from firmware to guest operating system.
24.7.6. Creating a Microsoft Windows® Guest
Setting up a guest for Windows versions 10 or earlier can be done directly from the original installation media and is a relatively straightforward process. Aside from minimum resource requirements, running Windows as guest requires
wiring virtual machine memory (flag
-w) andbooting with an UEFI bootrom.
An example for booting a virtual machine guest with a Windows installation ISO:
bhyve \
      -c 2 \
      -s 0,hostbridge \
      -s 3,nvme,windows2016.img \
      -s 4,ahci-cd,install.iso \
      -s 10,virtio-net,tap0 \
      -s 31,lpc \
      -s 30,xhci,tablet \
      -l bootrom,/usr/local/share/uefi-firmware/BHYVE_UEFI.fd \
      -m 8G -H -w \
      windows2016
Only one or two VCPUs should be used during installation but this number can be increased once Windows is installed.
VirtIO drivers must be installed to use the defined virtio-net network interface.
An alternative is to switch to E1000 (Intel E82545) emulation by changing virtio-net to e1000 in the above command line.
However, performance will be impacted.
24.7.6.1. Creating a Windows 11 Guest
Beginning with Windows 11, Microsoft introduced a hardware requirement for a TPM 2 module. bhyve supports passing a hardware TPM through to a guest. The installation media can be modified to disable the relevant hardware checks. A detailed description for this process can be found on the FreeBSD Wiki.
Modifying Windows installation media and running Windows guests without a TPM module are unsupported by the manufacturer. Consider your application and use case before implementing such approaches. |
24.7.7. Using ZFS with bhyve Guests
If ZFS is available on the host machine, using ZFS volumes instead of disk image files can provide significant performance benefits for the guest VMs. A ZFS volume can be created by:
# zfs create -V16G -o volmode=dev zroot/linuxdisk0When starting the VM, specify the ZFS volume as the disk drive:
# bhyve -A -H -P -s 0:0,hostbridge -s 1:0,lpc -s 2:0,virtio-net,tap0 \
  	-s3:0,virtio-blk,/dev/zvol/zroot/linuxdisk0 \
	-l com1,stdio -c 4 -m 1024M linuxguest
If you are using ZFS for the host as well as inside a guest, keep in mind the competing memory pressure of both systems caching the virtual machine’s contents.
To alleviate this, consider setting the host’s ZFS filesystems to use metadata-only cache.
To do this, apply the following settings to ZFS filesystems on the host, replacing <name> with the name of the specific zvol dataset name of the virtual machine.
# zfs set primarycache=metadata <name>24.7.8. Creating a Virtual Machine Snapshot
Modern hypervisors allow their users to create "snapshots" of their state; such a snapshot includes a guest’s disk, CPU, and memory contents. A snapshot can usually be taken independent of whether the guest is running or shut down. One can then reset and return the virtual machine to the precise state when the snapshot was taken.
24.7.8.1. ZFS Snapshots
Using ZFS volumes as the backing storage for a virtual machine enables the snapshotting of the guest’s disk. For example:
zfs snapshot zroot/path/to/zvol@snapshot_nameThough it is possible to snapshot a ZFS volume this way while the guest is running, keep in mind that the contents of the virtual disk may be in an inconsistent state while the guest is active. It is therefore recommended to first shutdown or pause the guest before executing this command. Pausing a guest is not supported by default and needs to be enabled first (see Memory and CPU Snapshots)
Rolling back a ZFS zvol to a snapshot while a virtual machine is using it may corrupt the file system contents and crash the guest. All unsaved data in the guest will be lost and modifications since the last snapshot may get destroyed. A second rollback may be required once the virtual machine is shut down to restore the file system to a useable state. This in turn will ultimately destroy any changes made after the snapshot. |
24.7.8.2. Memory and CPU Snapshots (Experimental Feature)
As of FreeBSD 13, bhyve has an experimental "snapshot" feature for dumping a guest’s memory and CPU state to a file and then halting the virtual machine. The guest can be resumed from the snapshot file contents later.
However, this feature is not enabled by default and requires the system to be rebuilt from source. See Building from Source for an in-depth description on the process of compiling the kernel with custom options.
The functionality is not ready for production use and limited to work for specific virtual machine configurations. There are multiple limitations:
|
Make sure the /usr/src directory is up-to date before taking the following steps. See Updating the Source for the detailed procedure how to do this. |
First, add the following to /etc/src.conf:
WITH_BHYVE_SNAPHOT=yes
BHYVE_SNAPSHOT=1
MK_BHYVE_SNAPSHOT=yes
If the system was partially or wholly rebuilt, it is recommended to run before proceeding. |
Then follow the steps outlined in the Quick Start section of the Updating FreeBSD from Source chapter to build and install world and kernel.
To verify successful activation of the snapshot feature, enter
# bhyvectl --usageand check if the output lists a --suspend flag.
If the flag is missing, the feature did not activate correctly.
Then, you can snapshot and suspend a running virtual machine of your choice:
# bhyvectl --vm=vmname --suspend=/path/to/snapshot/filenameProvide an absolute path and filename to Make sure to write the snapshot data to a secure directory. The generated output contains a full memory dump of the guest and may thus contain sensitive data (i.e. passwords)! |
This creates three files:
memory snapshot - named like the input to
--suspendkernel file - name like the input to
--suspendwith the suffix .kernmetadata - contains meta data about the system state, named with the suffix .meta
To restore a guest from a snapshot, use the -r flag with bhyve:
# bhyve -r /path/to/snapshot/filenameRestoring a guest snapshot on a different CPU architecture will not work. Generally, attempting to restore on a system not identical to the snapshot creator will likely fail.
24.7.9. Jailing bhyve
For improved security and separation of virtual machines from the host operating system, it is possible to run bhyve in a jail. See Jails for an in-depth description of jails and their security benefits.
24.7.9.1. Creating a Jail for bhyve
First, create a jail environment. If using a UFS file system, simply run:
# mkdir -p /jails/bhyveIf using a ZFS filesystem, use the following commands:
# zfs create zroot/jails
# zfs create zroot/jails/bhyve
Then create a ZFS zvol for the virtual machine bhyvevm0:
# zfs create zroot/vms
# zfs create -V 20G zroot/vms/bhyvevm0
If not using ZFS, use the following commands to create a disk image file directly in the jail directory structure:
# mkdir /jails/bhyve/vms
# truncate -s 20G /jails/bhyve/vms/bhyvevm0
Download a FreeBSD image, preferably a version equal to or older than the host and extract it into the jail directory:
# cd /jails
# fetch -o base.txz http://ftp.freebsd.org/pub/FreeBSD/releases/amd64/13.2-RELEASE/base.txz
# tar -C /jails/bhyve -xvf base.txz
Running a higher FreeBSD version in a jail than the host is unsupported (i.e. running 14.0-RELEASE in a jail, embedded in a 13.2-RELEASE host). |
Next, add a devfs ruleset to /etc/devfs.rules:
[devfsrules_jail_bhyve=100]
add include $devfsrules_hide_all
add include $devfsrules_unhide_login
add path 'urandom' unhide
add path 'random' unhide
add path 'crypto' unhide
add path 'shm' unhide
add path 'zero' unhide
add path 'null' unhide
add path 'mem' unhide
add path 'vmm' unhide
add path 'vmm/*' unhide
add path 'vmm.io' unhide
add path 'vmm.io/*' unhide
add path 'nmdmbhyve*' unhide
add path 'zvol' unhide
add path 'zvol/zroot' unhide
add path 'zvol/zroot/vms' unhide
add path 'zvol/zroot/vms/bhyvevm0' unhide
add path 'zvol/zroot/vms/bhyvevm1' unhide
add path 'tap10*' unhide
If there’s another devfs rule with the numeric ID 100 in your /etc/devfs.rules file, replace the one in the listing with another yet unused ID number. |
If not using a ZFS filesystem, skip the related zvol rules in /etc/devfs.rules: add path 'zvol' unhide add path 'zvol/zroot' unhide add path 'zvol/zroot/vms' unhide add path 'zvol/zroot/vms/bhyvevm0' unhide add path 'zvol/zroot/vms/bhyvevm1' unhide |
These rules will cause bhyve to
create a virtual machine with disk volumes called
bhyvevm0andbhyvevm1,use tap network interfaces with the name prefix
tap10. That means, valid interface names will betap10,tap100,tap101, …tap109,tap1000and so on.Limiting the access to a subset of possible tap interface names will prevent the jail (and thus bhyve) from seeing tap interfaces of the host and other jails.
use nmdm devices prefixed with "bhyve", i.e. /dev/nmdmbhyve0.
Those rules can be expanded and varied with different guest and interface names as desired.
If you intend to use bhyve on the host as well as in a one or more jails, remember that tap and nmdm interface names will operate in a shared environment. For example, you can use /dev/nmdmbhyve0 only either for bhyve on the host or in a jail. |
Restart devfs for the changes to be loaded:
# service devfs restartThen add a definition for your new jail into /etc/jail.conf or /etc/jail.conf.d. Replace the interface number $if and IP address with your personal variations.
Example 1. Using NAT or routed traffic with a firewall
bhyve {
        $if = 0;
        exec.prestart = "/sbin/ifconfig epair${if} create up";
        exec.prestart += "/sbin/ifconfig epair${if}a up";
        exec.prestart += "/sbin/ifconfig epair${if}a name ${name}0";
        exec.prestart += "/sbin/ifconfig epair${if}b name jail${if}";
        exec.prestart += "/sbin/ifconfig ${name}0 inet 192.168.168.1/27";
        exec.prestart += "/sbin/sysctl net.inet.ip.forwarding=1";

        exec.clean;

        host.hostname = "your-hostname-here";
        vnet;
        vnet.interface = "em${if}";
        path = "/jails/${name}";
        persist;
        securelevel = 3;
        devfs_ruleset = 100;
        mount.devfs;

        allow.vmm;

        exec.start += "/bin/sh /etc/rc";
        exec.stop = "/bin/sh /etc/rc.shutdown";

        exec.poststop += "/sbin/ifconfig ${name}0 destroy";
}
This example assumes use of a firewall like pf or ipfw to NAT your jail traffic.
See the Firewalls chapter for more details on the available options to implement this.
Example 2. Using a bridged network connection
bhyve {
        $if = 0;
        exec.prestart = "/sbin/ifconfig epair${if} create up";
        exec.prestart += "/sbin/ifconfig epair${if}a up";
        exec.prestart += "/sbin/ifconfig epair${if}a name ${name}0";
        exec.prestart += "/sbin/ifconfig epair${if}b name jail${if}";
        exec.prestart += "/sbin/ifconfig bridge0 addm ${name}0";
        exec.prestart += "/sbin/sysctl net.inet.ip.forwarding=1";

        exec.clean;

        host.hostname = "your-hostname-here";
        vnet;
        vnet.interface = "em${if}";
        path = "/jails/${name}";
        persist;
        securelevel = 3;
        devfs_ruleset = 100;
        mount.devfs;

        allow.vmm;

        exec.start += "/bin/sh /etc/rc";
        exec.stop = "/bin/sh /etc/rc.shutdown";

        exec.poststop += "/sbin/ifconfig ${name}0 destroy";
}
If you previously replaced the devfs ruleset ID 100 in /etc/devfs.rules with your own unique number, remember to replace the numeric ID also in your jails.conf too. |
24.7.9.2. Configuring the Jail
To start the jail for the first time and do some additional configuration work, enter:
# cp /etc/resolv.conf /jails/bhyve/etc
# service jail onestart bhyve
# jexec bhyve
# sysrc ifconfig_jail0="inet 192.168.168.2/27"
# sysrc defaultrouter="192.168.168.1"
# sysrc sendmail_enable=NONE
# sysrc cloned_interfaces="tap100"
# exit
Restart and enable the jail:
# sysrc jail_enable=YES
# service jail restart bhyve
Afterwards, you can create a virtual machine within the jail. For a FreeBSD guest, download an installation ISO first:
# jexec bhyve
# cd /vms
# fetch -o freebsd.iso https://download.freebsd.org/releases/ISO-IMAGES/14.0/FreeBSD-14.0-RELEASE-amd64-bootonly.iso
24.7.9.3. Creating a Virtual Machine Inside the Jail
To create a virtual machine, use bhyvectl to initialize it first:
# jexec bhyve
# bhyvectl --create --vm=bhyvevm0
Creating the guest with
|
Finally, use your preferred way of starting the guest.
Example 3. Starting with
vmrun.sh and ZFSUsing vmrun.sh on a ZFS filesystems:
# jexec bhyve
# sh /usr/share/examples/bhyve/vmrun.sh -c 1 -m 1024M \
     -t tap100 -d /dev/zvols/zroot/vms/bhyvevm0 -i -I /vms/FreeBSD-14.0-RELEASE-amd64-bootonly.iso bhyvevm0
Example 4. Starting with
vmrun.sh and UFSUsing vmrun.sh on a UFS filesystem:
# jexec bhyve
# sh /usr/share/examples/bhyve/vmrun.sh -c 1 -m 1024M \
     -t tap100 -d /vms/bhyvevm0 -i -I /vms/FreeBSD-14.0-RELEASE-amd64-bootonly.iso bhyvevm0
Example 5. Starting bhyve for an UEFI guest with ZFS
If instead you want to use an UEFI guest, remember to first install the required firmware package sysutils/bhyve-firmware in the jail:
# pkg -j bhyve install bhyve-firmwareThen use bhyve directly:
# bhyve -A -c 4 -D -H -m 2G \
        -s 0,hostbridge \
        -s 1,lpc \
        -s 2,virtio-net,tap100 \
        -s 3,virtio-blk,/dev/zvol/zroot/vms/bhyvevm0 \
	-s 4,ahci-cd,/vms/FreeBSD-14.0-RELEASE-amd64-bootonly.iso \
        -s 31,fbuf,tcp=127.0.0.1:5900,w=1024,h=800,tablet \
        -l bootrom,/usr/local/share/uefi-firmware/BHYVE_UEFI.fd \
        -l com1,/dev/nmdbbhyve0A \
        bhyvevm0
This will allow you to connect to your virtual machine bhyvevm0 through VNC as well as a serial console at /dev/nmdbbhyve0B.
24.7.10. Virtual Machine Consoles
It is advantageous to wrap the bhyve console in a session management tool such as sysutils/tmux or sysutils/screen in order to detach and reattach to the console.
It is also possible to have the console of bhyve be a null modem device that can be accessed with cu.
To do this, load the nmdm kernel module and replace -l com1,stdio with -l com1,/dev/nmdm0A.
The /dev/nmdm devices are created automatically as needed, where each is a pair, corresponding to the two ends of the null modem cable (/dev/nmdm0A and /dev/nmdm0B).
See nmdm(4) for more information.
# kldload nmdm
# bhyve -A -H -P -s 0:0,hostbridge -s 1:0,lpc -s 2:0,virtio-net,tap0 -s 3:0,virtio-blk,./linux.img \
    -l com1,/dev/nmdm0A -c 4 -m 1024M linuxguest
# cu -l /dev/nmdm0B
Connected

Ubuntu 13.10 handbook ttyS0

handbook login:
To disconnect from a console, enter a newline (i.e. press RETURN) followed by tilde (~), and finally dot (.).
Keep in mind that only the connection is dropped while the login session remains active.
Another user connecting to the same console could therefore make use of any active sessions without having to first authenticate.
For security reasons, it’s therefore recommended to logout before disconnecting.
The number in the nmdm device path must be unique for each virtual machine and must not be used by any other processes before bhyve starts. The number can be chosen arbitrarily and does not need to be taken from a consecutive sequence of numbers. The device node pair (i.e. /dev/nmdm0a and /dev/nmdm0b) are created dynamically when bhyve connects its console and destroyed when it shuts down. Keep this in mind when creating scripts to start your virtual machines: you need to make sure that all virtual machines are assigned unique nmdm devices.
24.7.11. Managing Virtual Machines
A device node is created in /dev/vmm for each virtual machine. This allows the administrator to easily see a list of the running virtual machines:
# ls -al /dev/vmm
total 1
dr-xr-xr-x   2 root  wheel    512 Mar 17 12:19 ./
dr-xr-xr-x  14 root  wheel    512 Mar 17 06:38 ../
crw-------   1 root  wheel  0x1a2 Mar 17 12:20 guestname
crw-------   1 root  wheel  0x19f Mar 17 12:19 linuxguest
crw-------   1 root  wheel  0x1a1 Mar 17 12:19 otherguest
A specified virtual machine can be destroyed using bhyvectl:
# bhyvectl --destroy --vm=guestnameDestroying a virtual machine this way means killing it immediately. Any unsaved data will be lost, open files and filesystems may get corrupted.
To gracefully shut down a virtual machine, send a TERM signal to its bhyve process instead. This triggers an ACPI shutdown event for the guest:
# ps ax | grep bhyve
17424  -  SC      56:48.27 bhyve: guestvm (bhyve)
# kill 17424
24.7.12. Tools and Utilities
There are numerous utilities and applications available in ports to help simplify setting up and managing bhyve virtual machines:
| Name | License | Package | Documentation |
|---|---|---|---|
vm-bhyve | BSD-2 | ||
CBSD | BSD-2 | ||
Virt-Manager | LGPL-3 | ||
Bhyve RC Script | Unknown | ||
bmd | Unknown | ||
vmstated | BSD-2 |
24.7.13. Persistent Configuration
In order to configure the system to start bhyve guests at boot time, some configuration file changes are required.
/etc/sysctl.conf
When using tap interfaces as network backend, you either need to manually set each used tap interface to UP or simply set the following sysctl:
net.link.tap.up_on_open=1
/etc/rc.conf
To connect your virtual machine’s tap device to the network via a bridge, you need to persist the device settings in /etc/rc.conf. Additionally, you can load the necessary kernel modules
vmmfor bhyve andnmdmfor nmdm devices through thekld_listconfiguration variable. When configuringifconfig_bridge0, make sure to replace<ipaddr>/<netmask>with the actual IP address of your physical interface (igb0 in this example) and remove IP settings from your physical device.# sysrc cloned_interfaces+="bridge0 tap0" # sysrc ifconfig_bridge0="inet <ipaddr>/<netmask> addm igb0 addm tap0" # sysrc kld_list+="nmdm vmm" # sysrc ifconfig_igb0="up"
Example 6. Setting the IP for a bridge device
For a host with an igb0 interface connected to the network with IP 10.10.10.1 and netmask 255.255.255.0, you would use the following commands:
# sysrc ifconfig_igb0="up"
# sysrc ifconfig_bridge0="inet 10.10.10.1/24 addm igb0 addm tap0"
# sysrc kld_list+="nmdm vmm"
# sysrc cloned_interfaces+="bridge0 tap0"
Modifying the IP address configuration of a system may lock you out if you are executing these commands while you are connected remotely (i.e. via SSH)! Take precautions to maintain system access or make those modifications while logged in on a local terminal session. |
24.8. FreeBSD as a Xen™-Host
Xen is a GPLv2-licensed type 1 hypervisor for Intel® and ARM® architectures. FreeBSD has included i386™ and AMD® 64-Bit DomU and Amazon EC2 unprivileged domain (virtual machine) support since FreeBSD 8.0 and includes Dom0 control domain (host) support in FreeBSD 11.0. Support for para-virtualized (PV) domains has been removed from FreeBSD 11 in favor of hardware virtualized (HVM) domains, which provides better performance.
Xen™ is a bare-metal hypervisor, which means that it is the first program loaded after the BIOS.
A special privileged guest called the Domain-0 (Dom0 for short) is then started.
The Dom0 uses its special privileges to directly access the underlying physical hardware, making it a high-performance solution.
It is able to access the disk controllers and network adapters directly.
The Xen™ management tools to manage and control the Xen™ hypervisor are also used by the Dom0 to create, list, and destroy VMs.
Dom0 provides virtual disks and networking for unprivileged domains, often called DomU.
Xen™ Dom0 can be compared to the service console of other hypervisor solutions, while the DomU is where individual guest VMs are run.
Xen™ can migrate VMs between different Xen™ servers. When the two xen hosts share the same underlying storage, the migration can be done without having to shut the VM down first. Instead, the migration is performed live while the DomU is running and there is no need to restart it or plan a downtime. This is useful in maintenance scenarios or upgrade windows to ensure that the services provided by the DomU are still provided. Many more features of Xen™ are listed on the Xen Wiki Overview page. Note that not all features are supported on FreeBSD yet.
24.8.1. Hardware Requirements for Xen™ Dom0
To run the Xen™ hypervisor on a host, certain hardware functionality is required. Hardware virtualized domains require Extended Page Table (EPT) and Input/Output Memory Management Unit (IOMMU) support in the host processor.
In order to run a FreeBSD Xen™ Dom0 the box must be booted using legacy boot (BIOS). |
24.8.2. Xen™ Dom0 Control Domain Setup
Users should install the emulators/xen-kernel and sysutils/xen-tools packages, based on Xen™ 4.18.
Configuration files must be edited to prepare the host for the Dom0 integration after the Xen packages are installed. An entry to /etc/sysctl.conf disables the limit on how many pages of memory are allowed to be wired. Otherwise, DomU VMs with higher memory requirements will not run.
# echo 'vm.max_wired=-1' >> /etc/sysctl.confAnother memory-related setting involves changing /etc/login.conf, setting the memorylocked option to unlimited.
Otherwise, creating DomU domains may fail with Cannot allocate memory errors.
After making the change to /etc/login.conf, run cap_mkdb to update the capability database.
See Resource Limits for details.
# sed -i '' -e 's/memorylocked=64K/memorylocked=unlimited/' /etc/login.conf
# cap_mkdb /etc/login.conf
Add an entry for the Xen™ console to /etc/ttys:
# echo 'xc0 "/usr/libexec/getty Pc" xterm onifconsole secure' >> /etc/ttysSelecting a Xen™ kernel in /boot/loader.conf activates the Dom0. Xen™ also requires resources like CPU and memory from the host machine for itself and other DomU domains. How much CPU and memory depends on the individual requirements and hardware capabilities. In this example, 8 GB of memory and 4 virtual CPUs are made available for the Dom0. The serial console is also activated, and logging options are defined.
The following command is used for Xen 4.7 packages:
# echo 'hw.pci.mcfg=0' >> /boot/loader.conf
# echo 'if_tap_load="YES"' >> /boot/loader.conf
# echo 'xen_kernel="/boot/xen"' >> /boot/loader.conf
# echo 'xen_cmdline="dom0_mem=8192M dom0_max_vcpus=4 dom0pvh=1 console=com1,vga com1=115200,8n1 guest_loglvl=all loglvl=all"' >> /boot/loader.conf
For Xen versions 4.11 and higher, the following command should be used instead:
# echo 'if_tap_load="YES"' >> /boot/loader.conf
# echo 'xen_kernel="/boot/xen"' >> /boot/loader.conf
# echo 'xen_cmdline="dom0_mem=8192M dom0_max_vcpus=4 dom0=pvh console=com1,vga com1=115200,8n1 guest_loglvl=all loglvl=all"' >> /boot/loader.conf
Log files that Xen™ creates for the DomU VMs are stored in /var/log/xen. Please be sure to check the contents of that directory if experiencing issues. |
Activate the xencommons service during system startup:
# sysrc xencommons_enable=yesThese settings are enough to start a Dom0-enabled system. However, it lacks network functionality for the DomU machines. To fix that, define a bridged interface with the main NIC of the system which the DomU VMs can use to connect to the network. Replace em0 with the host network interface name.
# sysrc cloned_interfaces="bridge0"
# sysrc ifconfig_bridge0="addm em0 SYNCDHCP"
# sysrc ifconfig_em0="up"
Restart the host to load the Xen™ kernel and start the Dom0.
# rebootAfter successfully booting the Xen™ kernel and logging into the system again, the Xen™ management tool xl is used to show information about the domains.
# xl list
Name                                        ID   Mem VCPUs      State   Time(s)
Domain-0                                     0  8192     4     r-----     962.0
The output confirms that the Dom0 (called Domain-0) has the ID 0 and is running.
It also has the memory and virtual CPUs that were defined in /boot/loader.conf earlier.
More information can be found in the Xen™ Documentation.
DomU guest VMs can now be created.
24.8.3. Xen™ DomU Guest VM Configuration
Unprivileged domains consist of a configuration file and virtual or physical hard disks. Virtual disk storage for the DomU can be files created by truncate(1) or ZFS volumes as described in “Creating and Destroying Volumes”. In this example, a 20 GB volume is used. A VM is created with the ZFS volume, a FreeBSD ISO image, 1 GB of RAM and two virtual CPUs. The ISO installation file is retrieved with fetch(1) and saved locally in a file called freebsd.iso.
# fetch https://download.freebsd.org/releases/ISO-IMAGES/14.0/FreeBSD-14.0-RELEASE-amd64-bootonly.iso -o freebsd.isoA ZFS volume of 20 GB called xendisk0 is created to serve as the disk space for the VM.
# zfs create -V20G -o volmode=dev zroot/xendisk0The new DomU guest VM is defined in a file. Some specific definitions like name, keymap, and VNC connection details are also defined. The following freebsd.cfg contains a minimum DomU configuration for this example:
# cat freebsd.cfg
builder = "hvm" (1)
name = "freebsd" (2)
memory = 1024 (3)
vcpus = 2 (4)
vif = [ 'mac=00:16:3E:74:34:32,bridge=bridge0' ] (5)
disk = [
'/dev/zvol/tank/xendisk0,raw,hda,rw', (6)
'/root/freebsd.iso,raw,hdc:cdrom,r' (7)
  ]
vnc = 1 (8)
vnclisten = "0.0.0.0"
serial = "pty"
usbdevice = "tablet"
These lines are explained in more detail:
| 1 | This defines what kind of virtualization to use. hvm refers to hardware-assisted virtualization or hardware virtual machine. Guest operating systems can run unmodified on CPUs with virtualization extensions, providing nearly the same performance as running on physical hardware. generic is the default value and creates a PV domain. |
| 2 | Name of this virtual machine to distinguish it from others running on the same Dom0. Required. |
| 3 | Quantity of RAM in megabytes to make available to the VM. This amount is subtracted from the hypervisor’s total available memory, not the memory of the Dom0. |
| 4 | Number of virtual CPUs available to the guest VM. For best performance, do not create guests with more virtual CPUs than the number of physical CPUs on the host. |
| 5 | Virtual network adapter. This is the bridge connected to the network interface of the host. The mac parameter is the MAC address set on the virtual network interface. This parameter is optional, if no MAC is provided Xen™ will generate a random one. |
| 6 | Full path to the disk, file, or ZFS volume of the disk storage for this VM. Options and multiple disk definitions are separated by commas. |
| 7 | Defines the Boot medium from which the initial operating system is installed. In this example, it is the ISO image downloaded earlier. Consult the Xen™ documentation for other kinds of devices and options to set. |
| 8 | Options controlling VNC connectivity to the serial console of the DomU. In order, these are: active VNC support, define IP address on which to listen, device node for the serial console, and the input method for precise positioning of the mouse and other input methods. keymap defines which keymap to use, and is english by default. |
After the file has been created with all the necessary options, the DomU is created by passing it to xl create as a parameter.
# xl create freebsd.cfgEach time the Dom0 is restarted, the configuration file must be passed to |
The output of xl list confirms that the DomU has been created.
# xl list
Name                                        ID   Mem VCPUs      State   Time(s)
Domain-0                                     0  8192     4     r-----  1653.4
freebsd                                      1  1024     1     -b----   663.9
To begin the installation of the base operating system, start the VNC client, directing it to the main network address of the host or to the IP address defined on the vnclisten line of freebsd.cfg.
After the operating system has been installed, shut down the DomU and disconnect the VNC viewer.
Edit freebsd.cfg, removing the line with the cdrom definition or commenting it out by inserting a # character at the beginning of the line.
To load this new configuration, it is necessary to remove the old DomU with xl destroy, passing either the name or the id as the parameter.
Afterwards, recreate it using the modified freebsd.cfg.
# xl destroy freebsd
# xl create freebsd.cfg
The machine can then be accessed again using the VNC viewer. This time, it will boot from the virtual disk where the operating system has been installed and can be used as a virtual machine.
24.8.4. Troubleshooting
This section contains basic information in order to help troubleshoot issues found when using FreeBSD as a Xen™ host or guest.
24.8.4.1. Host Boot Troubleshooting
Please note that the following troubleshooting tips are intended for Xen™ 4.11 or newer. If you are still using Xen™ 4.7 and having issues, consider migrating to a newer version of Xen™.
In order to troubleshoot host boot issues, you will likely need a serial cable, or a debug USB cable.
Verbose Xen™ boot output can be obtained by adding options to the xen_cmdline option found in loader.conf.
A couple of relevant debug options are:
iommu=debug: can be used to print additional diagnostic information about the iommu.dom0=verbose: can be used to print additional diagnostic information about the dom0 build process.sync_console: flag to force synchronous console output. Useful for debugging to avoid losing messages due to rate limiting. Never use this option in production environments since it can allow malicious guests to perform DoS attacks against Xen™ using the console.
FreeBSD should also be booted in verbose mode in order to identify any issues. To activate verbose booting, run this command:
# echo 'boot_verbose="YES"' >> /boot/loader.confIf none of these options help solving the problem, please send the serial boot log to freebsd-xen@FreeBSD.org and xen-devel@lists.xenproject.org for further analysis.
24.8.4.2. Guest Creation Troubleshooting
Issues can also arise when creating guests, the following attempts to provide some help for those trying to diagnose guest creation issues.
The most common cause of guest creation failures is the xl command spitting some error and exiting with a return code different than 0.
If the error provided is not enough to help identify the issue, more verbose output can also be obtained from xl by using the v option repeatedly.
# xl -vvv create freebsd.cfg
Parsing config from freebsd.cfg
libxl: debug: libxl_create.c:1693:do_domain_create: Domain 0:ao 0x800d750a0: create: how=0x0 callback=0x0 poller=0x800d6f0f0
libxl: debug: libxl_device.c:397:libxl__device_disk_set_backend: Disk vdev=xvda spec.backend=unknown
libxl: debug: libxl_device.c:432:libxl__device_disk_set_backend: Disk vdev=xvda, using backend phy
libxl: debug: libxl_create.c:1018:initiate_domain_create: Domain 1:running bootloader
libxl: debug: libxl_bootloader.c:328:libxl__bootloader_run: Domain 1:not a PV/PVH domain, skipping bootloader
libxl: debug: libxl_event.c:689:libxl__ev_xswatch_deregister: watch w=0x800d96b98: deregister unregistered
domainbuilder: detail: xc_dom_allocate: cmdline="", features=""
domainbuilder: detail: xc_dom_kernel_file: filename="/usr/local/lib/xen/boot/hvmloader"
domainbuilder: detail: xc_dom_malloc_filemap    : 326 kB
libxl: debug: libxl_dom.c:988:libxl__load_hvm_firmware_module: Loading BIOS: /usr/local/share/seabios/bios.bin
...
If the verbose output does not help diagnose the issue, there are also QEMU and Xen™ toolstack logs in /var/log/xen.
Note that the name of the domain is appended to the log name, so if the domain is named freebsd you should find a /var/log/xen/xl-freebsd.log and likely a /var/log/xen/qemu-dm-freebsd.log.
Both log files can contain useful information for debugging.
If none of this helps solve the issue, please send the description of the issue you are facing and as much information as possible to freebsd-xen@FreeBSD.org and xen-devel@lists.xenproject.org in order to get help.
Last modified on: May 29, 2024 by Chris Moerz

